Friday, 4 September 2009

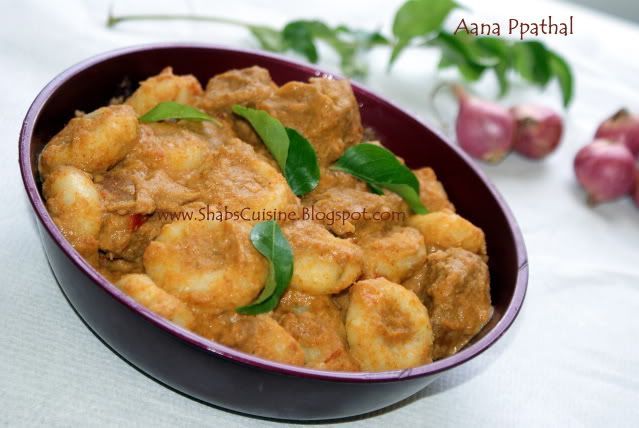
Aana pathal/ Kozhi Pidi (Steamed Rice Dumplings in Rich Coconut and Beef Gravy)


AanaPathal (N.B: First of all, it is not aana which means elephant, but it is pronounced as 'na' as in naanam, naanayam etc.)/ Kozhippidi is one of the exotic food hailing from the Great Malabar coast. These are small rice dumplings that are steam cooked and then added to rich gravy that are mainly meat/poultry based. I think great recipes as these are dying now since the process is quite long and takes very long time to prepare. In this era of mechanical life and metropolitan life style who would ever bother spending 3-4 hours just cooking a dinner or a lunch for the sake of eating? No way! These kind of rich dishes are mainly made for the time of Ramadan where you cook just one meal a day; and you need something that you would love to nibble on rather than a quick fix or a takeaway. After all it’s just once a day that you eat, apart from the Suhur (Pre-dawn meal). So it should be satisfying as well. I am not a great savoury person as such, but during Ramadan I always prepare something savoury that I don’t make usually and aanapathal is such a dish. I am not happy by the span of time aanapathal takes to prepare, especially with a little one who clings on to me whenever I step into kitchen. He wants to see everything that I do. So it took me more time than expected. But, to keep him busy, I just sat him on the worktop, gave him a small ball from the dough for him to play with. He was also trying to make the pidis like me, rolling the dough with hand and then pressing it using his cute little finger to make the depression.
N.B:
One of my readers just mentioned that they call these UnniPathal in thalassery. I think when we use meat in the recipe it is called irachi pidi/erachi pidi...and when we use chicken it is called kozhi Pidi where kozhi is chicken:)
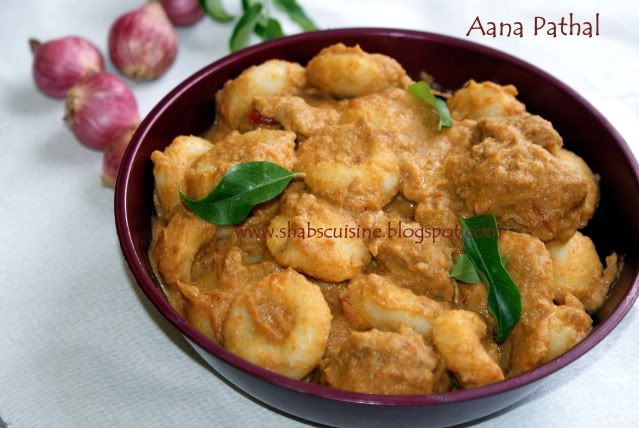


I think it is important to make pidis quite small because the gravy gets coated well on the individual dumplings rather than the bigger ones. And apart from that, the smaller one looks CUTE! We used to help mom to make these dumpling and when it gets larger, she re-do them saying they won’t look good! Here, I make them slightly bigger to finish up the work faster..

I made this stuff only twice just because my husband is not a big fan of Rice-meat combination. Even then he liked it very much when I prepared it. You may substitute chicken or lamb with the beef. My favourite has always been beef, because that’s how my mom prepared it always. When I cooked this for the first time, the pidi did not come out good. It dint get cooked!!!And it would never get cooked as well just because I used the wrong rice for this. And we ended up having something else with the gravy. So choosing the right rice is crucial for this recipe. I had tough time getting the right rice for this kind of dish, due to my lack of knowledge in rice and you can’t believe there are so many kind of rice that looks so similar even the experts might get a bit confused. Again the dough for the Pidis (rice dumplings) are prepared in the same way I prepared
Neypathal. You can see the methods I followed there and prepare this pidi as mentioned there. Anyways, if you are someone who loves tasty food, I would recommend you to try this one. Yes, It is so good.
Ingredients:
For the Pidi:
2 cups long grain rice (Pachari)
1/2 cup water
1 1/2 cup freshly grated coconut
2 tspful fennel seeds (Perumjeerakam)
1 large onion (175g), roughly chopped
3/4 Tbs salt
1/2 cup +2 tbs Rice flour


For the gravy:

800 g Beef cut in cubes (Can use chicken or mutton)
3 tsp Kashmiri Chilli powder
4 tsp Coriander powder
1/2 tsp turmeric
1/2 tsp Garam masala powder
250 g onion, chopped
30 g (1 heaped Tbs) grated ginger
6 large cloves (2 Tbs) of grated garlic
200g (1 cup) chopped tomato
1 cup water
1-2 tbs oil

For making coconut paste:
2 tbs oil
1 1/4 - 1 1/2 cups Grated coconut (fresh or desiccated)
2 Tsp rice
1 tsp fennel seeds
4 cardamoms
4 cloves
2-3 small pieces of cinnamon sticks
2 cups water
Preparation:

A. For making the pidis:


1. Soak the rice in tap water for 3-4 hours.(Soak for longer time if using parboiled rice).


2. Grind it along with minimal water until you get a coarse and grainy mixture


3. Add coconut, fennel seeds and roughly chopped onions to this and grind for few seconds until everything is just crushed and NOT smooth.


4. Tip the whole mixture in to a large bowl, add salt and mix well.


5. Add the rice powder and mix well using hands until you get a dough that can be shaped into balls.


6. Now, rub your palms and fingers using oil. Take a very small portion of the dough, roll it into rounds and gently press in the middle to make a depression. The size of these pellets should be as small as coin of 1 1/2 " diameter (appx)


7. Oil the steamer and arrange these pellets directly in it in after pressing in a slanting position adjacent to each other.

8. Steam cook for 8-10 minutes until done. The soft rice dough will harden once fully cooked.


For making the coconut Paste:


1. Heat a large frying pan, add oil. Add rice, cardamom, cloves and cinnamon and sauté until the aroma comes and rice puff up little. It will take just few seconds or under a minute depending on the heat and saucepan used.

2. Add fennel seeds and coconut and sauté until the coconut starts taking golden colour.

3. Grind all into a smooth paste by adding the required amount of water, I added 2 cups (480 mls).

For making the Gravy:

1. Heat a pressure cooker, add oil. When hot, Add onions and salt and sauté till it starts turning golden. Don’t brown. Add ginger and garlic and saute till raw smell fades.


2. Add the chopped tomatoes, cover and cook for few minutes until everything is well combined.Add chilli powder, coriander powder and turmeric powder and sauté for few seconds.

3. Add beef and stir well. Add a cup of water and pressure cook till meat is cooked and oil clears from sides. Add the ground coconut mixture, curry leaves and garam masala to this and bring to boil stirring well. Cook for a couple of minutes more.


4. Add the cooked pidi into this one, stir well and cook in very low flame for 5 minutes. Take it off the flame. By this time, the gravy will be very thick coating all the pidis.


The sequence I followed:

1. I made the rice dough ready for making pidis. I then kept them aside.

2. Then I started off with the gravy.


3. When the gravy was being done, I shaped the pidis and cooked them.


4. After the pidi's were done, I sautéed the coconut and ground them and then added them to the curry.


5. Later added pidi to curry.

Notes:
1. The process is quite lengthy, but the gravy can be made a day ahead and then the pidis the next day.


2. If you are not using water while grinding, you don’t have to use the rice powder. So increase the amount of rice to 2 ½ - 3 cups.

3. As I mentioned in
Neypathal, this pidis can also be made from rice powder, parboiled rice etc. The dough is exactly the same, but for aanapathal we steam the rice where as in Neypathal we fry them. If using parboiled rice, try to get PONNI rice. It works well for this. Please see how I made the dough for Neypathal . Because the dough is the same.


4. Before making the pidi, try by grinding little rice and steaming it. If it gets cooked in less than 10 minutes, then that rice should work fine for this recipe. I had to waste whole lot of the rice dough the first time I made it, because as I told you, the rice wasn't the right one.

5. You can add few greenchillies if the curry is not spicy enough. Since my Kashmiri Chilli (Melam Brand) is quite hot, I dint use any Green chillies in the gravy.


Before I go, Here comes another award from my beautiful friends Sushma Mallya and Faiza Ali has passed on to me the beautiful Honest scrap Award. Thank you sweeties.


Requirements of the award:-I must thank the person who gave me the award and list their blog and link it .
I must list 10 honest things about myself .
I must put a copy of Honest Scrap logo on my blog .
I must select atleast 7 other worthy bloggers and list their links.
I must notify the bloggers of the award and hopefully they will follow the above three requirements also.
I will try to be honest while writing honest things about me:)
1. I love little kids and babies. They are so adorable and cute! Probably they would hate me because I always squeeze them.
2. I love cooking a lot and trying out new recipes, a recently discovered obsession. I also love love anything that is food related ;crockeries, cookery shows, cookery books and foodies too!
3. I am a computer/Internet addict. I Can spend hours sitting on it and browsing.
4. I used to be an athletic/ sports person during my school days and now I am a lazy home-maker.
5. I have the worst habit of munching on something every time.
6. I am very slow at eating, which I find it very difficult especially during Parties and weddings.
7. I talk a lot, and sometimes I hate it.
8. Love sweets and chocolates. If those things don’t make me fat, I can live on them without having anything else.
9. Love to cook for the ones I love and love to please them with good, comforting food. I love it when my dad comes into the kitchen looking for sweets; he knows that if I am there at home, there would be some sweet goodies around. He loves my Gulab Jamun, Saba's Cheesecake and the biscuit caramel pudding alot. He’s got such a sweet tooth, goodness!.....Now you know where I got my sweet tooth from!
10. And for the last one, I am a Libra-Scorpio Cusp!
I would like to pass on this award to the following Honest Bloggers:



Monday, 31 August 2009

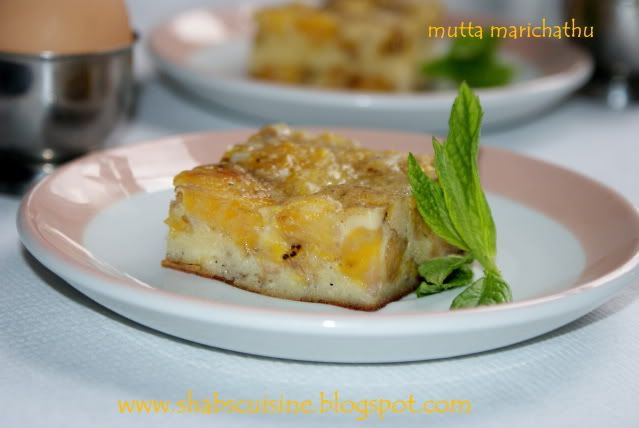
Mutta Marichathu (Egg and Plantain turnover)

Hi all,
This is another snack best for making during Ramadan. I have already posted this recipe long back but with another name (Plantain sweet). Now I am re posting this by editing the old post with better pics and the original name and a slight different method. Sorry, I didn't know the original name before!


Mutta Marichathu was one among many dishes that I had back home. It is mainly made of plantains/nenthrappazham and eggs. My younger sister made for us (myself and hubby) when we went to my aunt's house and we absolutely loved it. Yeah, it was too good. Its is kind of a cake or pudding like stuff,very easy to make, takes very less time and tastes delicious and very moist. It's one of the best snack you could make for someone coming home with quick notice. It is also good for making during Ramadan. There are many other recipes that can be made with plantains and I guess such dishes are mostly made in Muslim houses in kannur and Thalassery.


Ingredients:
Ripe plantains - 2 no.s (540 g)
Extra large eggs - 5 large
Sugar - 12 tbs (or as per individual taste preference)
Cardamom powder - 3/4 tsp ; Cardamom - 4-5 crushed
Ghee - 1 tbsp (Can use more if preferred)
cashew nuts - 8 no.s crushed (optional)
raisins - 1 tbs (optional)

Preparation :
1.Cut the plantain into two halves(lengthwise) and again cut the halves into further halves (lengthwise). Slice the plantains into medium thin slices. Not too thin and not too thick.
2. Heat a saucepan,add ghee and plantains and saute on medium heat until the plantains get cooked and turn just golden in colour here and there.
3. Meanwhile in another dish, break eggs, add sugar and cardamom powder to it and beat lightly for a couple of minutes. (1 -2 minutes).
4. Add the cooked plantains in the egg and sugar mixture and stir well until uniformally distributed. Pour it back to the pan that was used to fry the plantains, COVER it and cook it over very low flame until the top part is set.Once the mutta marichathu is cooked, the egg on top will be hardened, It should take 10-20 minutes depending on the saucepan used.
5. Transfer this to a another plate and cut into small squares and serve hot or warm with tea.
6. Can be stored in fridge and stays up to 3-4 days. Warm it up and serve if refrigerated.

N.B: If using nuts, just before frying plantains, add a tbs of ghee, saute the crushed cashews until golden and keep aside. In the same pan put raisins and saute until they all puff up. Remove at once and keep it along with nuts. Mix it with egg and plantains and pour to the saucepan and cook it until done.

2. You can use 4 Ex large eggs and 10 tbs of sugar, if you want to use less number of eggs; that is perfectly fine.

This is another entry of mine for Joy From Fasting To Feasting conducted by Lubna and Yasmeen .


Friday, 28 August 2009

Spring Roll and a TAG!


Spring roll is a snack made with the Meat masala filled in pancakes. The pan cakes are filled with meat or vegetable masalas and then dipped in egg and then coated in breadcrumbs to give a very crispy and crunchy wrap and delicately spiced filling. This is one of the usual snacks made during Ramadan and is easy if you have the filling made ahead. This is not the regular Chinese spring roll with crispy pancakes, but a very modified and a different version that is made at home mainly during Iftar and to serve guests. Some call it ‘Churulappam’ since it is made by rolling the pancakes. With the below mentioned recipe, you will be able to make 14-16 rolls. I fried half and the rest I froze them for later use. So next time when I need to fry them, all I have to do is just defrost them and fry them.

Ingredients:
1 cup Plain Flour (150gms)
1 1/4 cup water
1 medium size egg
Salt to taste

For the filling:
1 heaped cup of Meat masala

For coating:
1-2 Eggwhites
Breadcrumbs- As required
Vegetable oil- To deep fry the spring rolls.

Preparation:

1. To make the batter, Mix all the ingredients well in a large bowl using a balloon whisk or Blend them in a blender until everything is blended without lumps.
2. Heat a small frying pan onto medium heat; pour ½ a ladle of batter to form circles of 5” diameter.
3. Just cook the pancake on one side ONLY and take them out.(The pancake will be cooked on both sides this way).Place them in a plate rubbed with oil. Place a heaped teaspoon of the masala on the uncooked side as shown in the picture. Place it in the top part from middle, an inch away from the sides. Fold both sides to enclose the filling in and then roll it completely to seal the filling in.
4. When you fill one spring roll, you can start making the next one.
5. Dip the roll in lightly beaten egg whites and then roll it in breadcrumbs until fully coated. I normally use the spoon or fork for this as it is quite messy when done with hand.
6. Heat a frying pan filled halfway with oil. Fry these rolls in the oil until golden and crisp.
7. Serve whilst warm with ketchup, chilli sauce, sweet chilli sauce, chilli garlic sauce etc.

And Now Sushma Mallya has tagged me and here are few other bits about me.
The Rules:1. Link the person who tagged you.
2. Post the rules on your blog.3. Share the ABCs of you.
4. Tag 4 people at the end of your post by linking to their blogs.
5. Let the 4 tagged people know that they have been tagged by leaving a comment on their website.
6. Do not tag the same person repeatedly but try to tag different people, so that there is a big network of bloggers doing this tag.The Tag:

1. A – Available/Single? No
2. B – Best friend? My mom and sis mainly;and few more school/college friends of mine who I am very very close to.

3. C – Cake or Pie? Definitely Cake
4. D – Drink of choice? Milk Shakes and smoothies.
5. E – Essential item you use every day? Laptop, my measuring cups and spoons and my kitchen scale. I just love them.
6. F – Favorite color? Nothing as such.
7. G – Gummy Bears Or Worms? Gummy bears
8. H – Hometown? Kerala.
9. I – Indulgence? Desserts and sweets...
10. J – January or February? I don’t think there is anything special about those months, so it’s the same.
11. K – Kids & their names? 1 Son- Rishan
12. L – Life is incomplete without? Family and friends.
13. M – Marriage date? April 28......
14. N – Number of siblings? 2 sis and twin brothers. They are all adorable.
15. O – Oranges or Apples? Not a fruit person.
16. P – Phobias/Fears? Darkness (I always feel there is somebody following me when I am in the dark and keep looking back while I walk in dark even if it is at home...lols...), and reptiles especially lizards found in the gulf (Goodness me!They are huge and disgusting and I can’t stand the sight of it), large spiders, snakes, then comes dogs...oh there are too many...etc....I think I am scared of anything and everything but not scared of cockroaches..
17. Q – Quote for today? Can’t think of one.
18. R – Reason to smile? Many
19. S – Season? Spring/Autumn.
20. T – Tag 4 People? See below.
21. U – Unknown fact about me? That’s Unknown!
22. V – Vegetable you don't like? Hmmm.....none actually.
23. W – Worst habit? Misplacing things around home and searching it for hours and hours and hours. God! The worst part is when I misplace my hubby’s stuffs like his hair comb. And he has to join me in searching just before going for work which almost every time drive him nuts J..There are so many incidents associated with my misplacing. One is when I misplaced the whole bunch of our house keys including the postal box key. My husband was expecting an important mail and he wanted to open mail..Looked out for keys, it was not in the regular place..Myself and my hubby kept on searching and searching and couldn’t find it anywhere. Finally we headed to the garbage and checked that also, Goodness me. It took us more than an hour searching the whole house, and then we gave up. I Told my hubby that we will find it later on somewhere forget about it atleast for the time beaing...Then when I went to kitchen and started off my work, I found it under the tea towel!!!Imagine.
24. X – X-rays you've had? Did I have any?
25. Y – Your favorite food? Sweets, desserts and Certain malabari food. Sometimes it entirely depends on my mood, no...most of the time.
26. Z – Zodiac sign? Scorpio.
I would like to pass the above tag to:
Parita
Faiza Ali
umelbanat
Duchess of Tea
This is my entry to Joy From Fasting To Feasting conducted by Lubna and Yasmeen .

Tuesday, 25 August 2009

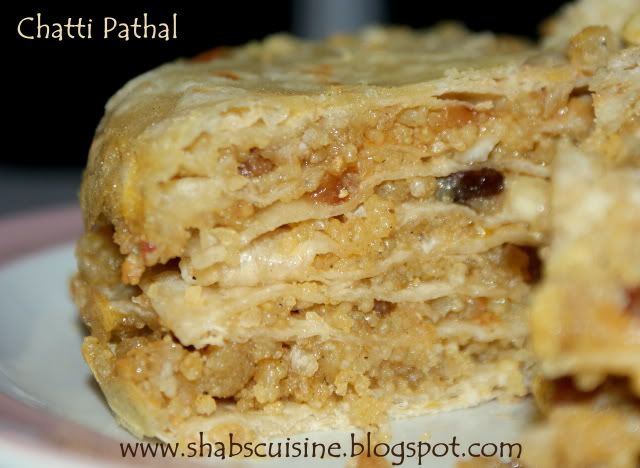
Chatti Pathal / Chatti Pathiri


Chatti pathal / Chatti Pathiri is a dish that has layers of chappathi/ pancakes and sweet filling. I had bookmarked this recipe last Ramadan when my friend Hanan told me about this dish from www.pachakam.com. She told it was a must try dish and was too good. So I thought I would give it a try. These kind of snacks are only made during Ramadan for Breaking the fast. I wanted to try this since very long time, so tried and we liked it very much and so sharing with you all.

Just while making the chappathi for the ChattiPathal, I remembered that we used to make Atti Pathal, which is similar to this but with savoury meat filling. Some used to make the Pathiri like the Chappathi dough, rolling it and then cooking on the Tawa/ griddle. And some make it by making batter, by mixing maida (Plain Flour), water, egg and salt . I always liked the batter version because it is so soft and is easier to make and tastes fantastic. Some like it with the chappathi dough, but it won't be as soft as the pancake version. I remembered about the batter only while I was making the chappathi. Else I would have done it with batter.Doh!

And again, after shifting to the new place, I dint bake anything until now!! Chattipathal was the first thing I tried baking and I was not very happy in the first place about baking this dish since I had a feeling it was going to be too dry, once it comes from the oven. Anyway, tried to follow the instruction in the recipe as such and popped the chattipathal into the oven. I first set it @170 degrees Celsius, Checked after 10 minutes, and dint see any change, so increased the temperature to 175, and kept for another 10 minutes and the chattipathiri looked exactly like how it went to the oven! My patience being drowned, again increased the temperature to 190 degrees Celsius and kept for another few more minutes and it looked still the same!!!That was when I noticed the oven in the present flat is a crap one. The original recipe mentioned to bake it for 15 minutes, and even after 30 minutes, mine was unshaken. Alas, that's it. I took it out of the oven and cooked it on the stove top in a very low flame and it was real good. No wonder it took ages to get my naan cooked, after all it should take only few minutes. So no baking for sometime...:(.

The recipe asks to use an 8" pan. I had a non-stick pan which has become a stick pan now after my THOROUGH cleaning, and an over proof Pyrex glass dish. Both were of the different size and was wondering which one was 8". Right on time my hubby came in to the kitchen to check for something (Probably to see what I am cooking). I asked him " Hey, which pan do u think is 8 inches?"...My husband as usual, " I dono , what is it for, anyway?".....Myself: " That is to make chattipathal and showing him both pans I told him I think This is 9 inches and the other one is 8 inches.."..And he bursting out in laughter told me"wow, adipoli cooking aanallo(Ironically, Your cooking is great), inch vechaanallo cook cheyyunnathu (You measure in inches while cooking....somewhat like that)". Anyways, I went for the smaller pan because when I made the chappathis it wouldn't get bigger than that small pan. I divided them into 9 small balls. But since it was a "Stick Pan", and I dint oil it properly to reduce the fat, It really stuck to the bottom of the pan!! I had to scrape it off with a spatula halfway! So these were the mistakes I did while cooking and scribbled it in here so that you don't repeat the same mistakes that I dind and hope you can come with a better result.

P.S: Just measured the sauce pan That I cooked it and it is only 6 Inches wide;)..After all it doesn't matter whatever the pan size is. Just make the chappathis to the size of your dish.

Sorry for the poor quality picture, I was so hungry and busy too. But I thin you can get an idea of how it should look once Done.


Ingredients:
For the Pathiris:
1 cup (150 g) Plain flour
1/3 cup warm water
1 tbs vegetable oil
salt to taste

For the filling:
5 small Eggs (8 oz)
10 tbs Castor Sugar(Can adjust according to your preferences, I normally use 2 tbs of sugar per egg)
5 tbsp Grated coconut
3 tbs (30 gm) Raisins
3 tbs (30 gm ) Cashew nuts(broken)
4 tbsp Poppy seeds(Couscous)
1 tsp Cardamom powder
2 tsp Ghee

For Coating:
4-5 small eggs
6 tbsp Sugar
A pinch of Cardamom powder

Preparation:
For the Pathiris/ Chappathi:
1. Mix the flour with water, oil and salt and knead into a dough like that of chappathi. Keep them covered for half an hour.
2. Divide the dough into 9 equal portions.Using a roller pin, roll it out into paper-thin chapathies of uniform size(6 Inches inches diameter) on a dusted flour board.
3.Heat a griddle and cook the chappathis lightly on a tawa. Keep them aside.You should be able to get 9 chappathis with this amount.
Note:You can vary the size of the chappathi depending on the size of the pathiri chatti or the vessel in which you are baking it.

For the filling:
1. Beat the eggs lightly with sugar and cardamom.
2. Heat a Large frying pan.Add ghee and saute raisins, cashew nuts, poppy seeds and grated coconut until they start to change the colour slightly.
3. Add the beaten egg and scramble the whole mixture until the egg is well cooked. Keep it aside.

For the coating and the assembling.
1. For coating, beat the remaining eggs, sugar and cardamom and keep aside.
2. Take a non-stick baking tray, spread couple of tsps oil or ghee all around(spray the nonstick oil).
3. Keep one pathiri as the first layer. Using a spoon sprinkle the scrambled egg filling on top of the pathiri.
4. Dip the second chappathi in the egg coating mixture, coat well and place it on top of the filling.
5. Sprinkle the scrambled egg mixture again and repeat this until all the pathiris and the scrambled egg mixture is used up and pathiri being the top layer. Pour the remaining egg mixture on top of pathiri so that it drains on all the gaps on sides and form a thin layer on top. This is important to keep the Chatti Pathiri moist. If you run out of the egg mixture after coating, break 1 or 2 eggs, mix with sufficient sugar and cardamom and pour on top.
6. Bake in oven for about 15 minutes or until the top of pathiri turns golden.
7. Garnish with cashew nuts and raisins.Traditionally the baking is done in a sealed container with the coconut husk embers on top....Or you can cook it in non stick saucepan on stove, by placing it in very low flame and then flipping it over carefully and cook on the other side.

Notes:
1. I cooked it in the stove because I tried it in my oven and found that it doesn't work well!!So I don't know how it comes out in the oven.
2. Instead of making chappathis as mentioned in this recipe, You can also make pancakes with the above amount of flour, adding an extra egg and sufficient water enough to make a smooth pancake batter. This will give a very soft textured chatti pathiri. I loooove this version.

This is my entry to Joy From Fasting To Feasting conducted by Lubna and Yasmeen.

Recipe Courtesy: Zeba Niyas @ http://www.pachakam.com/

Monday, 24 August 2009

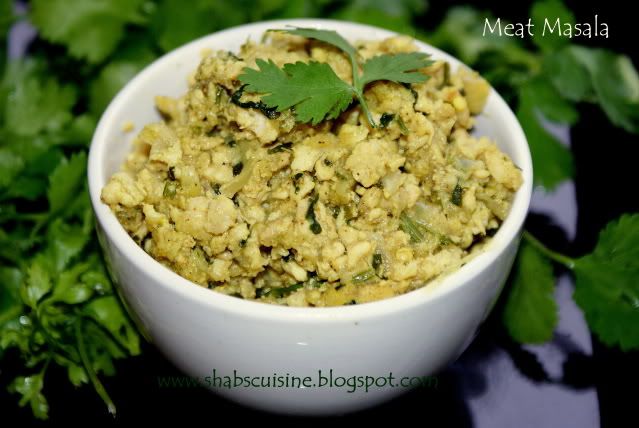
Meat masala (Meat Stuffing for Snacks )


Ramadan Mubarak to you guys! This time I am dusting up one of my old recipe that was listed quite long back and relisting it with few updates and a better view of the picture. I usually make masala in a different way and wondered why I never got that authentic taste that we have at home. I had always thought adding so many spices brought that flavour. But to my surprise, I came to know it is the simple ingredients that gave elegant flavour to this meat masala, or stuffing. This is a typical Malabari type filling for samosas or Irachi Ada, puffs, Spring roll and many other snacks and you will find similar taste through out Malabar area. You can make many snacks using this masala. One of our faaaavorite snack is the Bread roll that I make using this filling. It's really great. I used chicken mince to masala this time. You can make the same masala with minced meat as well. Here is the updated version of the recipe.

The best part of making these masala is you can prepare them in bulk and divide them into several small freezer bags and pop them into the freezer for later use. Since this filling can also be prepared days ahead, I always have them in my freezer, so that I don’t have to panic thinking of what to prepare when somebody comes home with quick notice. All you need to do is just take a small bag of masala out of freezer and defrost them thoroughly before use. Don’t defrost and freeze many times as it really alters the taste. So it is better to divide the masala into many individual freezer bags and use as per need rather than defrosting the whole stuff all at once. This masala really lasts for weeks if frozen.

Sometimes, thinking of making the masala itself makes me a bit lazy. Making them requires quite lot of time and work. Lot of onion chopping, peeling and grating ginger and garlic, aah! So I never made them in small quantities. But again, using the processor makes the job very easy. Again, the best part is that, a huge number of snacks can be made by making masala in the below said quantity. These kinds of dishes are mainly made during Iftar and when there are parties or guests coming home. Snacks like samosas, cutlets, bread-roll, spring-roll, attippathiri,stuffed buns etc uses the same masala but all of these taste so different that nobody would even know that you prepared all the snacks using the same filling. You can even use it for making sandwiches. Once the masala is done, to finalise it into snack is very easy and requires less time.

Meat masala

Ingredients:

900 gm Minced meat
4 cups (3 1/2 medium sized) Onion, thinly sliced and then chopped
2 ½ " - 3"- Ginger, grated
10 -12 Cloves of garlic, grated
8-10 Crushed Green chilli
½ tsp Turmeric
1 tsp + 1/2 tsp Pepper powder
1/4 + 1/4 tsp garam masala
Salt – as reqd.
3-4 tbs- Oil
1 tsp - Lime juice
½ - 3/4 cup (loosely packed)- chopped coriander leaves
10 mint leaves chopped

Preparation
1. In a sauce pan Add 2 tbs oil and add minced chicken. Add 1 tsp pepper powder,1/4 tsp turmeric powder,¼ tsp garam masala and enough salt. Cook until the meat is tender and all water has dried up completely. (If using Minced lamb or beef. add half a cup of water and cook until the water is completely dries and meat is well cooked)
2. Slice the onion and chop them into even smaller size.* (see note)
3. Grate ginger, garlic and Green chillies.* (see note)
4. In a large non-stick sauce pan or frying pan add oil and set the heat to medium-high.** (see note)
5. Add the onion, grated ginger, garlic, green chillies and salt and sauté until onion becomes just translucent i.e. they have become soft and started turning pale. Don’t brown them. If you see any moisture in the onions at this stage, just turn up the heat, and dry them out. Once the water has completely dried up,add ½ tsp of pepper powder and ¼ tsp of turmeric powder and sauté for few more seconds.
6. Add cooked minced meat and lime juice to this; mix well and simmer for about 5- 10 minutes on medium flame by covering the lid.
7. Add chopped coriander, mint leaves (if adding) and rest of the garam masala to this and stir well and cook for further couple of minutes until the leaves are wilted. Use as a filling for any snacks.


Notes:
* For slicing onions and chopping them you can use the food processor.
You can also add whole garlic cloves, ginger and chillies all together and process in the processor until well crushed.

** You have to be very careful at this stage because using large pans (I use 30 cm or 32 cm saucepans) and medium- high flame is very important thing to keep in mind. Since there are quite lot of onions in the recipe, using a small saucepan and low heat can tend to make the onions soaky and release so much moisture in the masala that it will turn out like curry or sauce .. Keep an eye so that the mixture doesn’t stick to the pan as well.
Another important thing to note is that since you are adding salt to meat, add salt to onions carefully. I always add salt along with onions because they get cooked easily.Apart from using minced meat, u can also make the same masala with chicken pieces cooked in the same way by adding little water and then shredding it once it is completely cooked.

Friday, 21 August 2009

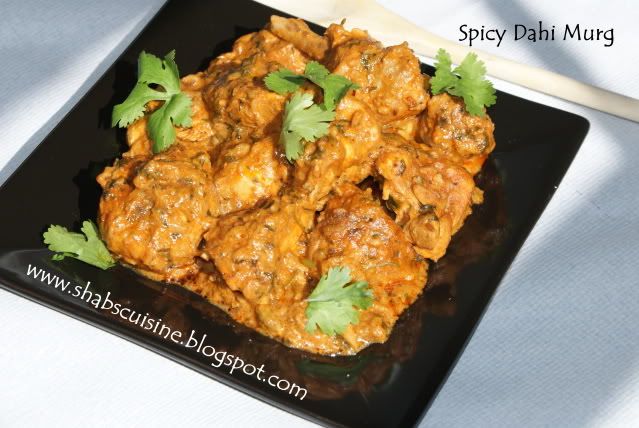
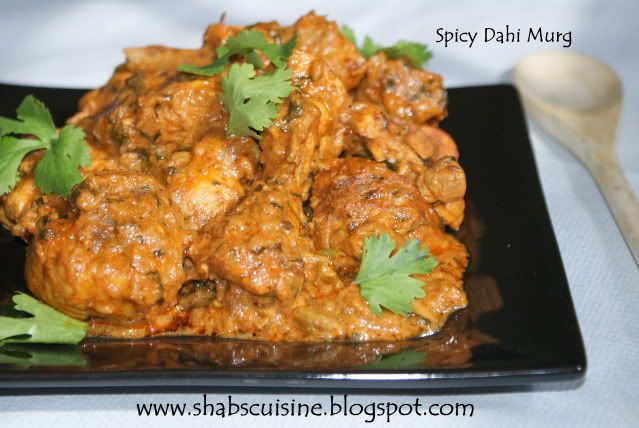
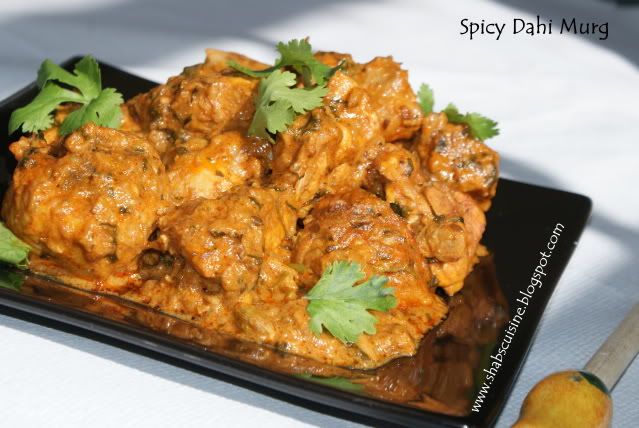
Spicy Dahi Murg (Spicy chicken in yoghurt sauce)


This particular curry dish was prepared by mom when we visited her last time in UAE. She served this curry along this curry with paratta and we loved it so so much that we stuffed ourselves like anything. When I asked her what was the name of the curry, she told me, there is no name as such. She just calls it 'Thairu itta chicken curry' (Chicken Curry in youghurt sauce). I asked her where she got the recipe from and she told me she just made it up by herself! I think this was her invention and dint know what to name it after all. So I myself named it Spicy Dahi Murg, hehe. I don't know if that name is apt for the curry after all....When I told my husband that I am going to name the dish dahi Murg, He just laughed and thought that name was funny....And headed for another suggestion to confuse me more.... He asked me " What's that green leaves you added in the curry?"...I told him it was coriander leaves.....He then came up with the name " Spicy coriander chicken" ..... I was not happy with that name so stuck with mine......ummmm.


I had made this recipe with different proportions and every time I made it, it tasted different!! I think it was my temptation to add lots of onions that made so much of difference in the taste. I had almost given up trying this recipe since I wouldn't get the exact taste that I was looking for. The other day, it was ready made paratta for dinner and when thinking of what to make for curry, this 'Dahi murg' started dancing in my mind and the taste of my mom's curry just forced me to give it another try again. And hurray! Got it finally. I dono where I have been doing wrong, probably adding more water to make some gravy to suit my husband's taste, or adding lot of onions to make more thick sauce. This is almost a dry curry I would say or a curry with very thick sauce. Follow the ingredients closely and the outcome will be really good.


Ingredients:
800 g chicken cut into medium size pieces
For marinade:
3 tsp Kashmiri Chilli powder
4 tsp Coriander powder
6tbs (in 15ml tbs) Greek yogurt or any other thick curd
1 tbs lemon juice
1 tsp salt
Others:
1 medium size onion chopped thinly (150g,nearly 1 cup)
1" piece ginger,grated
7 large cloves of garlic,grated
3 tbs oil
1 tsp cumin seeds(jeerakam)
5 whole cardamom
5 cloves
2" piece of cinnamon stick
1/2 cup(loosely packed) chopped coriander leaves
1 medium size tomato (I once used 2 tsp of tomato puree when I ran out of tomatoes and it works fine.)

Preparation:
1. Mix all the ingredients for the marinade and apply it to the chicken.Mix well. Cover and leave it in the fridge for a minimum of 2 hours.
2. Heat a large saucepan and add oil. Add cumin seeds along with other whole spices. When the aroma comes,add in chopped onion,little salt, ginger and garlic and fry until the onion starts to turn golden in colour.
3. Add in the marinated chicken along with 4 tablespoons of water and mix well. Cover and cook in low flame until the chicken is almost cooked and the gravy is very thick.
4. Add in the chopped tomatoes and chopped coriander leaves and stir carefully. Cover and cook until done.
Pairs well with : Neychor, Neypathal (Deep fried rice pancakes with onion, coconut and fennel)
, paratta, puri, chappathi etc.
Related Posts Plugin for WordPress, Blogger...