Showing posts with label Starters. Show all posts

Monday, 27 June 2016

Shami Kebabs (Mince meat patties)


Hello Everyone!

Ramadan Mubarak to you all! Ramadan is almost finished and  it’s unbelievable how the time flies. Here I am sharing with you one of my favorite Kebab recipes of all time. Since the days are longer here in Summer, we have'nt got much time to eat, literally. Sun sets here at 9:50pm and the Fajr Azan goes off at 2:45am. I always aim to reduce some weight as we have'nt got much time to eat and try myself to stay aloof from indulging into snacks and sweet goodies. Probably, that's why, all I want to devour is fried snacks!! But, I stop at that and dont eat anything else. No main course, just the unhealthy, yet delicious fried snacks. I am trying to comfort myself here, you see.

When Lubna asked me if I could do a guest post for her, I was delighted! It is her blog that springs in my mind when it comes to Ramadan recipes and I look forward to her Ramadan posts for recipe ideas. She has fabulous collection of recipes and I love her Ramadan series in particular. If you want to see the amazing compilation of recipes from all over the world, hers is the blog you want to be.  I have come across many amazing blogs through her blog, which other wise I would have missed. Check her blog out, and don't forget to get the recipe of my shami kebab there.

Wednesday, 6 March 2013

Restaurant Style Chicken 65


It looks like it’s been a while that I posted some recipes here. I have plenty of recipes pending in my drafts, I am not sure when I am going to be done with all those. I am caught up with loads of stuff for the past couple of weeks and I am going to be busy for the coming weeks as well. So, I am hoping my posts are going to sporadic, until unless I prioritize blogging over several other things like I used to do before. 
 

Back home, Chicken 65 is one of the most popular starters in an Indian restaurant menu. They are not seen in the menus here somehow, but these are the ones we always order for the starters, if they are available. The Indian restaurants here have very different menus as that to India, something that not only taste different, but looks quite different as well. I have to agree to the fact that, Indian food in Indian restaurants back home tastes so much better than the ones in here.


There are many stories about the origin of this recipe, I am not certain with any of them though. I read that, it uses chicken that is 65 days old. Some says it is the 65th recipe on some restaurant menu. Whatever the story is, all I can tell you is, this is a great, simple and easy chicken recipe with great depth of flavour.

I always believed that we can never recreate the restaurant-like food at home and this recipe proved me wrong. I was quite surprised at its outcome, as it tasted as good as the ones we get in the restaurants if not better. It is not only scrumptious, but equally easy and quick to prepare. The outcome is always juicy, tangy and spicy chunks of meat slathered in goodness! I have already prepared it several times, many a times it being the starters for the party and I got rave reviews for it. I usually prepare it with chicken breast, as it is easy for the little ones to eat, but they are more tasty and tender with meat on bone.


Restaurant Style Chicken 65
Serves about 12-15 as starters
Recipe adapted from Shashirecipes
Preparation time: 10 minutes
Cooking time: 20 mins
 
 Ingredients:
 2 lb, 900g chicken breast, or legs cut into small bite size portions, about 2 inches
 Marinade:
1 tsp minced ginger
1 tsp minced garlic
1 tsp black pepper powder
1 Tbsp coriander powder
1 Tbsp Red chilli powder*
½ tsp cumin powder
½ Tbsp Paprika**
¼ tsp turmeric powder
2 tbsp corn flour
2 large eggs
3 Tbsp lemon juice
few drops of red colour
salt to taste

Others:
½ of a large onion finely chopped, ½ cup
1 tbsp finely chopped ginger
1 Tbsp finely chopped garlic
2-4 green chillies
1 tsp pepper powder
2 strands of curry leaves finely chopped
2 tbsp coriander leaves chopped
Vegetable oil to deep fry

Preparations:
1. Marinate the chicken piece with all the ingredients listed under marinade until the chicken is evently coated and leave it in the fridge for couple of hours or overnight in the refrigerator for the marinade to seep in the meat.

2. Heat oil in a kadai or a large frying pan and pour enough oil to deep fry the chicken. Oil should not be heated to smoking high heat, but retained at a medium heat to cook the chicken pieces.

3. Once the oil is hot, add few chicken pieces in the kadai and let them cook for about 3-4 minutes undisturbed until the bubbles starts to come down. Using a slotted spoon, flip the chicken pieces over and cook for 3-4 more minutes. At a medium heat it just takes about 7-8 minutes to cook each batch, but check the doneness by taking out couple of pieces. Make sure it is cooked through and you don’t see any pink in the middle. Over cooking them can make it hard and chewy, so make sure you cook it for sufficient time to keep it juicy and moist. Once done, drain them in a kitchen towel to remove excess oil.

4. For the tadka, in another oan, add 2 tbsp of oil and throw in chopped onions. Once they trun golden, add in the ginger garlic, curry  leaves and green chilli and sauté for 2-3 minutes until the raw smell fades.

5. Add in pepper powder and coriander leaves and sauté for few seconds and then add the chicken pieces and mix well. Serve hot with rice, chappathis or naans or as starters.

Sunday, 6 May 2012

Restaurant Style Chicken Tikka


There is nothing as tranquil as being on the beach, early morning when everything around is so beautiful, so fresh and so serene, but on nice sunny day. Being in the UK, warm weather is something we’ve been missing these days, so we need to utilise as much as of the sunny days we get.. It used to be the other way around while I used to live in Abu dhabi. We used to pray for rain, and when it drizzles, we stretch our hands out the window to catch few drops.Few precious drops..


We have been living in this part of Tyne & Wear for more than a year and half and it was not until recently that we discovered one of the beautiful beaches around, Fish Quays. It’s just couple of minutes from my son’s school and on days with less house chores, I drive down to spend some time on the beach. The beach in the morning is beautiful with fresh air to breathe in, less crowded apart from few elderly people sitting in their cars enjoying the beach or walking their dogs. It is very refreshing and relaxing. There are many old benches lined along the shore, where I sit for a while looking far at the sea, the fort, the ships, gulls etc.

But these days, in spite of it being spring, it is just like another winter. So cold, and with the wind, it just makes it all worse. The other day, when I went to the beach, the tide was really low so I just walked down a bit further skimming through the slippery dirt-green sea weed covered rocks. I had seen a bloke returning with a little bagful of mussels. So I just looked around the grooves and creases to see if I could spot something. I was super excited to see some fresh live mussels clutched on to the mossy rocks covered in slimy see weeds. 


As most woman I also get sold for anything that comes free and on sale, so, I started picking them, but was a bit wary if there would be some creatures around. Despite that, it was too cold that my fingers started getting numb, so I left the idea of picking them. Sad I dint carry my camera with me that day, I couldn’t any pictures of the mussels, mossy rocks etc. But here are few pictures for you that I captured on a bright sunny day, when the tide was high, no shore to be seen and no mossy rocks. It was all under the furious sea. I will share more pictures in some other post, when I get to take more of them.


Now, coming to the recipe, chicken tikka is something that needs no introduction. Mildly spiced boneless chicken cubes cooked on a charcoal grill is a crowd pleasing appetizer and is very popular in countries all over the world. It has gained much popularity over time. The tikka is traditionally made in a hot clay based oven called Tandoor. But at home, it can easily made in a very hot oven. I usually set my oven to 200ºC when I bake kebabs but many recipes asks to set the oven at 230 or so. 

This is one of the regular starters that we order at any Indian restaurant or take-away. This recipe of chicken tikka tastes just like restaurant one, if not better. I have been making this for years now, making no changes and can easily be doubled. I found this recipe on net long back, and I haven’t got the link saved. So, if this recipe belongs to someone you know, please write to me, I will add the link.


Chicken Tikka
Serves 3 - 4

Ingredients:
400 gm Skinless boneless chicken pieces ( 2 medium breast pieces)
2 tbs Fresh lemon/lime juice
½ - ¾ tsp Salt
2 tbs Greek yogurt
2 garlic cloves, minced
3/4 tbs ground coriander
1 tsp ground cumin
1/2 ts ground turmeric
1 tsp minced ginger
1 tsp red chilli powder
½ tsp - 1 tsp methy leaves crushed (fenugreek leaves)
Few drops of orange red food colour (optional)
2-3 tbsp butter, melted or ghee
2 tomatoes, cored, and flesh scooped out
2 onions cut into squares
Extra lemon/lime juice to squeeze on the kebabs.
6 Bamboo skewers, soaked in water for an hour (6- to 8-inch)

Preparation:
1. Wash the chicken and place it n a colander to drain off excess water. Wipe off the excess water using a kitchen towel and cut the chicken into 2" thickness.  Combine chicken, lemon juice and salt in a bowl and let it sit for 30 minutes. 

2. Mix Greek yogurt, minced garlic and ginger, coriander powder, cumin powder, turmeric powder and chilli powder in small bowl. Add food colour and mix well. Add in the chicken cubes and stir until chicken is well coated with spice mixture.

3. Refrigerate chicken at least 3 hours or overnight. I usually marinate it overnight to let the flavours steep in.

4. Preheat the grill to 200ºC. Thread chicken on skewers, alternating with onion wedges and cubed tomatoes.

5. Brush chicken and vegetables with melted butter. Grill kebabs until well cooked, turning frequently, and applying butter in between. Cook until you see brown spots here and there. It will take about 20 minutes. Keep checking for doneness in between, as overcooking them can make them dry and ruin the taste. Squeeze lemon juice once they are done, if required. You can also sprinkle little garam masala to boost up the spice level.

Notes and tips:
1. The bamboo sticks should be soaked in cold water to prevent the wood from burning while cooking.

2. If you have no skewers, just lay the kebabs flat on a baking tray and cook till done, turning sides and basting with melted butter or ghee every time you turn, to keep them juicy.

3. You can also pan fry them in little oil, if you have no access to oven.

4. Make sure that there is no moisture in chicken at all prior to marinating.

Monday, 23 August 2010

Mehshi Malfouf (Stuffed Cabbage rolls)


Before I go in to the recipe and details, Let me Wish you all a 'Happy Onam'. This post is not related to Onam, but something that I started composing a while ago.

*************************************************************************************

As I spent a major chunk of my life in the Arab world, I was acquainted to most of their food and I absolutely adore them. Who wouldn’t? I guess my love affair with Arabic food dish dates back to my university days or way before that when it comes to sweets like Baklawa and their all time favourite rice Machbus. There were couple of Lebanese Bakeries next to our campus where they sold Lebanese pizza and sandwiches, different kind of snacks, sweets and what not. Almost all afternoons I and my friends would stop at one of the bakeries and grab something and take it to the university canteen to devour during our busy university schedule and some discussions to go along with it or gossiping to add a bit of spice! The bakery sold all the famous Arabic Lebanese food and they have become part of my regular diet. During Ramadan, they used to display a different array of assorted snacks and sweets like Shaabiat, Luqaimat, Nammoura, Basbousa, Qatayef, Othmaliye to name a few. I used to grab few of them and take home to share it with my family too.

Apart from all that , During Ramadan, each faculty used to organize an Iftar evening where you would come across all the home made treats that you wouldn’t normally see in bakeries or sometimes even in restaurants. Oh boy! Those were days. I have come across many dishes that I have never seen before or even after those Iftar events in the College. In one of the Grand Iftar organized by our faculty, I remember there were around 6 - 8 rice Varieties served in Massive plates - as massive as it could be; with huge chunks of seasoned lamb served on top of each rice dish. Since lamb dishes were prepared in bite sized pieces at home, it was amusing for me to see them in large chunks, even though it din’t appeal me much. That was when I came across this ‘Stuffed Cabbage rolls’ also known as ‘Dolmah’ and Warak Al Einab or stuffed Grape leaves. They were very lemony for my taste, one bite into it and I could see myself just blinking. It is that sour. But apparently it is one of the most favourite and popular dishes of the Arab Community. Apart from the lemony taste the flavours were absolutely divine.


When I searched on the recipe for stuffed Cabbage leaves, I found out that not only the Arabs but all across the globe make stuffed cabbages but with their own native variations. You would find many variations with different kinds of fillings and a variety of cabbages like green cabbage or the savoy ones, but this is the kind that I am familiar with - the regular white cabbage that we normally get to see in India or UAE. I have always trusted Nestle family for their recipes and have followed their recipe pretty much as it is with minimal changes. And this is the Arabic version of Stuffed cabbage, literally known as 'Mehshi Malfouf'.

I prepared this dish at night and so I couldn’t shoot pictures of step by step preparations. The prepared dish was shot in the following noon by then which the rolls got a bit pale which otherwise was a bit more of a translucent off white. It is best served and eaten as soon as it is prepared. I have used home made Baharat or Arabic spice mix, but you can use readymade ones or even garam masala and adjust the seasoning to your liking. The only time consuming part in the process was separating the cabbage leaves. I had to cook the cabbage in boiling water for around 10 minutes then remove few leaves at a time, then return the cabbage back to boiling water to cook for further few more minutes to remove few more leaves until all leaves were takes except for the laste few which were too small to roll. It took me some extra time than I expected. But if you use different kind of cabbage, with loose leaves, it should be easier. And the filling is just mixing the ingredients without prior cooking which makes the job really easy.


Ingredients:
25 - 30 leaves of white cabbage (Around 600 g)
¾ cup rice or 150 g, soaked for 2 hours and drained (I used Basmati, traditionally Egyptian rice is used)
300 g minced lamb
3 medium cloves of garlic, crushed
½ Tablespoon Arabic Spice Mix
¼ teaspoon ground cinnamon
½ teaspoon turmeric powder
½ teaspoon paprika or Red chilli powder
2 Tablespoons chopped mint (20 leaves)
2 ½ Tablespoons chopped coriander leaves
1 Tablespoon Ghee (Clarified Butter)
5 large cloves of garlic, extra
1 ½ cubes MAGGI® Flavored Mutton Bouillon
2 cups water or 500 ml
2 tablespoons lemon juice
1 large onion sliced
1 Tablespoon vegetable oil

Preparation:

Please Check the Links below for an idea of how the Cabbage is prepared and is rolled:


1. Core the centre stalk of the cabbage, and blanch it in boiling water for 15 -20 minutes or until soft and pliable. It should look kind of semi transparent when done.Separate the leaves without much breaking. Leaves should be pliable, so that you can roll them easily without breaking up. If it hasn’t reached this stage, put the cabbage back to the sauce pan, cover and boilfor few more minutes until it reaches that stage. Then start separating the leaves until all leaves are removed. Once done, take each leaf and thinly slice the thicker part of the rib of each leaf to make it thinner. Else it will be difficult to roll. If you can separate the leaves without blanching, separate them and blanch.

2. Combine uncooked rice, meat, garlic, spices, mint, coriander and butter in a bowl. Mix well until well combined.

3. Place a heaping tablespoon of the filling almost in the middle of the leaf opposite side of the thick rib part, fold the sides over to cover the filling and roll the leaf up. Fold it tightly so that everything is intact. Repeat until all of the filling is used up.

4. Meanwhile, heat oil in a saucepan/casserole dish and sauté the onions till it turns completely soft. Arrange cabbage rolls tightly over these sautéed onions and sprinkle some garlic slices over. Arrange another layer over the first layer and sprinkle rest of garlic as well. The rolls should be placed next to each other without spaces in between for them to open loose in the cooking process.

5. Dissolve MAGGI Mutton/ Chicken Bouillon cubes with water, add lemon juice and pour over the rolls. Add enough water just above the rolls. Invert a heavy dinner plate over the rolls, so that the rolls stay intact and doesn’t float while cooking.

6. Cover and cook on medium heat for about 20-25 minutes and reduce the heat and cook for further 35 – 40 minutes, a total of about 45 minutes - 1 hour, or until rice is cooked. You may pick out a roll after 40-45 minutes for checking the doneness. Once rice is completely cooked, serve immediately. There will be a little sauce left in the pan. You may pour that sauce over the rolls if you wish.

Wednesday, 7 July 2010

Spicy Grilled Chicken


Last weekend sun was shining with all its glory, so we ended up having BBQ at our friends place. We had loads of fun with guys grilling meat, veggies and bun and ladies gossiping and eating them. Kids were just running around and playing without wasting their time eating. After all that grilling was done men sat down to watch the footie. Apart from all that hungama, food was just amazing. We had some kebabs and burgers; lamb chops and chicken wings marinated in a spicy marinade as mains. We very much loved the meal and among them, the lamb chops were outstanding. Here is the re-created version of that one in my kitchen, but using chicken instead of lamb. I would love to try it with lamb, but I am not sure if lamb would come out well in the oven. Well, has anyone tried grilling lamb pieces in the oven? Does it cook well? And how long would it take to get cooked, without using any tenderizer? Any suggestions are much appreciated. Let's get on the recipe, now. It's quite simple to prepare and tastes quite good as well.


Spicy Grilled Chicken
Serves 4

Ingredients:
2 Large leg portions (around 700g)

Marinade:
½ Tbsp fresh ginger puree
½ Tbsp fresh garlic puree
4 Tsp Kashmiri Chilli powder *
1-2 tsp Lime juice
½ tsp turmeric powder
Salt to taste
Few teaspoons of water
1-2 Tablespoon of oil
Lemon slices to serve.

Preparations:


1.Wash chicken thoroughly and drain in a colander to remove excess water. Make deep gashes on to fleshy parts of leg and thigh portions of chicken to penetrate the marinade through.

2. Mix all ingredients for the marinade with just enough water to make a smooth paste. Rub the marinade thoroughly all over the chicken and deep down the gashes. Sprinkle oil all over the chicken and lightly rub in.

3. Transfer it into a bowl, cover using a cling film or foil and chill it over night or for a minimum of 2 hours.

4. Bring the marinated chicken to room temperature before cooking and Preheat the oven 10 minutes prior to grilling. Place the chicken on foiled tray and grill on medium heat for around 35-40 minutes turning once or twice in between. I Grilled (at 3) one side for 15 minutes, flipped the chicken over and cooked the other side for another 15 minutes and flipped again to cook for some more time. To ensure that chicken is fully cooked, poke the chicken on several parts until you see clear juice oozing through the poked area. If not, cook it for some more time. Make sure you don’t over cook your chicken as it can become really dry. Chicken prepared can be baked or even fried in oil. But the results may vary slightly depending on how you do it. Grilling gives it a slight smoky flavour.

Squeeze plenty of lime juice while serving if preferred. This can be used as a side dish fo rchappathis, Indian naan breads or rice dishes.

Notes:

Instead of using chilli powder aby itself, you can use a mixture of paprika and Kashmiri chilli powder. Or if you want it real hot, use the regular chilli powder. Paprika gives it a real good colour and a milder heat. I used 3 tsp Kashmiri chilli powder and a teaspoon of paprika powder here.

Tuesday, 12 January 2010

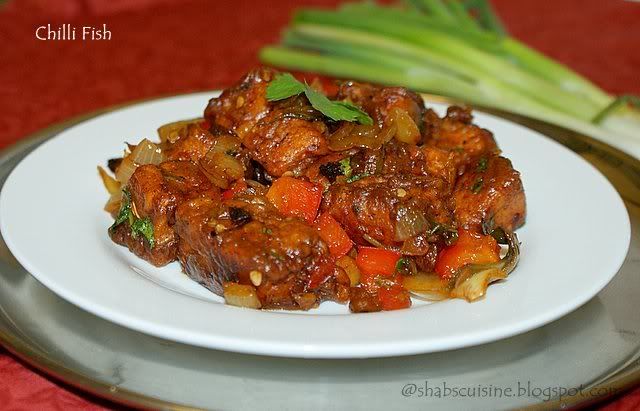
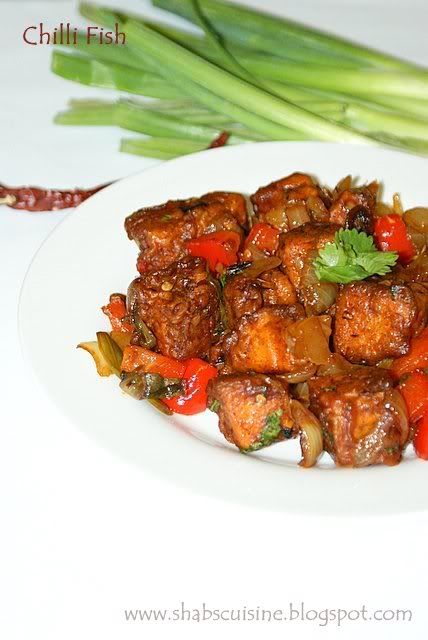
Chilli Fish


Chilli fish is one of my all time favourite food! I had it for the first time from the flight and fell in love with it on the spot. I desperately tried to re-create it few times at home and was a failure. It was then that I came across the chilli fish recipe posted by Varsha of Will-O’- the- wisp (www.varshaspaceblog.blogspot.com). Well, I just couldn’t resist to try her recipe and that’s it. My experiment has come to an end. To be frank, her recipe was better than the one I had from the flight and was so happy that I found it. Thanks to Varsha for posting such an amazing recipe. I followed her recipe as such and the outcome was just amazing. It had all the heat from the spices and green chillies and sauces and vinegar gave it a slight tang.

I have made this recipe twice ever since. I also tried the same with mushrooms. So, for the vegetarians, you may substitute mushrooms for the fish. They are really good, but personally, I loved the fish better. For some reason I am not a fan of the woody taste of mushrooms. I tried to like it, but I can’t! I only tried the dry version of this recipe. But if you want a gravy, just mix the required amount of corn flour and water as mentioned in the recipe and add it to the dish at the end.
For a note, you may use different fish for this recipe. But make sure the fish is fresh and good especially when it comes to fish like ‘King fish’ (neymeen, Aykoora). They smell very odd when they are kept in the freezer for long time. You may use frozen salmon, haddock etc with no problem, but make sure you use fresh fish when it comes to king fish. I once prepared chilli fish using frozen king fish and the dish turned out to be ‘Uneatable’ because of the nasty smell it had!


Chilli fish as a dry curry can be served as a starter, it is really yummy to munch. It can also be served as accompaniments for rotis, rice, chappathis, noodles etc when you have other curries around. If you are making the gravy version, it will blend well with Fried rice, chilli garlic fried rice, chappathis and even parattas. And you may omit or reduce the green chillies to reduce the heat. I just used 1 of them.

Ingredients:
260g Fillet of fish (salmon. Haddock etc)

To marinate:
2 tbsp Plain flour
2 tbsp corn flour
4 tbsp water
½ Tbsp pepper powder
½ tsp Kashmiri chilli powder/paprika
1 tsp minced ginger and garlic
A pinch of salt


Others:

Vegetable Oil to deep fry the fish
2-3 tsp sesame oil
2 whole Dried Kashmiri Red Chilli (Piriyan mulaku)
2 large cloves of garlic minced
1” ginger julienned (1 Tbsp)
1 ½ cups onion diced
1-5 green chillies split lengthwise (add more or reduce depending on your spice level)
½ of a capsicum diced
2-3 stalks of spring onion sliced thick
1 Tbsp hot Chilli sauce (I used Maggi)
¾ Tbsp Soy sauce
2 tsp tomato ketchup
1 tsp white vinegar
4 Tbsp water
2 tsp corn flour (Add only if making gravy)
1 cup water (Add only if making gravy)

Preparation:

1.Clean the fish thoroughly and drain on a kitchen towel. Cut them into small cubes, about an inch long. Make them as small as u can manage without breaking them.

2. Marinate the fish using the ingredients under ‘To marinate’ title.

3. Fill a frying pan with 2” height of oil and set the heat to medium. When the oil is hot enough, slowly add in the marinated fish pieces (fish pieces should be fully coated in the marinade) and fry till golden and crisp. You may shallow fry them as well with minimal oil. Drain on kitchen towel.

4. In another pan, heat sesame oil and add the crushed chilli flakes. Sauté for few seconds and throw in the minced garlic, ginger juliennes and diced onions. Cook for some time, sautéing occasionally, until the onion is transparent, slightly soft yet crisp.

5. Add bell pepper, spring onion and sauté for a minute. Add the sauces and 4 tbsp of water and mix well till blended.

6. Tip in the battered fish and slit green chillies and mix well until the fish is coated well with the sauces.

7. Add vinegar. Cover and cook on low heat for few minutes until all the flavour is infused and the sauce is all dried up. Chilli Fish prepared this way can be served as starters. If you are serving as gravy for Fried rice or rotis, mix corn flour with water and pour it in the chilli fish. Mix and cook for a while till gravy thicken.

Saturday, 18 July 2009

Meat Kibbeh Akras/ Kubbeh


Kibbeh or kubbeh is a meat and bulgur mixture stuffed with cooked meat and then deep fried in oil. This is one of the most famous Labanese dish that is normally served as a starter or an appetizer. I first came across this dish during one of many Iftar (breaking of fast during the month of Ramadan) feasts that was held in our University. I fell in love with it at the first bite itself. I still remember being shocked to see a meatball which has its outer cover and inner stuffing both made of minced meat. After that I had this a couple of times when we went to Lebanese Restaurants. Kibbeh used to be on top of my list. The university Iftar used to be really grand. We used to have a buffet with loads and loads of dishes, mostly Arabic.....The buffet had different kinds of Arabic salads such as tabbouleh, fatoush and many dips such as hummus, Muthabbal, Baba ghannouj; appetizers such as kibbeh, dolma (stuffed cabbage leaves, stuffed with a mixture of minced meat, rice, herbs and spices), Warak al einab (thats stuffed grape leaves), different kind of rices like kabsa, makboos, and not to mention : the heavenly desserts and pastries that includes Baklava and many many others. I never thought of making kibbeh at home, mainly because it was a new kind of dish and I never dealt with such a cooking process before. But it came out really good, the real taste that I was expecting and had in my memories and we loved it. We had it for dinner along with Pitta bread, salad and hummus and it was great. All courtesy goes to www.nestle-family.com. That's where I adapted this recipe from. The next day we were going out for a short break to Isle of Wight, so I packed the rest for the Brunch to take away with us. But I halved the amount mentioned in the original recipe, since I was experimenting. Here I have made it in the shape of rugby ball/oval, but you can make it into small patties or balls as you wish.


Ingredients:
3/4 cup,150g Bulgur wheat/cracked wheat, fine
250g minced meat
50g onion (1/2 of a medium onion)
12 mint leaves
1/2 tsp salt
1/2 tsp Balck pepper powder
1/4 tsp cinnamon powder
1/2 tsp cumin powder
For the Stuffing:
2 tbs vegetable/olive oil
100g, 1 medium size onion,chopped
250g minced meat
1/2 of maggi stock cube, crumbled
1/4 tsp garam masala
10 mint leaves
1 1/2 tbs almonds (blanched, peeled, chopped and toasted until golden), can use toasted pine nuts as well
1/4 tsp cumin powder
1/4 tsp cinnamon powder
2 green chilli chopped (Optional)
Vegetable oil for deep frying

Preparation:

1. Wash bulgar and drain then cover and set it aside for 1 hour.
2. Combine in a mixing bowl the prepared bulgar, minced beef, onion, mint, salt and spices. Place this mixture in a processor and process by adding just enough water (I added 10 tablespoons of water) to allow the mixture to come together and form into a coarse dough that can be shaped into balls.Cover and set in the fridge.
3. Meanwhile prepare the stuffing. For that, heat oil in a pan, add onion and cook until tender. Add the minced lamb and stir until cooked and brown in color. Add the crumbled MAGGI® chicken Bouillon cube, garam masala, almonds, mint and spices and stir to combine well and cook for a couple of minutes.
4. Divide the kibbeh dough into 12-13 balls.. With wet hands take a ball and form it into an oval shape, Just like the shape of an egg. Make a space (hole) in the center by pushing your finger through from one end.. Make a hole big enough so that a teaspoon can be inserted into it. this can be done by pushing the finger into the dough several times to make the space bigger.
5. Add a teaspoonful of stuffing (cooked mixture), close by pressing firmly.
6. Fry the kibbeh in hot deep oil until golden brown.
7. Serve hot with green salad and fresh yogurt.
Recipe Courtesy: www.nestle-family.com
Related Posts Plugin for WordPress, Blogger...