
I always had the passion to bake or cook something sweet, but the only thing that kept me away was, I was the only one with sweet tooth at home and my hubby either hates it or just eats in a very moderate amount leaving the whole chunk for me. But recently I discovered that my son loves cakes. I haven’t noticed his love for cakes until I baked one on his birthday. He kept asking for it and that was when I realised that Richu loves cakes. It was a chocolate Madeira sandwiched with another vanilla cake. It was good, but not that great though. So I baked another cake of chocolate flavour after that and it was taken from Divya’s breath taking blog which she took from Hersheys site. Her blog is full of baked goodies and this particular cake was showcased for few days which really caught my attention. I just thought I had to bake it and here you go. The cake was really moist and tasted yum. Well, it doesn’t look as neat and pretty as Divya’s. I am just a beginner in icing the cakes and I am not happy with the look of my icing here. Hopefully it will get better in time. I knew that cake was going to be a huge one, so I halved her recipe and baked it in a 6 inch pan which was perfect for our small family. Even then after icing was done, it was quite a big cake. You can view the original version of her recipe here.

My son had been pestering me from the moment he saw the cake batter being prepared and was really impatient to have them. So, as you see the cake was iced whilst warm and the icing in the centre got melted and got absorbed into the cake. So you cannot see the middle layer in the picture. That’s why it’s always advised to ice the cake when it’s completely cool:). The cake was an absolute beautiful one in all sense and tasted simply yum. And the icing is fantastic too. Very easy to put together and tasted great. Even my hubby who hates chocolate cake told me that the cake was real good.
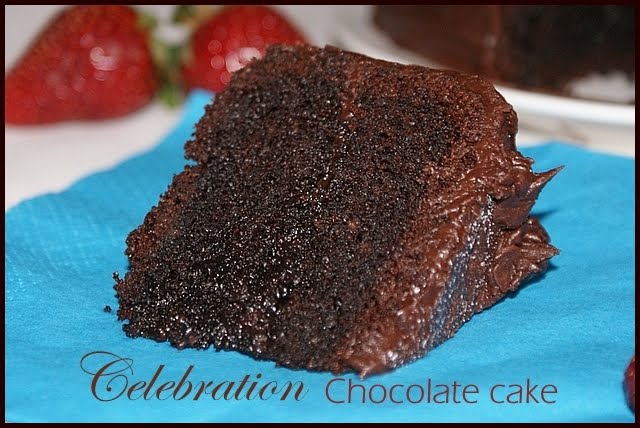
Celebration Chocolate Cake
Serves 7-8 people
Ingredients:
6 Tbsp Cocoa powder
½ cup boiling water
80g soft butter (not spread)*
1 cup caster sugar
2 large eggs
½ tsp vanilla essence
¾ cup All purpose flour (Maida)
¾ tsp baking soda
A pinch of salt
1/3 cup plus 1 tablespoon whole milk
2 Tbsp greek yogurt
Chocolate Butter Icing:
50g butter
1/3 cup (5 Tbsp) cocoa
1 ½ cup icing sugar
2 ½ - 3 Tbsp milk
Preparation:
1. Mix cocoa with boiling water and stir until smooth and free of lumps. Set aside to cool.
2. Beat butter and sugar until light and fluffy for around 2 minutes.
3. Add eggs, one at a time mixing well after each addition .
4. Add in vanilla and stir well. Add cocoa mixture beating well.
5. Sift flour, baking soda and salt 2-3 times. Add alternately with milk and sour cream to butter mixture, beating until blended.
6. Grease and line a 6 inch pan and pour this mixture in the pan. Keep the cake tin in a pre-heated oven of 180 degrees and bake until well risen and the cake springs back up when lightly pressed. Or to to check the doneness, insert a skewer in the centre and the skewer should come out clean without any crumbs clinging to it. I was hoping my oven was a fan assisted one, so baked it @170 degrees Celsius for 1 hour and 10 minutes and it came out perfect even though it took long time. But you can bake it at 180 degrees and bake till done.
For the Chocolate butter Icing:
Melt Butter and stir in cocoa powder. Add in powdered sugar and vanilla essence and mix till smooth. Add in enough milk to loosen the icing just enough to a spreading consistency mixture. If the icing becomes loose, add in some icing sugar and if it goes too stiff to spread, add in some milk. Make sure you sift the icing sugar and cocoa to avoid any nasty lumps.
For assembling:
Let the cake cool completely before frosting. Cut the cake horizontally into two using a serrated knife. Spread little icing and sandwich the cakes. Spread rest of the icing outside using a palette knife (Which I don’t have, so I used a regular one). After icing the cake, dip the knife in hot water and smooth the icing using the warm knife. Or you can use warm knife through out icing to get an even smoother finish.
Notes: * While using butter make sure that you don't use spread here for cooking as most spreads are not suitable for baking.


