Monday 28 September 2009

Neeru Dosa (Paper-thin Rice and Coconut Pancakes)

Few days back, I was all set to make Ottil pollichathu for dinner. Made some mixed vegetable curry first to go with it and had soaked some rice the previous night to make Ottil pollichathu. When I was about to make the batter, I noticed that there was no cooked rice in the fridge which I guessed there was! I have to do something to use up the soaked rice, and dint feel like cooking rice for this Ottil pollichathu, After all I make these to reduce my work...Thinking of what to cook, these Neeru Dosas from the Gulf News Cookery Book sparked in my brain. I have the habit of skimming through my recipe books very often and almost all the recipes have become quite familiar to me. Grabbed the book just praying there should not be any cooked rice and there you go - no cooked rice in Neeru Dosa. I was a bit worried to try these since it had no cooked rice and thought it would turn out hard. But it was softer than the normal Ottil pollichathuthat I make and is even easier.

Unlike Ottil pollichathu, Neeru Dosa has lot of freshly grated coconut in it which gave a lovely flavour and aroma to this Dosa. The batter was very thin and you need to swirl the pan rather than spreading the dosa with a spoon. These paper-thin dosas are served as an integral part of a curry dish with gravy. It was wonderfully soft and could go with most of vegetable curries and non-veg curries. But as u can see in most of my rice based dishes/pancakes I have used onion for a distinct flavour. A very small piece of onion gives a wonderful taste and we love it. The taste of onion doesn’t stand out there, but gives a beautiful flavour and a mild aroma.... Since I was making this dish for the first time, I din’t go for any experiment. I wanted to taste it the authentic way. But next time I make it, I will try adding a small piece of onion while grinding the batter. You may try it that way too.

We eat these kinds of dosa for breakfasts along with some vegetable curry and for dinner along with some non-veg curry. You can also make these dosas for dinner with vegetable curry, but for a strict non-veg like us, a fried piece of fish/fried Prawns/egg Omelet are some of the side dishes that I make while I make vegetable curry for dinner!!


Neeru Dosa: (Serves 6)
Recip Courtesy: Gulf News Cookery Book
Ingredients:
400 g/2 cups long grain rice (Pachari)
200g/2 cups grated coconut
1200 mls water
1 tsp salt or as required

Preparation:
1.Soak the rice for about 2 hours and grind it to fine paste, to make a pouring consistency using water. When the rice is well ground without any grainy feeling, add coconut and grind it well again until smooth or almost smooth.

2. To cook the dosa: In a non-stick pan, pour a ladleful of the batter and tilt the pan to form a thin even layer. Cook for just couple of minutes until the edges form crispy and starts to leave the sides. Since the dosa is paper thin, you don’t have to flip it over. Just cooking one side will do. Take it off without breaking using a flexible spatula. Repeat with all the batter and serve with any vegetarian, non-vegetarian or seafood curry. Here are few of the combinations for neeru dosa:
Green peas Curry in Coconut milk
Chemmeen Muringavaal curry
Malabar fish curry
Chemmeen Varattiyathu
King Prawn and Okra Curry
Chicken Chettinadu

Notes: This is the doubled amount than mentioned in the original recipe.

Saturday 26 September 2009

MeenPathiri (Steamed Rice Pancakes Filled with Rich Fish Masala)


HI friends, how are you all doing?...I have been quite busy these days with stuffs at home and house hunting for our next move and we just found it today! Jeez, we are moving again may be in October or November. This time I am going to post another authentic recipe from Malabar region of Kerala, South India.....Yes, it is my all time favourite Meen pathiri...I had this for the first time when I attended one of my husbands relative’s wedding party in Tellicherry. It was in a post-wedding party that I had these gorgeous, yummilicious meenpathiri. There were loads of different varieties of food, I can’t remember, but they were all finger-licking good!! And meen pathiri was one thing that I can’t forget.I think I just had a couple of these during that party due to my slow eating behaviour and couldn't have anything else..As I mentioned before, I am quite slow in eating and it is a pain when it comes to parties. There will be so much of food that we might need an extra stomach to stuff them in, and a slow-eater like me cant even eat peacefully. Those who attended the parties in kannur-tellicherry region would have experienced this treat for sure.

Coming to the recipe, meenpathiris are steamed pancakes filled with a spicy fish masala. The pancakes are enriched itself with freshly grated coconut, fennel and onions. The procedure is quite lengthy and time consuming, but the outcome and the taste is......my goodness, unbelievable. I am not a big fan of fish dishes, but certain fish recipes like Malabar fish biriyani and meen pathiris are an exception.....This is something that is normally made during parties or during Ramadan.

Meen Pathiri (serves 4-6)
Ingredients:
For the pathiri:
(Please refer to the Neypathal dough and options given there. You can prepare the dough in any of the method mentioned there. The amount is the same)
2 cups Parboiled rice (Puzhukkalari, best is Ponni rice, Long grain rice can be substituted)
1 ½ Tbs fennel seeds (Perumjeerakam)
1 ¾ cups grated coconut
1 ½ cups water
1 cup rice flour
Salt – As reqd

For frying fish:
600 gm (4 large piece) King fish
1 Tbs Kashmiri chilli powder
2 tsp coriander powder
½ tsp turmeric powder
½ tsp salt
2 Tbs water
6 Tbs oil

For the masala:3 Large onion (510 gm, 4 cups chopped)
5 large cloves of garlic (1 heaped Tbs, grated)
2 medium Tomatoes(150 gms, 1 cup chopped)
2 tsp Kashmiri Chilli Powder
3 tsp Coriander powder
½ tsp turmeric powder
1 tsp salt
1-1 ½ Tbsp Lime/lemon juice
2 twigs curry leaves, chopped
6-8 mint leaves, chopped
3 Tbs coriander leaves
4 Tbs water
½ tsp garam masala

For coconut paste:½ cup grated coconut
½ tsp fennel seeds (perumjeerakam)
2 shallots
4 Tbs (1/4 cup) water

Preparation:

1. Rub the fish with salt and lemon juice to get rid of the raw smell. Wash it thoroughly.

2. Make a thick paste of all the powders with water and marinate fish for about ½ hour -1 hour.

3. Make a smooth coconut paste by grinding the coconut, fennel, 2 shallots and water.

4. Heat a large frying pan and add oil. Fry the fish well. Remove from flame, remove the bones and break each piece into 4-6 portions. Keep them aside.

5. In the same pan, add onions and salt and sauté until it becomes soft and translucent. Add ginger, garlic and sauté for few minutes until the onion is cooked very well. Add chilli powder, coriander powder and turmeric powder and sauté for few seconds.

6. Add in the chopped tomatoes, cover and cook till the tomatoes are soft and cooked. Add the coconut paste and ¼ cup water (less or more as required to get a very thick, not dry and not watery gravy/masala). Cover and cook for 3-4 minutes until the raw smell of the coconut goes away. Add the chopped leaves, lime/lemon juice and garam masala and stir well, cook for a minute or two. Add the fish pieces, cover and cook on very low flame until all the flavour is infused well for about 8-10 minutes

For the making pathiris and assembling:
1. Soak the rice in tap water for 3-4 hours.

2. Grind it along with minimal water until you get a coarse and grainy mixture.

3. Add coconut, fennel seeds and roughly chopped onions to this and grind for few seconds until everything is just crushed and NOT smooth.

4. Tip the whole mixture in to a large bowl, add salt and mix well.

5. Add the rice powder and mix well using hands until you get dough that can be shaped into balls.

6. Take a small portion from the rice dough, make a ball and flatten it in a sheet (I used baking paper cut into square shape, u can use banana leaf or any other sheet made from shopper bag) using the heel of your palm. Add some masala in the centre along with the fish pieces, leaving a cm from the circumference.

7. Make another pathiri in another sheet the same way, a bit bigger than the previous one and cover the masala filled pathiri, covering the masalas completely. Slowly press the edges using the fingers to seal all the fish masala in. Carefully lift the sheet/banana leaf and place it in a steamer. Steam cook for about 10-12 minutes or until the pathiri is firm. Hold all the edges of the banana leaf/baking paper and lift out the meenPathiris. (Beware steam getting into hands!)

8. Repeat the same process until all the masalas and the rice are used up.

Now comes the awards!!
Aruna of Ensamayal kuripukal has Given me few sets of Awards and has also tagged me. I have been tagged before as well, So please view them here. Thank you Aruna.
Priya of Ensamaiyal and Sarah of vazhayila has also passed on the following beautiful awards for me. Thank you ladies...


I would like to pass the above awards and tags to all my friends out there. Please feel free to accept it and post it in your blog.

Sunday 20 September 2009

Aromatic Rice Pulao - My 100th Post!

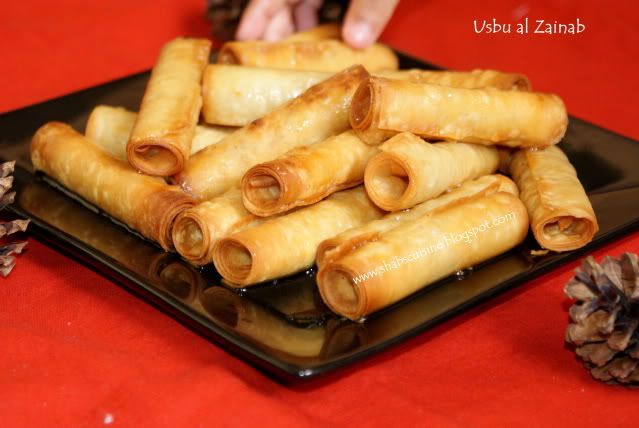
A warm Eid wishes to all of my dear readers out there. This time it’s one of my special posts, it being my 100th post! I have been waiting for sometime to hit the ‘Century’ and finally I did! Hurray!! I thought I would make this special post during Eid itself. If anyone out there doesn’t know what Eid is, it is a day of celebration for Muslims that comes after a whole month of fasting. It is something like X’mas for Christians. We celebrate Eid by making special dishes and visiting the families and friends. If in Malabar region, right after the Eid Prayer, there would be a light snack and tea. Then the real spread is the lunch which would consist of mainly
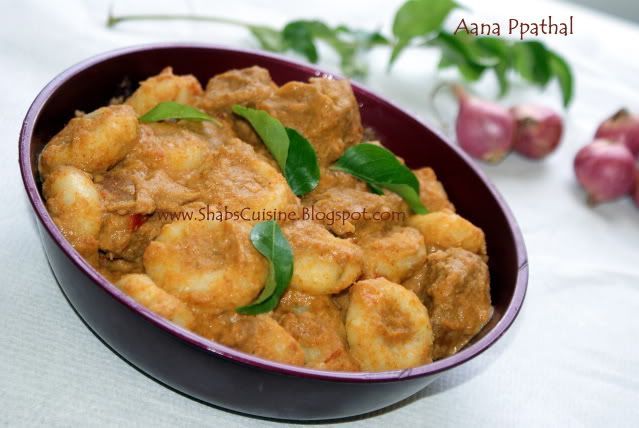
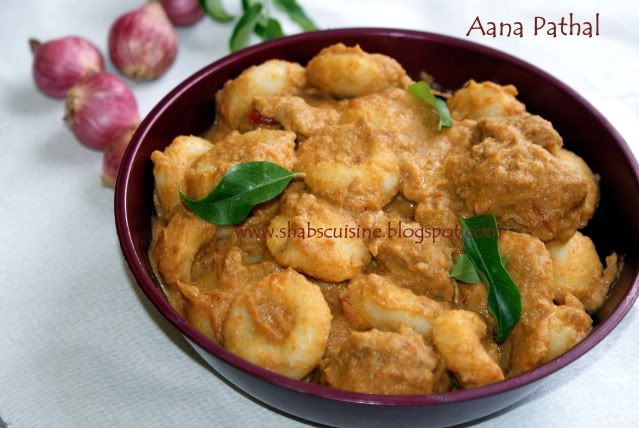
 Alisa for starter, Mutton biriyani with chicken fries, salads and Raita for main dish and something for dessert - it can be anything from a single custard and fruits etc to the very elaborate Godambu payasam, sometimes known as Musaara varakiyathu or Chakkara Chhoru and kaaykkari. This is a time that I would be missing being with my family because my mom makes the best of the above mentioned payasams and biriyani. How much I would be missing those...Sigh! Whenever I go to visit her, this is the only payasam that I ask her to make it for me. Well, I haven’t tried making it by myself after all. My fave being the Musaara varakiyathu/Chakkara Chhoru is made of ground wheat and coconut milk and cooked Channa dal sweetened with sugar or Jaggery. Kaaykkari is another wheat payasam made of whole wheat with coconut milk and chopped plantains are added to it for an extra bite. My god, I am already salivating. These are traditional payasam made in Malabar Muslim houses during festive occasions.

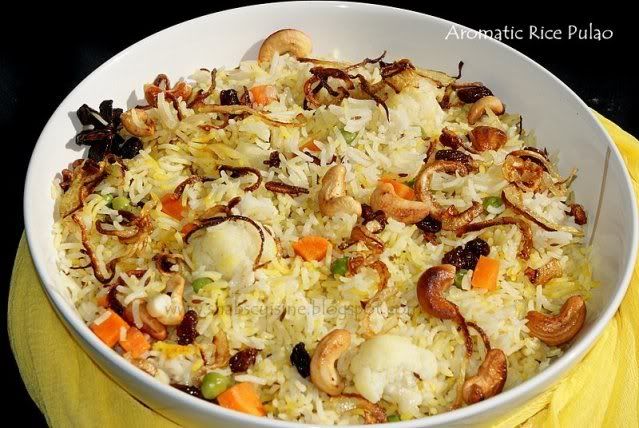
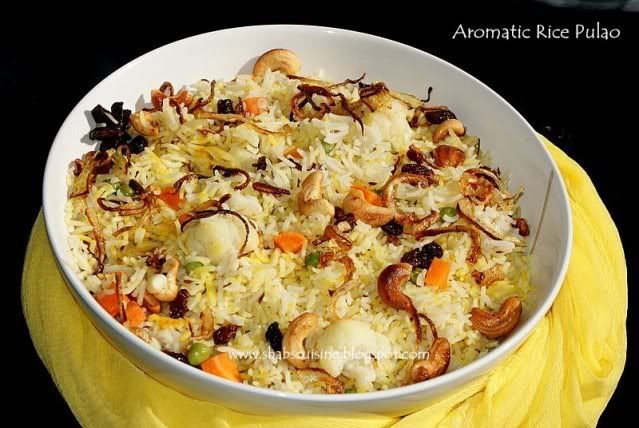
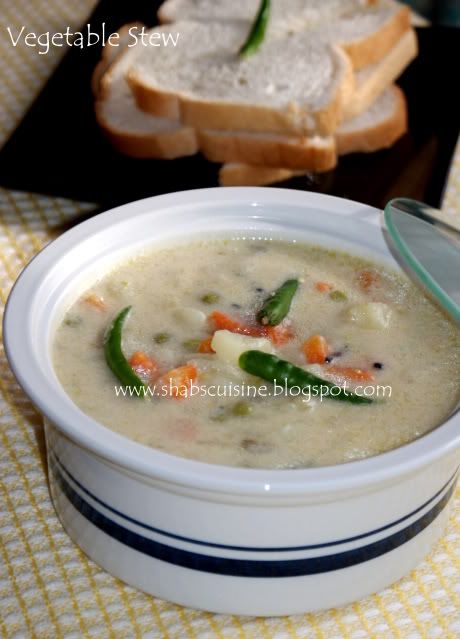
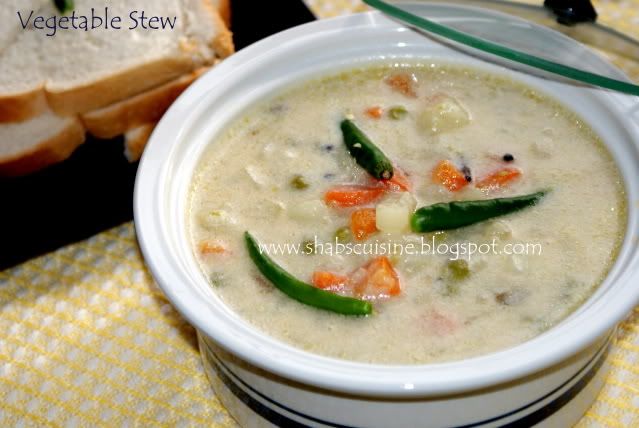
This time I am going to post a recipe for very flavourful rice as the name indicates. The recipe is adapted from the ‘Gulf News’ cookbook that my uncle brought for me long ago, as old as 12 years. The book has so many mouth watering dishes with stunning pictures in it. This particular rice has caught my attention ever since I saw it in that book. Especially during Ramadan when we don’t eat anything during the day, any food or food picture no matter if it is appealing to the eyes or not, we will crave for them. And this is such a dish that I had craving for and made it. As the name sounds, it was really aromatic, perfectly cooked and tasted really fantastic. This is not the only Pulao that I make, but this is the easier one with less chopping of vegetables involved and lesser spices and masala. Unlike the biriyani, this tasted great on the first day rather than next day. Hope you will enjoy as much as we did.
The book also mentiones that the key to making superb rice pulao is to gather all the many ingredients together first. Therefore making it is very straight forward and always deliciously worthwhile. Enjoy your Eid!
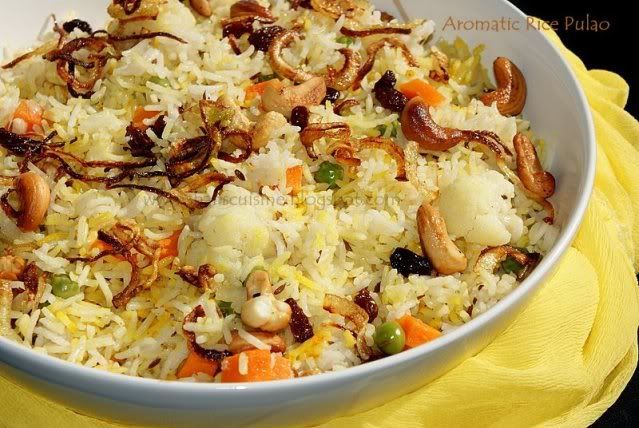
Recipe Courtesy: Gulf News Cookbook
Aromatic Rice Pulao/Pilaff/Pulav (Serves 4-6)
Ingredients:
2 ½ cups/500 g Basmati rice
3 ¾ cups chicken stock (I used 1 ½ magi chicken stock cubes and just a bit of salt)
4 Tbs vegetable oil
2 Tbs clarified butter/ghee
½ cup chopped onion (1/2 of a large onion)
1 cm / ½ inch ginger
Salt to taste
Spices:
1 bay leaf
2 star anise
5 cardamoms
4 small pieces of cinnamon sticks
7 cloves
1 – 1½ tsp cumin seeds
Few drops of yellow food colouring (I used ½ tsp turmeric powder in little water and sprinkled on top)
Vegetables:
100g /1 large/ Carrot cut into small cubes (1/2 cupful)
100 g/ 4 large florets Cauliflower, cut into medium size pieces
70g / ½ cup frozen green peas
For Garnish:
½ cup-1 cup sliced onion
¼ cup / 30g Dry nuts (Cashew, pistachio, almonds etc or a mix of all)
2 Tbs / 25g raisins

Preparation:
1. Wash the rice several times and soak for an hour to lengthen the grains during cooking.
2. Heat a large saucepan, add oil+ghee, fry the onions for garnishing until golden, drain and keep them aside. In the same oil, add cashew and fry until golden. Take them out too. Again, in the same oil add raisins and sauté just until it puffs up. Keep it along with nuts and onion.
3. In the same oil add all the spices and sauté just for few seconds if on high flame. Take care not to burn the spices, else the whole rice will go bitter. Add onion and ginger and sauté until the onion is soft.
4. Add the reserved rice and sauté for 2 minutes to cover the rice with the flavours of the pan.
5. Add the vegetables and sauté for further 2 minutes.
6. Mix the stock cubes in boiling water and add it to the pan. Stir for a couple of minutes and adjust salt if needed. Since the cube is quite salty, adding just a little salt would be enough.
7. When the water starts boiling, cover and cook on low flame for about 20 minutes or until the rice is well cooked. Stir once in between to allow uniform cooking.

Note: You can use ghee completely instead of using oil, or u can just oil. Use the vegetables you have in hand like mushrooms, corns, beans etc...These are the only ones I had in hand! You can also use more nuts and dry fruits in the rice. I would definitely be adding more raisins because I like the little sweet taste in between the deliciously flavoured rice. The recipe also asks for adding 1 tsp saffron mixed in milk for colour and 2 tsp of rose water/kewra water. I dint add both, since I dint have saffron and I am not sure if I would like the taste of rose water in my Rice. But as the recipe indicates, it was really aromatic and yummy!

Monday 14 September 2009

Usbu al Zainab (Zainab's fingers)

Before going to the recipe and my blah-blah, I would like to Thank Mr. Pratheesh for giving me a wonderful opportunity to include my little blog here and a couple of my recipes in his recently published article in a Malayalam magazine called ‘Snehitha’. Mr. Pratheesh is the presenter of the cookery show ‘Taste Time’ that appears in Surya TV and a Serial artist. You can find many of his program episodes in youtube. His article was based on the cookery blog sites which comprises few other blogs including mine. You can find few details online as well. It is the latest Onam edition. I am sad I don’t get to buy the magazine here, but have asked my relatives to get a bunch for me:). I also would like to thank my sweet friend Dhanya for letting me know about this. Thanks to you both. I also thank my family, my friends and all my readers for giving me lot of inspiration and encouragement.


I am reposting this old post of mine with new snaps. Since it is Ramadan it would be a reminder as well, if anyone’s wants to try it out. I believe food should be presented well enough to be appealing to the eyes as well as mouth. As I was unhappy with the old pictures of Usbu al Zainab, I thought I would replace them and repost them again.

Coming to the recipe, Usbu al zainab is a common evening snack made especially during Ramadan. I learned it from my Arab friends back in hostel and this snack always takes my memory back to the hostel days and the time I spent there. The food prepared in the hostel mess wasn’t very good everytime, so we always prepared our own food in our flat. And Ramadan was the only time when such snacks were made. Usbu al zainab is a crispy cheese roll made with tiny bits of cheese rolled in samosa pastry then deep fried in oil and served with sugar syrup. Since I loved the recipe so much, I started making it at home when I used to be with parents, addicting everyone to this snack.


Now, this has become one of the regular snacks made during iftar here as well. It is easy to make and tastes really amazing. You won’t imagine (even I din’t initially) such a simple snack could really work magic. I have been trying to avoid all the fried snacks during Ramadan. But I made this one few days back, because my husband has been reminding me of this snack quite a few times. So made quite a huge pile of it, and it got over in a matter of no time!!! Not only my husband, but also my little one was hogging on it like crazy..Then I realised that it was the first time my little one was having this. During the last Ramadan he was too young to eat something as crispy as Usbu al zainab. And this time I made it, he kept on munching on it and was all smeared in sugar syrup. Somehow I got to capture some shots by engaging him with something else, still you could see him picking from the stack, as always! I don’t know if it happens to everyone with little kids, that when ever you set up a platter to capture a picture, your little one wants to grab something from it and only it! It aaaaaaaaallllllllways happens here and sometimes, I just give up without taking snaps and waiting for another chance!!


N.B: The measurement given here are just appropriate, u may make more or less, use more cheese or less or no cheese at all, and all tastes great. I always used triangle cheese, but u may substitute with any other cream cheese.

Ingredients :
Rectangular samosa pastry - around 24 pieces (thawed)
cheese triangles – 4

For sealing the pastry:
plain flour - 2 tbs
water – 4-5 Tbs

For syrup:
Sugar - 1/3 cup
water - 1/3 cup
cardamom - 3 nos.
lime/lemon juice - 1 tbs
Oil - for deep frying the rolls

Preparation:


1. For preparing the sealing, mix well the flour and water until u get a thick paste. This mixture is used to seal the edges of the pastry after rolling. Keep them aside.

2. Place a small piece of cheese in the tip of the short end, leaving a cm form the egde. Follow picture instructions.

3. Seal the cheese completely by folding the edges. Then roll the pastry until the edge. When it reaches the end, spread a very thin coating of the flour and water mix to the tip of the pastry and seal the edges. With one cheese triangle you should be able to make around 6-7 rolls. Repeat the same process with all the samosa pastry sheets.

4. Fill a frying pan half way with oil and set the flame to medium. Put few rolls at a time. when it turns golden on one side, turn it over until other side also turns golden. At this stage, sometimes, if the cheese is not completely covered in, the cheese inside will start to melt and ooze out in the oil. This will start crackling and oil will start spluttering a bit. So be careful to use long handed spoon or tongs for this. And as soon as this happens, remove the rolls from the oil and place them on kitchen towel to drain extra oil. NEVER USE A SPOON WITH SMALL HANDLE.

5. Preparing syrup: Heat a saucepan and add water and sugar. Let it simmer gently for about 10 minutes until thick and syrupy. DON’T stir the mixture using spoon, just swirl the pan, incase necessary. Add crushed cardamom and lemon/lime juice, boil for a minute turn the flame off. Set aside to cool.

6. Serve the rolls on a serving plate and sprinkle the syrup all over. The rolls remain crispy for very very long time even after pouring the syrup over!! I dont know how.

N.B. You can prepare as many number you want, and If you want to avoid cheese, that works very well too. Last time when I made these, I ran out of cheese for the last couple of samosa pastry and I just made them without cheese. And they were equally yummy. SO you may try out that way as well.

Friday 11 September 2009

Vegetable Stew


Vegetable Stew is one of the curries that I started making during my budding stage of cooking as it is one of the easiest curries anyone could make in no time. Whenever I make Appams, paalappam or vellayappam, this is the first curry that comes to my mind. It is so easy to make and tastes really good. The first time I made this curry, I had wondered how this curry could come out good when there is not even a single powdered spice in it! But I gave it a try because i have heard this is the best comination with Appams. And just to my surprise, it came out so well. It is the whole spices sautéed in oil that gives this curry the entire flavour. This is a very mild curry with no heat at all. So if you want to add some heat, add a couple of slit green chillies along with the spices.


Vegetable stew:
Ingredients:
Vegetables:
4 medium size potatoes diced (2 ½ cups, ~500 g)
1 medium carrot dices (1/2 cup, 100 g)
1 onion sliced (1 ¼ cup, 175g)
½ cup frozen green peas (70 g)
Whole spices:
4 cardamoms
5 cloves
3 small pieces of cinnamon sticks
½- ¾ tsp pepper corns
Others:
2 cups thin coconut milk (500 ml)
¾ cup thick coconut milk
2-3 Tbs oil (vegetable or coconut)
salt- as required


Preparation:
1.Heat a saucepan, add oil and add the whole spices. When the aroma comes, add the chopped vegetables and sauté for 5 minutes stirring occasionally.
2. Add the thin coconut milk, cover and cook until the vegetables are well cooked, soft and start to breakdown. Add salt and adjust taste.
3. Add thick coconut milk and just boil once until all the flavours blen well.
This goes very well with appam. It can be had wth bread as well.

Recipe adpated from Lakshmi Nair.

Notes:
1. For the coconut milk, I normally use the maggi coconut milk powder. But I have also used fresh coconut, dessicated coconut to extract coconut milk. In this recipe, for thin milk, I have used 4 tbs of coconut milk powder for 500 mls of warm water. And 4 tbs of milk mixed with 3/4 cup of warm water to give 3/4 cup coconut milk. You may reduce or add more as required.
2. I always used the vegetables that I had in hand for this curry. I have used the combination of potatoes with cauliflower, potatoes and carrots and beans and even made just using potatoes. And everything tastes equally good. So throw in the vegetables u have in hand and prepare it.

Now comes The awards. This time I received 3 awards from my fellow bloggers. Thanks alot guys for the appreciation and the inspiration you give me.

1. Parita had passed me the 360 degree Foodie award. Thank you Parita. I am honoured.


2. vidhas has also passed me the following awards. Thank you so much Vidhas.


3. Aysha has given me the following Awards along with the 360 Degree award. Thank you so much aysha.


I Would like to pass the above awards to the following amazing bloggers:

Zoyah.

Tina

En Samaiyal

Pavithra

Dil se

Amma's AdukkalaPublish Post


Friday 4 September 2009

Aana pathal/ Kozhi Pidi (Steamed Rice Dumplings in Rich Coconut and Beef Gravy)


AanaPathal (N.B: First of all, it is not aana which means elephant, but it is pronounced as 'na' as in naanam, naanayam etc.)/ Kozhippidi is one of the exotic food hailing from the Great Malabar coast. These are small rice dumplings that are steam cooked and then added to rich gravy that are mainly meat/poultry based. I think great recipes as these are dying now since the process is quite long and takes very long time to prepare. In this era of mechanical life and metropolitan life style who would ever bother spending 3-4 hours just cooking a dinner or a lunch for the sake of eating? No way! These kind of rich dishes are mainly made for the time of Ramadan where you cook just one meal a day; and you need something that you would love to nibble on rather than a quick fix or a takeaway. After all it’s just once a day that you eat, apart from the Suhur (Pre-dawn meal). So it should be satisfying as well. I am not a great savoury person as such, but during Ramadan I always prepare something savoury that I don’t make usually and aanapathal is such a dish. I am not happy by the span of time aanapathal takes to prepare, especially with a little one who clings on to me whenever I step into kitchen. He wants to see everything that I do. So it took me more time than expected. But, to keep him busy, I just sat him on the worktop, gave him a small ball from the dough for him to play with. He was also trying to make the pidis like me, rolling the dough with hand and then pressing it using his cute little finger to make the depression.
N.B:
One of my readers just mentioned that they call these UnniPathal in thalassery. I think when we use meat in the recipe it is called irachi pidi/erachi pidi...and when we use chicken it is called kozhi Pidi where kozhi is chicken:)


I think it is important to make pidis quite small because the gravy gets coated well on the individual dumplings rather than the bigger ones. And apart from that, the smaller one looks CUTE! We used to help mom to make these dumpling and when it gets larger, she re-do them saying they won’t look good! Here, I make them slightly bigger to finish up the work faster..

I made this stuff only twice just because my husband is not a big fan of Rice-meat combination. Even then he liked it very much when I prepared it. You may substitute chicken or lamb with the beef. My favourite has always been beef, because that’s how my mom prepared it always. When I cooked this for the first time, the pidi did not come out good. It dint get cooked!!!And it would never get cooked as well just because I used the wrong rice for this. And we ended up having something else with the gravy. So choosing the right rice is crucial for this recipe. I had tough time getting the right rice for this kind of dish, due to my lack of knowledge in rice and you can’t believe there are so many kind of rice that looks so similar even the experts might get a bit confused. Again the dough for the Pidis (rice dumplings) are prepared in the same way I prepared
Neypathal. You can see the methods I followed there and prepare this pidi as mentioned there. Anyways, if you are someone who loves tasty food, I would recommend you to try this one. Yes, It is so good.
Ingredients:
For the Pidi:
2 cups long grain rice (Pachari)
1/2 cup water
1 1/2 cup freshly grated coconut
2 tspful fennel seeds (Perumjeerakam)
1 large onion (175g), roughly chopped
3/4 Tbs salt
1/2 cup +2 tbs Rice flour


For the gravy:

800 g Beef cut in cubes (Can use chicken or mutton)
3 tsp Kashmiri Chilli powder
4 tsp Coriander powder
1/2 tsp turmeric
1/2 tsp Garam masala powder
250 g onion, chopped
30 g (1 heaped Tbs) grated ginger
6 large cloves (2 Tbs) of grated garlic
200g (1 cup) chopped tomato
1 cup water
1-2 tbs oil

For making coconut paste:
2 tbs oil
1 1/4 - 1 1/2 cups Grated coconut (fresh or desiccated)
2 Tsp rice
1 tsp fennel seeds
4 cardamoms
4 cloves
2-3 small pieces of cinnamon sticks
2 cups water
Preparation:

A. For making the pidis:


1. Soak the rice in tap water for 3-4 hours.(Soak for longer time if using parboiled rice).


2. Grind it along with minimal water until you get a coarse and grainy mixture


3. Add coconut, fennel seeds and roughly chopped onions to this and grind for few seconds until everything is just crushed and NOT smooth.


4. Tip the whole mixture in to a large bowl, add salt and mix well.


5. Add the rice powder and mix well using hands until you get a dough that can be shaped into balls.


6. Now, rub your palms and fingers using oil. Take a very small portion of the dough, roll it into rounds and gently press in the middle to make a depression. The size of these pellets should be as small as coin of 1 1/2 " diameter (appx)


7. Oil the steamer and arrange these pellets directly in it in after pressing in a slanting position adjacent to each other.

8. Steam cook for 8-10 minutes until done. The soft rice dough will harden once fully cooked.


For making the coconut Paste:


1. Heat a large frying pan, add oil. Add rice, cardamom, cloves and cinnamon and sauté until the aroma comes and rice puff up little. It will take just few seconds or under a minute depending on the heat and saucepan used.

2. Add fennel seeds and coconut and sauté until the coconut starts taking golden colour.

3. Grind all into a smooth paste by adding the required amount of water, I added 2 cups (480 mls).

For making the Gravy:

1. Heat a pressure cooker, add oil. When hot, Add onions and salt and sauté till it starts turning golden. Don’t brown. Add ginger and garlic and saute till raw smell fades.


2. Add the chopped tomatoes, cover and cook for few minutes until everything is well combined.Add chilli powder, coriander powder and turmeric powder and sauté for few seconds.

3. Add beef and stir well. Add a cup of water and pressure cook till meat is cooked and oil clears from sides. Add the ground coconut mixture, curry leaves and garam masala to this and bring to boil stirring well. Cook for a couple of minutes more.


4. Add the cooked pidi into this one, stir well and cook in very low flame for 5 minutes. Take it off the flame. By this time, the gravy will be very thick coating all the pidis.


The sequence I followed:

1. I made the rice dough ready for making pidis. I then kept them aside.

2. Then I started off with the gravy.


3. When the gravy was being done, I shaped the pidis and cooked them.


4. After the pidi's were done, I sautéed the coconut and ground them and then added them to the curry.


5. Later added pidi to curry.

Notes:
1. The process is quite lengthy, but the gravy can be made a day ahead and then the pidis the next day.


2. If you are not using water while grinding, you don’t have to use the rice powder. So increase the amount of rice to 2 ½ - 3 cups.

3. As I mentioned in
Neypathal, this pidis can also be made from rice powder, parboiled rice etc. The dough is exactly the same, but for aanapathal we steam the rice where as in Neypathal we fry them. If using parboiled rice, try to get PONNI rice. It works well for this. Please see how I made the dough for Neypathal . Because the dough is the same.


4. Before making the pidi, try by grinding little rice and steaming it. If it gets cooked in less than 10 minutes, then that rice should work fine for this recipe. I had to waste whole lot of the rice dough the first time I made it, because as I told you, the rice wasn't the right one.

5. You can add few greenchillies if the curry is not spicy enough. Since my Kashmiri Chilli (Melam Brand) is quite hot, I dint use any Green chillies in the gravy.


Before I go, Here comes another award from my beautiful friends Sushma Mallya and Faiza Ali has passed on to me the beautiful Honest scrap Award. Thank you sweeties.


Requirements of the award:-I must thank the person who gave me the award and list their blog and link it .
I must list 10 honest things about myself .
I must put a copy of Honest Scrap logo on my blog .
I must select atleast 7 other worthy bloggers and list their links.
I must notify the bloggers of the award and hopefully they will follow the above three requirements also.
I will try to be honest while writing honest things about me:)
1. I love little kids and babies. They are so adorable and cute! Probably they would hate me because I always squeeze them.
2. I love cooking a lot and trying out new recipes, a recently discovered obsession. I also love love anything that is food related ;crockeries, cookery shows, cookery books and foodies too!
3. I am a computer/Internet addict. I Can spend hours sitting on it and browsing.
4. I used to be an athletic/ sports person during my school days and now I am a lazy home-maker.
5. I have the worst habit of munching on something every time.
6. I am very slow at eating, which I find it very difficult especially during Parties and weddings.
7. I talk a lot, and sometimes I hate it.
8. Love sweets and chocolates. If those things don’t make me fat, I can live on them without having anything else.
9. Love to cook for the ones I love and love to please them with good, comforting food. I love it when my dad comes into the kitchen looking for sweets; he knows that if I am there at home, there would be some sweet goodies around. He loves my Gulab Jamun, Saba's Cheesecake and the biscuit caramel pudding alot. He’s got such a sweet tooth, goodness!.....Now you know where I got my sweet tooth from!
10. And for the last one, I am a Libra-Scorpio Cusp!
I would like to pass on this award to the following Honest Bloggers:


Related Posts Plugin for WordPress, Blogger...