 I got this fabulous and yummy recipe from Maria of Mariasmenu and followed the recipe as such according to the amount of the prawns used. It always came out delicious and we loved it! It can be used as a side dish with fried rice,noodles etc.
Friday, 27 June 2008
Chilli Prawns
 I got this fabulous and yummy recipe from Maria of Mariasmenu and followed the recipe as such according to the amount of the prawns used. It always came out delicious and we loved it! It can be used as a side dish with fried rice,noodles etc.
Tuesday, 24 June 2008
Pasta with Mustard Sauce and Stir-fried Chicken

2 large or 500 grams - Chicken fillet
3 tbs Soya sauce
6 large cloves of garlic
½ cup Spring onions (green part)
1 tsp black pepper powder
2 tbs olive oil
Salt – as required
For the mustard sauce:
2 tbs butter + a dash of oil
2 tbs flour
2 cups or 1/2 litre milk
1 chicken stock cube
½ tsp black pepper powder
Preparation :
Friday, 20 June 2008
Chicken Cobbler
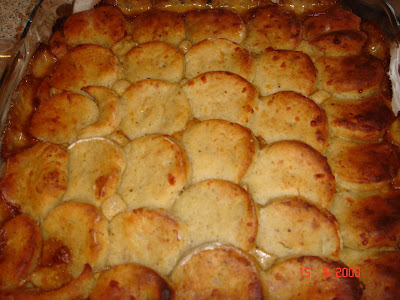
 Chicken cobbler - I dont know how this dish got its name and dont know which country this dish belongs to!. Anyway, I was very much attracted by its name and its appealing look. I came across this very unsual recipe quite sometime back and I make this when I feel like eating something different from the usual spiced up Indian dishes. Chicken cobbler has creamy chicken and vegetable gravy lightly seasoned with salt,pepper and mustard paste and topped with flaky and golden scones or cobbler.
Ingredients:
1 medium onion, 1 medium potato,1 medium carrot
2 leek
2 chicken fillets cut into strips
6-8 Spring onion
1 tsp - Mustard paste
150 mls Cream
1 cup Chicken stock
1 tsp + ½ tsp - Black pepper
Salt as required
2 cup Plain flour + 1 tbs
1 tbs Baking powder
2 tbs + 5 tbs Butter (cold)
1 cup grated cheddar cheese
Preparation :
To make sauce:
1. Cut carrot and potatoes into small cubes. In 2 tbs of butter, sauté carrot and potato until they are almost cooked .Take them out and keep them aside.
2. In the same pan, add thinly chopped onion and sauté until pink. (Add a dash of oil if needed.) At this stage, add chicken strips and sauté until half done. Add leeks chopped thickly to the chicken and cook until the chicken is golden brown in color. Add one tbs of plain flour and sauté for a minute. Add the sauted carrots and potatoes back to the pan containing chicken.Now add 1 cup of chicken stock and mustard paste and cook for some more time. Add cream and spring onion and cook for 2 more minutes. Add 1 tsp pepper and salt to season. Mix well.
To make cobbler:
1. Sieve flour. Add salt and baking powder to it and mix well until well combined.
2. To this add 4 tbs of butter and mix well until they look like breadcrumbs. Add cheese and pepper and mix well again. Add enough water to make dough that’s quite soft (as that of chapatti dough). You should be able to roll it out and cut shapes out of it.
3. Take half of the dough and roll it into a thickness of about 1.5 cm and cut out several round shapes out of it
4. Take a baking dish and pour the chicken sauce. Level it using the spoon. Now arrange the round shaped cut dough in a way that each circle overlaps the next one. Continue repeating the process until the whole sauce is covered with the cobbler.See the picture below..
 5. Bake it in a preheated oven at 190°C for about 25-30 minutes or until the cobbler (the top) is golden brown colour. Serve it hot with steamed broccoli or any other vegetables.
Wednesday, 18 June 2008
Chocolate cake with Chocolate Wipped Cream filling and Ganache Topping
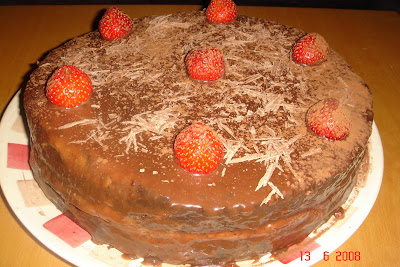
 I always wanted to bake a moist and excellent chocolate cake but always I ended up in disaster. I sometimes wonder how things can go so wrong when you follow the recipe as such. I have tried another chocolate cake before and I should say that it was so bad that I had to throw out the whole stuff. And thought, I wouldn't try them again. But recenlty I saw this cookery show on TV in which the chef baked a chocolate cake. I got so tempted that I baked the cake next day itself. It came out so good, it just melts in mouth. I have chosen to layer the cake with chocolate whipped cream and top it with a gooey ganache that took from JoyofBaking. If you want to read more on ganache you can see it here.
I love the light bitterness of the dark chocolate. And since quite lot of cocoa powder is used to make this cake , it's slightly, very slightly bitter. But if you are the kind of person who love dark chocolate, you are gonna love this. Else you can reduce the amount of cocoa used. Believe me, its amazing.
 Ingredients:
 For the cake:
1 ¾ cup - Plain flour
¾ cup/175 gm Butter at room temperature
2 - large Eggs
¾ cup – Sugar
½ cup cocoa powder
4 tsp Baking Powder
1 tsp Baking Soda
1 tsp Vanilla Essence
1 ½ cup milk
A pinch of salt
For the Moistening Syrup :6 tbs sugar
10 tbs water
Preparation:
For the cake:
1. Preheat the oven to 180°C/ Gas Mark 4/ 350° F.
2. In a large bowl, put butter and sugar and beat well using blender or whisk until creamy.
3. Add vanilla essence and beat again. After that add 1 egg at a time, beating well after each addition.
4. Sift flour 2-3 times. Add cocoa powder, baking powder, salt and baking soda to the flour and mix well until all ingredients are evenly distributed.
5. Add this dry mixture to the egg mixture in 2-3 batches and mix well. Add milk and mix well with spoon until you get a smooth velvety batter.
6. Grease a 9’’ baking pan and bake it for about 40-45 minutes or until a skewer comes out clean when inserted. This way you can make sure the cake is cooked.
7. Cool the cake completely by placing it on the wire rack.
Assembling the Cake:
Tuesday, 10 June 2008
Orange and raisin cookies (makes around 20)

I found this particular yummy recipe on the raisin packet that I bought from store. The dough was a bit sticky and soft compared to the normal cookie dough. So while making the cookie, I rubbed a little oil in my hands, so that the dough wont stick to my hand. It was worth a try. The cookie was wonderfully delicious with a light orange flavour and orange smell with chewy raisins in between.
Ingredients:
150 gm (5 oz) plain flour
100g (40z) castor sugar
100 (4oz) butter, softened
1 medium egg, lightly beaten
1/4 tsp salt
½ tsp vanilla essence/orange essence
100 gm seedless raisins
1 tablespoon grated orange zest
Preparation:
1. Pre-heat oven to 190° C/375° F/ gas mark 5 and grease three baking sheets.
2. Place all the ingredients except orange rind and raisins,into a large bowl and mix well with a wooden spoon.
3. Stir in the raisin and orange rind.
4. Take a dessertspoonful of the mixture, place into palm and press with the fingers to shape it into rounds of around half cm thickness and place it in the baking sheet leaving 2 inches apart.
5. Bake it for 15-17 minutes or until the cookies are golden brown.
6. Remove from the baking sheet and cool it on a wire rack.
N.B: While taking the orange Zest, take care not to take the white sheath that comes under the zest, because it can turn the cookie really bitter and ruin the taste. And you can always scrape of the orange zest before making juice and reserve it by freezing it for any later use.


