Monday, 28 March 2011

Some 'Likes' Please!

Hello there,
This post is nothing related to food. It's a bout a photography competition held by perizia where my following pictures are selected. The selection for the final round is based on the number of 'likes' you give on each photo. You would have guessed it now. Yes, I am in need of some ' likes' as i posted my pictures way late in the competition. If you  liked my pictures, pls go to their contest page, 'like' the contest page and 'like' my picture (s) if you liked them. - Snowbound britain, melting moments and mother nature are my photoes. Hope You liked them. Popular pictures (One with the maximum number of 'likes' qualifies it to final seven).Pls 'like ' my pictures on Perizia contest page! You wud have 2 click 'like' on perizia contest page 1st. 

Updated: Deadline for accepting 'likes' is on 2nd April. Please hurry up friends. 


1. Click 'like' on the link below.
http://www.facebook.com/perizia#!/album.php?fbid=153920561335329&id=144655288928523&aid=31876 - perizia reflection contest page

2. Then click on 'like' on following pictures with links:

A) http://www.facebook.com/perizia#!/photo.php?fbid=155391021188283&set=a.153920561335329.31876.144655288928523&theater - melting moments


B) http://www.facebook.com/perizia#!/photo.php?fbid=155458674514851&set=a.153920561335329.31876.144655288928523&theater -mother nature


C) http://www.facebook.com/perizia#!/photo.php?fbid=155459414514777&set=a.153920561335329.31876.144655288928523&theater - snowbound Britain


Thanks,
Shabs.

Saturday, 26 March 2011

Kallummakkaaya Nirachathu/Ari Kadukka - Stuffed Mussels.


Hi all,

Hope everyone is doing great out there. This is a special post that I am posting for an event that a lovely blogger Magpiesrecipes is hosting at Magpiesrecipe. If she wouldn’t have asked me to join her event, I guess this recipe wouldn’t have appeared on the blog. It’s a lengthy recipe, lot of work, lot of typing and I don’t really expect many to be trying out his one. I prepared these almost an year ago. Wanted to post then and there, but as the post was going to be a lengthy and elaborate one, the thought of typing out made me just lethargic. These days I am not much keen on trying any new dishes or taking pictures and if it was not for Magpie, I wouldn’t have posted this recipe. She has been asking me to join her Kerala kitchen and I thought may be this would be the time for a marvellous recipe as this one to get published. Thanks Magpie for your event and the invite.

I guess the length of the name of this dish has to reflect in the intense labour that goes in making this Malabar delicacy. If you come across the Malabar specialities, these are the one of the dishes that everyone crave about and tops the list of favourite Malabar dishes! These are rich in flavour, aroma and has its own distinguished taste. Arikkadukka or stuffed mussels (Kallummakkaya nirachathu as people from Kannur (North Kerala) calls it). In this particular recipe, Mussels are stuffed with a ground rice mixture and then steamed in shell. Steam cooked rice is then scooped out of shell, marinated in a spicy mixture and then deep fried until golden. YUM!

Well, this was the first time ever that I prepared this dish all by myself. Usually, while preparing arikadukka, the labour is divided between people so as to ease out the process. Couple of ladies will do the scrubbing of mussels to remove the dirt, talking and cracking jokes in between while someone does the grinding of rice and preparing the rice dough. It would be couple of others filling the dough in to the shell, getting them ready to be steamed. See, there is division of labour here and normally these are made in huge batches of 75 or100 or even more. When there are many to do the job, it wouldn’t be that difficult, but if you need to do everything all by yourself, it can be a bit tiring. Imagine, how many of them I prepared, doing all the work by myself? Fifty of them!! Crazy, Isn’t it? I know. It all happened as I never bought mussels myself before. Back in India, these are sold by counts and not by weight. But over here, they sell by weight which is rather sensible I thought! But I was not sure how both are related as well. So when the fish monger at the farmers market asked me how many I wanted I asked him for 25 pieces. When he told me that I need to give him in weight in gram measures, I told him a Kilo! He then handed over to me a large bagful of nice, clean mussels which was fresh, live and full of flesh. I stood there a while, flabbergasted seeing the amount of the mussels and that too just for a £3. I din’t want so many, but was embarrassed to return and get a few instaed, so came back home with the lot. You know, there were 50 of them, whereas I just wanted around 20 of them!


Arikkadukka is prepared with fresh mussels - not frozen. So they have to be prepared on the day of purchase. Mussels that I bought were so clean that I dint have to do all that nasty scrubbing which otherwise takes ages. So it was one job down. Traditionally, kallummakkaaya nirachathu is prepared using parboiled rice. Rice is soaked for several hours, then ground coarsely without adding water along with coconut, fennel and onion. This needs Indian kind of mixies which uses no or minimal amount of water to do the grinding. The dough is exactly the same as the one I use for neypathal or aanapathal. But for the ease of use, I used roasted rice powder after I referred to shaheen’s recipe. Thank you Shaheen for that great tip. Don’t forget to check out her version too. It’s slightly different from mine. My way is the one that we have been making for ages at home and been eating at my relatives and anywhere in Kannur/Tellicherry. But due the intense labour that goes into its making, and bakeries coming up with these already made, these days people opt out getting them from the bakeries. Some adds, ginger, red chilli powder, turmeric and curry leaves to the ground mixture. But we always loved the ones without them. Even though this recipe takes considerable amount of time, it is easy, as I always say. The taste is worth every bit of labour.

Kallummakkaaya Nirachathu/Ari Kadukka- Stuffed Mussels
Serves 20-25

 Ingredients:

1 kilo – 50 medium size fresh mussels with shell

For the dough:

3 cups Puttu Podi (Coarsely ground and roasted rice powder)
2 medium size onions chopped (200 g)
2 cups grated coconut
1 ½ Tablespoons fennel seeds
2 tsp – 3 tsp salt (NB:Mussels are really salty, you may need to reduce the amount of salt considerably here depending on your taste.)
3 ½ - 4 1/2 cups boiling water (NB:Just enough water to make a soft and smooth dough. The amount of water needed may be less or more depending on the rice powder and how well the rice is roasted).

For marinating: (This quantity of spices are for frying around 15 of them)

1 tablespoon Kashmiri Chilli powder.
1/2 teaspoon turmeric powder
Couple of pinches of salt
3-4 tablespoons of water

Preparations:


1 Grind coconut well, without adding water. Add fennel seeds, onion and grind again to get a coarse paste.

2. In a large bowl, add puttu podi and salt. Mix well. To this, add ground coconut mixture. Slowly add boiling water and mix using a large spoon until the mixture comes together. Knead it to a smooth dough, once it is warm enough to handle with bare hand. Dough shouldn’t be too soft and sticky or too hard and breaking apart. You can add more or less water as necessary. Cover and keep it aside while you prepare the mussels.

3. Clean the outer part of the mussels by scrubbing away all the dirt, if any. Discard the already opened mussels and use only the ones that are closed tight.

4. Using a blunt knife, slowly slide in the knife through the slits and open them slowly without breaking the shells apart. (I was told that leaving them in the freezer for about half an hour or so makes it easier to force open the shells). Once the shell is open, pull out the hairy substance from the flesh. Wash the opened mussels under slow running tap water, rubbing its flesh gently to clean any further dirt.

5. Make balls of the rice dough (You can divide teh dough depending on teh amount of mussels you have), wide open the shells without cracking them and stuff the dough into the shells. Take off any excess dough and shape them neatly.

6. Fill all the shells in the same manner.

7. Steam cook these stuffed mussels for about 25-30 minutes. You can stack these on top of each other and you will need to steam them in in 2-3 batches altogether. They will be slightly sticky when hot, but gets firmer as it cools down .( At this point, once it is completely cooled, you can store them in Ziploc bags and freeze them for later use. (See the tip in the notes). )

9. Slowly break open the shell and take out the cooked stuffing taking care not to break or part the mussel from the dough. It is usual that the mussel sticking to the shell, you can take them off using a sharp knife in case need be.

10. Add oil about 1 ½ - 2 inch high in a kadai/frying pan and set it on medium heat. Mix chilli powder, turmeric powder and a tad bit of salt along with water to make a thin paste. Dip the scooped out dough into this solution and slide into the hot oil. You may add as many your kadai/pan take. Fry on all sides until it takes golden colour. Drain on kitchen paper and serve with an evening tea.

Notes:

1.Traditional recipe uses soaked parboiled rice for making the dough, which requires even more time. I have substituted this with roasted coarse rice powder (Puttu podi) for the ease of making. Thanks to shaheen for this tip. Although the recipe yielded me an excellent review, I thought there was a slight difference in the texture while using raw rice and rice powder

2. Mussels are very salty. So salt should be used with caution.

3. Once the mussels are steamed, if you are not planning to fry them all at a time, place them in a Ziploc bag, around8-10 mussels each in a bag and freeze it with shell on. DO NOT take the shell off. When you want to fry these frozen stuffed mussels, bring them back to room temperature and steam them with shell on for 8-10 minutes on until they are hot. This makes them soft and bring back their texture. Then marinate them again in spice solution and fry. Chilli powder may be reduced depending on the heat level.

4. The spice amount given here is just for 12-15 of them.

5. With the leftover dough, you can just shape them into ovals and steam cook it along with the rest of stuffed mussels. These can also be fried like the other one and are really tasty as well – A non-veg version

Friday, 11 March 2011

Best Ever Brownies for Third Blog Anniversary!


Hi all,

How have you been doing? On my side, I am doing great. I was back on 19th and getting all settled after the lazy stay in Abu Dhabi. As with everyone, I tend to get real lazy when I am around my family or shud I say mom? No cooking; not even thinking about it. All what I did was baking some fancy stuffs that my siblings wanted me to bake for them. And some continental and Mediterranean dishes for my dad who loves them. Absolutely nothing elseBut the long gap of non blogging days have made me quite lazy to get back to blogging.

While I was away, I did receive many emails and messages from my readers to check on me which was very sweet. Thank you all for being so kind. I also received many queries which I couldn’t answer them then. I apologize for that; I have answered all your doubts in here. Now let me get straight to the recipe. Yesterday was my dear hubby’s birthday and we had a nice day together. Baked a wonderful cake (strawberry Gateau with Praline) for which he commented it is one of the best cakes I ever made!!Wow!!My husband is someone who is not so fond of sweets and bakes, so any positive comment on sugary stuff is a great thing for me.

Today I am posting a recipe of a brownie that I have been making again and again and again. My blog turns three today. Thanks to all my readers, well wishers and fellow bloggers for your continuous support, encouragement and inspiration. So to make this day a special one, I am sharing this delicious brownie recipe that is very easy to make, very chocolaty and fudgy - a pure chocoholic’s heaven. I am also writing this post to send to Divya's Brownie event. She is a great baker and look at her gorgeous Dulce de Leche Brownies! She never stops to tempt me.
Best Ever Cocoa Brownies
Adapted from Alice Mendrich’s Bittersweet
Makes 16 larger or 25 smaller brownies

Ingredients:
10 tablespoons / 140 grams unsalted butter
1 1/4 cups/280 grams caster sugar
3/4 cup / 80 grams unsweetened cocoa powder
1/4 teaspoon salt
1-2 teaspoons instant coffee powder
1/2 teaspoon pure vanilla essence
2 large eggs, cold
1/2 cup all-purpose flour
1/2 cup walnut or pecan pieces (optional)

Preparation:

1. Position a rack in the lower third of the oven and preheat the oven to 160°C. Line the bottom and sides of the baking pan with parchment paper or foil, leaving an overhang on two opposite sides.

2. Combine the butter, sugar, coffee, cocoa, and salt in a medium heatproof bowl and set the bowl in a wide skillet of barely simmering water. Stir from time to time until the butter is melted and the mixture is smooth and hot enough that you want to remove your finger fairly quickly after dipping it in to test. Remove the bowl from the skillet and set aside briefly until the mixture is only warm, not hot.

3. Stir in the vanilla with a wooden spoon. Add the eggs one at a time, stirring vigorously after each one. When the batter looks thick, shiny, and well blended, add the flour and stir until you cannot see it any longer, then beat vigorously for 40 strokes with the wooden spoon or a rubber spatula. Stir in the nuts, if using. Spread evenly in the lined pan.

4. Bake until a toothpick plunged into the center emerges slightly moist with batter, 20 to 25. It took me from 32- 40 minutes to bake until I got few moist crumbs on my skewer. Let cool completely on a rack

5. Lift up the ends of the parchment or foil liner, and transfer the brownies to a cutting board. Cut into 16 or 25 squares. . (You really need to make sure these have to cooled down completely before you cut them. I never had patience to wait that long and I couldn’t ever cut my brownies neat. As you see, these brownies were cut whilst they were still warm. If you cut them when they are completely cool, you should get neat squares).


***************************************************************************************************************************

Hasna, my friend, who blogs at het lovely space Hasna'sdelights has shared this lovely blogger award. Thank you hasna. She has been motivating me to re-blog again and is one of the reasons to blog again. I am sharing this award to all my fellow bloggers..


Thursday, 25 November 2010

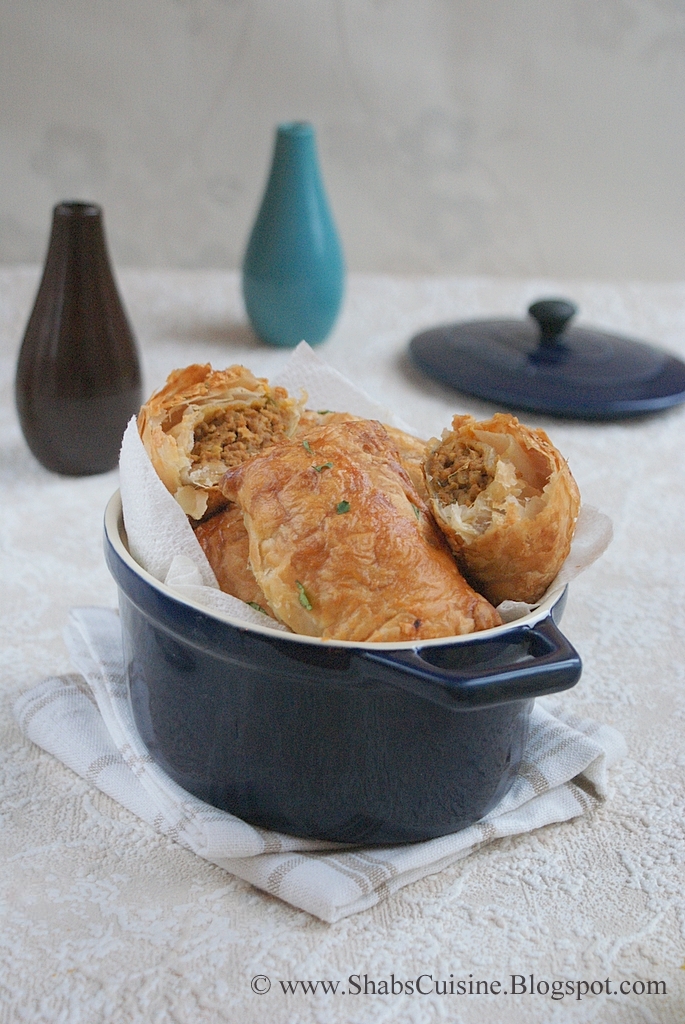
Kerala Puffs (Non-Veg)


Next week I am off to UAE for a couple of months to spend some quality time with my parents and siblings and let me share this wonderful recipe before I leave. I have never been a regular blogger during my stay in UAE, so I might not be able to answer your queries or respond to the comments promptly. UAE is going to have its best weather during this time of the year (December, January and February) and UK, it’s the worst. It has already started snowing today with temperature hitting minus 1. I am kind of fleeing away from horrible British winter at least this year and I think I should plan the same every year ;). Earlier I had plans to visit in June-July when it would be scorching hot there in UAE, and I had postponed my trip to a much pleasant time even though the wait was a bit long.


Anyways, let’s discuss about today’s recipe, shall we? Puffs and recipes using puff pastry is very popular all over the world and Kerala (A state in South India) is not behind at all. Puff is one of Keralite’s favourite snacks enjoyed by everyone. Puffs filled with spicy stuffing like egg, meat and vegetables have always been a favourite evening snack. Memory of having puffs date back to my early school days, where these were sold in school canteens during the breakfast break along with vegetable samosas and crisps. But to get hold of puffs, we had to reach the canteen as early as possible, as that was the only item that used get over in no time. Light and flaky puff pastry filled with spiced chicken is just mouth-watering and a must try one. I have been making these puffs for couple of years now and I think it’s high time to post it so that you can make it too. You may use minced beef or mutton instead of chicken here. I have used mutton and chicken and mutton mince was always the favourite.


I have used an unrolled block of puff pastry which had to be thawed and rolled for use. These days ready rolled puff pastries are also available and sometimes these are rolled and cut which makes the puff making even more easy. You just have to prepare the fillings and then the rest is all easy. Ideally you should get around 10 puffs with this amount of masala, but as I have over stuffed the pastries, I just got 8 of them.

On another note, One of my readers (I guess it is Jehanne) had asked me to share some tips on photography long back. If you are reading this, please pass me your E-mail ID once more. I have been searching for it for couple of days and I am sorry, I think I misplaced it. I know I am still a beginner in photography and I don’t know many things in photography. But I am more than happy to share the little things that I know. Please leave your E-mail Id here once more, so that I can send you the draft of a photography tutorial that I prepared to send you a while ago.
 Kerala puffs

Makes 8-10 pieces

Ingredients:
1 block of puff pastry sheets, thawed – 340g
1 ½ cups (300g) chicken/Mutton minced
1 large onion chopped (I cup)
1 teaspoon grated Ginger
2 Green chillies, finely chopped
1 medium size tomato (90g), chopped
2 large cloves of garlic, grated
1 1/4 tsp Garam Masala
1 teaspoon mild chilli powder
1 teaspoon Coriander powder
1/4 tsp Turmeric powder
3 Tablespoon coconut milk powder
water- as required
15 curry leaves finely chopped
Salt - As reqd
1 egg white
1 teaspoon water
Oil - 3 tbsp
little flour- to dust the work surface

Preparation:


1.Cook the minced meat in with salt and turmeric along with couple of tablespoon of water until almost done .
2. Heat a non stick frying pan and add oil. Keeping the lid open, fry the onions by adding little salt until they are golden brown.

3. Throw in ginger-garlic paste, chillies and fry until the raw smell goes off.

4. Add in tomatoes and cook till it turns soft and mushy and oil clears from sides..

5. Add coriander and chilli powder .Stir for a min for the spices to cook.

6. Add in the prepared meat, mix well and cook until the water evaporates.

7. Meanwhile, add enough hot water to coconut milk powder to make ½ cup of coconut milk (You can use any coconut milk here).
8. When the mixture is almost dry, add coconut milk and stir continuously until the mixture is well combined and slightly wet, not too dry and crumbly.

9. Stir in the garam masala and chopped curry leaves, cook for a minute and keep aside to cool.

10. While the meat is cooking, thaw the pastry sheets.

11. Flour the work surface lightly and roll out the pastry into a large rectangle. Cut it into 8 portions.

12. Divide the masala mixture into 8 portions. Add a heaped tablespoon of the stuffing to one half of the pastry leaving about a centimetre from the edges to seal the stuffing in.

13. Lightly beat the egg whites with water and brush the sides of the pastry sheet with egg wash. Fold over the pastry to cover the filling in and press firmly to seal the edges (This can be done with fork to get nice ridged edge). Lightly brush the top of the filled pastries with egg wash to give it a glaze once baked.

14. Place all the sealed puffs on a baking sheet lined with baking paper and bake it for 15-17 minutes @ 220 degrees Celcius until the top is nice and golden in colour and the puff has puffed up well. Serve hot along with a nice cup of tea.

Notes:

1. I make these puffs with chicken and mutton. I found it tastier with minced mutton than chicken. When using mutton, the masala is lightly brown compared to chicken where it is less brownish.

2. With this amount of masala, you can easily get 10 puffs, but I over-stuff the pastry to use up all the masala and I get only 8 pieces of pastry sheet from one block. You may use a bigger block of puff pastry to use up all the masala.

3. These puffs can be frozen before baking and then baked directly from the freezer. But the baking time will increase accordingly. For freezing, place them between parchment paper to avoid sticking.

Tuesday, 16 November 2010

Chocolate Cupcakes with Strawberry Frosting


Eid-al- Adha Mubarak to you all. Hope you all have a wonderful day with family, friends and relatives.

For me, before I start on my cooking and daily chores of the day I thought I will post something for the day to make it special. This is something that I have typed long back, shot pictures even longer before, actually few months back, but just dint find time or gap to post it. Life’s been so busy that I can’t get my head around on anything these days. I have moved to this new place couple of weeks back, and I am travelling to Dubai in another two weeks time. So it’s all a chaos, settling down, shopping, unpacking and packing for travelling on other side. And my little baby (read Blog) is the one getting affected by all this chaos :D. It’s been hard to log into my blog these days, I just peep into it if I need to cook something. Anyhow, let me break all that chaos and give you another fabulous recipe to enjoy.


Today I am posting the recipe of cupcakes that I made a while ago. These beauties were prepared to send off to my little one’s nursery on his last day there. I thought it was nice way of conveying a ‘Thank you’ message by baking something home, rather than getting a ready-made one. I made around 50 mini cupcakes, that turned out perfectly spongy and chocolaty. I had a plan to frost them with my favourite chocolate frosting, but I then thought that would be too chocolaty and sweet. So I frosted them with strawberry as mentioned in the recipe. I made a thin glace rather than a large blob of frosting as it would turn out to be too sweet again. These could be made into large ones, which would come around 16-20 of them. Follow the recipe to dot and get perfect results all way long. Please read Cupcakeblog and the comments given on the site for any doubts.


Chocolate Cupcakes with Strawberry Frosting
Recipe Courtesy: Cupcakeblog

Ingredients:
226 g (2 Sticks) butter at room temperature
2 ½ cups castor sugar
4 large eggs at room temperature
1 ¾ cup plain flour
1 teaspoon baking powder
½ teaspoon baking soda
¼ teaspoon salt
1 cup cocoa powder (I used Cadbury’s)
1 cup whole milk
2 teaspoon vanilla essence
Hundreds and thousands – to sprinkle

Preparations:

1. Beat butter and sugar for 3 minutes on high speed until soft and fluffy.

2. Add egg, one by one at a time to the above mix, mixing well after each addition.

3. In a separate bowl, sieve together flour, baking powder and soda, cocoa powder and salt twice or thrice.

4. Mix vanilla essence with milk.

5. Fold 1/3 of the flour mixture to the egg-sugar mixture followed by little of the milk and mixing well. Repeat the process until milk and flour is all used up. Add flour and milk alternately, starting and finishing off with flour.

6. Scoop the mixture to muffin liners filling just below half or just half full. Bake for 20 minutes in a preheated oven of 180 degrees Celsius or until a skewer inserted in the middle comes out clean. Cool them on wire rack completely before frosting them.

N:B:Batter rises quite high, so don’t get tempted to fill more than half full as it will overflow.


For the frosting:

400g icing sugar
175g soft unsalted butter
3 Tablespoons strawberry Pulp (see notes)
Few drops of strained strawberry juice

Prepareation:

1.Mix all until you get a thick glace. Spread on the cooled cakes as required. Add more puree or icing sugar to get the right consistency. Sprinkle with Hundreds and thousands.

Notes:

For making strawberry pulp, I used frozen strawberries. After reading few comments mantioneing about runny frosting, I pureed strawberries in a blender and placed them in a sieve to drain off every drop of juice from it. I heated the strained juice to get thick syrup and used few drops of it to loosen the icing as required and to give some natural colour. I used the frosting as a glace rather than a thick frosting.

Monday, 8 November 2010

Fish Cutlets - Malabar Style


Cutlets are one of the dishes that I used to prepare during my initial stages of cooking. It is easy to make and tastes great. But I have to agree to the fact that it takes a bit of time to cook. Again, plus point is that these patties can be frozen without frying and can be fried when ever you feel like treating yourself. For freezing the patties, shape them and place them in a container in layers, one layer of cutlets over another layer of cutlets, and baking paper or wax paper in between so that they don’t stick to each other. i.e, one layer of uncooked cutlets, a sheet of baking paper and another layer of cutlets on top of baking paper. You can take a few out s required, thaw them and fry them as per need and it would taste as fresh as new. No one would even know that they were frozen once. These are usually served along with evening tea, or during Iftar or to serve any guests. My mom always tricks my sisters into eating these fish cutlets  as they don't eat fish and these almost tastes like chicken cutlets and fish taste is not very obvious. 
Here, I have used only egg whites as the yolks make the oil frothy while frying the patties.


Ingredients:

2 Canned tuna in spring water
1 large potato, 250g
500g onions, chopped (3 ½ medium size, 3 ½ cup chopped)
1 Tablespoon pureed Garlic
1 Tablespoon pureed Ginger
3 medium hot Green Chillies, cut into thin rounds
½ cup chopped Coriander Leaves
A pinch of Turmeric powder
1 teaspoon coriander powder
½ teaspoon Garam Masala Powder
2 teaspoon Kashmiri Chilli Powder
2 Tablespoon Lime Juice
Oil – as required to fry the cutlets
4 egg whites
Breadcrumbs – as required

Update: I have forgotten to add potato in the ingredients, which is now added.


Preparations:

1. In a large non stick frying pan or a wide saucepan heat 2-3 tablespoons of oil.

2. Add chopped onion and salt and sauté until onion becomes soft and translucent.

3. Add chopped chillies along with pureed ginger and garlic. Sauté for 2-3 minutes or until the raw smell goes off.

4. Add all the spices and coriander leaves. Cook for couple of minutes.

5. Add drained tuna; stir well breaking all the lumps.

6. Add lemon juice and adjust seasoning if necessary. Cook on low - medium heat for about 5-10 minutes until the flavours are well blended.

7. Meanwhile Cut the potato into 4 large chunks and cook it in salted water just until soft. Make sure the potatoes don’t go really soft and fall apart. They have to be firm, but cooked through. If it goes really soft, cutlets will fall apart while frying.

8. Drain water completely and peel potatoes. Mash them with fork lightly with little lumpy texture; whilst hot/warm. (Don’t make it into a paste or a smooth puree).

9. Add mashed potatoes to the fish masala prepared earlier and mix well.

10. Make lemon size balls out of this mixture, flatten it into 1” thick patties; dip it in lightly beaten egg whites and roll it in breadcrumbs. Tap off extra crumbs and leave it aside for 5 minutes to dry a bit.

11. Heat a frying pan (any size) and add vegetable oil to a height of 1-2 centimetres. Fry the patties on medium heat until they turn golden brown colour, flipping them over a couple of times to ensure even browning.

12. Serve hot or warm with ketchup.
Related Posts Plugin for WordPress, Blogger...