Thursday, 25 November 2010

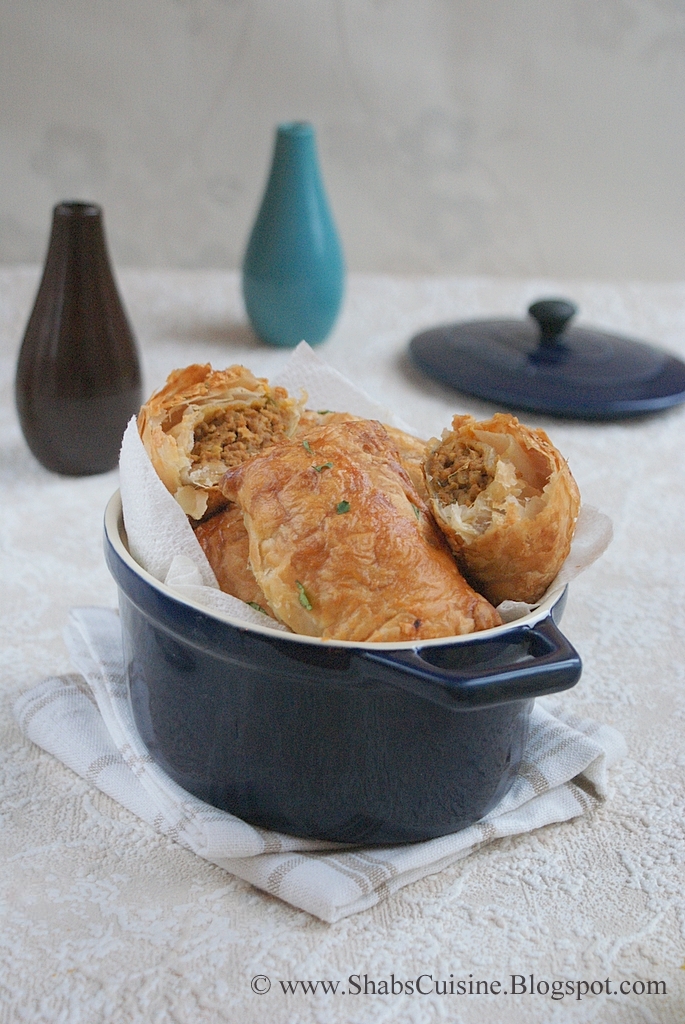
Kerala Puffs (Non-Veg)


Next week I am off to UAE for a couple of months to spend some quality time with my parents and siblings and let me share this wonderful recipe before I leave. I have never been a regular blogger during my stay in UAE, so I might not be able to answer your queries or respond to the comments promptly. UAE is going to have its best weather during this time of the year (December, January and February) and UK, it’s the worst. It has already started snowing today with temperature hitting minus 1. I am kind of fleeing away from horrible British winter at least this year and I think I should plan the same every year ;). Earlier I had plans to visit in June-July when it would be scorching hot there in UAE, and I had postponed my trip to a much pleasant time even though the wait was a bit long.


Anyways, let’s discuss about today’s recipe, shall we? Puffs and recipes using puff pastry is very popular all over the world and Kerala (A state in South India) is not behind at all. Puff is one of Keralite’s favourite snacks enjoyed by everyone. Puffs filled with spicy stuffing like egg, meat and vegetables have always been a favourite evening snack. Memory of having puffs date back to my early school days, where these were sold in school canteens during the breakfast break along with vegetable samosas and crisps. But to get hold of puffs, we had to reach the canteen as early as possible, as that was the only item that used get over in no time. Light and flaky puff pastry filled with spiced chicken is just mouth-watering and a must try one. I have been making these puffs for couple of years now and I think it’s high time to post it so that you can make it too. You may use minced beef or mutton instead of chicken here. I have used mutton and chicken and mutton mince was always the favourite.


I have used an unrolled block of puff pastry which had to be thawed and rolled for use. These days ready rolled puff pastries are also available and sometimes these are rolled and cut which makes the puff making even more easy. You just have to prepare the fillings and then the rest is all easy. Ideally you should get around 10 puffs with this amount of masala, but as I have over stuffed the pastries, I just got 8 of them.

On another note, One of my readers (I guess it is Jehanne) had asked me to share some tips on photography long back. If you are reading this, please pass me your E-mail ID once more. I have been searching for it for couple of days and I am sorry, I think I misplaced it. I know I am still a beginner in photography and I don’t know many things in photography. But I am more than happy to share the little things that I know. Please leave your E-mail Id here once more, so that I can send you the draft of a photography tutorial that I prepared to send you a while ago.
 Kerala puffs

Makes 8-10 pieces

Ingredients:
1 block of puff pastry sheets, thawed – 340g
1 ½ cups (300g) chicken/Mutton minced
1 large onion chopped (I cup)
1 teaspoon grated Ginger
2 Green chillies, finely chopped
1 medium size tomato (90g), chopped
2 large cloves of garlic, grated
1 1/4 tsp Garam Masala
1 teaspoon mild chilli powder
1 teaspoon Coriander powder
1/4 tsp Turmeric powder
3 Tablespoon coconut milk powder
water- as required
15 curry leaves finely chopped
Salt - As reqd
1 egg white
1 teaspoon water
Oil - 3 tbsp
little flour- to dust the work surface

Preparation:


1.Cook the minced meat in with salt and turmeric along with couple of tablespoon of water until almost done .
2. Heat a non stick frying pan and add oil. Keeping the lid open, fry the onions by adding little salt until they are golden brown.

3. Throw in ginger-garlic paste, chillies and fry until the raw smell goes off.

4. Add in tomatoes and cook till it turns soft and mushy and oil clears from sides..

5. Add coriander and chilli powder .Stir for a min for the spices to cook.

6. Add in the prepared meat, mix well and cook until the water evaporates.

7. Meanwhile, add enough hot water to coconut milk powder to make ½ cup of coconut milk (You can use any coconut milk here).
8. When the mixture is almost dry, add coconut milk and stir continuously until the mixture is well combined and slightly wet, not too dry and crumbly.

9. Stir in the garam masala and chopped curry leaves, cook for a minute and keep aside to cool.

10. While the meat is cooking, thaw the pastry sheets.

11. Flour the work surface lightly and roll out the pastry into a large rectangle. Cut it into 8 portions.

12. Divide the masala mixture into 8 portions. Add a heaped tablespoon of the stuffing to one half of the pastry leaving about a centimetre from the edges to seal the stuffing in.

13. Lightly beat the egg whites with water and brush the sides of the pastry sheet with egg wash. Fold over the pastry to cover the filling in and press firmly to seal the edges (This can be done with fork to get nice ridged edge). Lightly brush the top of the filled pastries with egg wash to give it a glaze once baked.

14. Place all the sealed puffs on a baking sheet lined with baking paper and bake it for 15-17 minutes @ 220 degrees Celcius until the top is nice and golden in colour and the puff has puffed up well. Serve hot along with a nice cup of tea.

Notes:

1. I make these puffs with chicken and mutton. I found it tastier with minced mutton than chicken. When using mutton, the masala is lightly brown compared to chicken where it is less brownish.

2. With this amount of masala, you can easily get 10 puffs, but I over-stuff the pastry to use up all the masala and I get only 8 pieces of pastry sheet from one block. You may use a bigger block of puff pastry to use up all the masala.

3. These puffs can be frozen before baking and then baked directly from the freezer. But the baking time will increase accordingly. For freezing, place them between parchment paper to avoid sticking.

Tuesday, 16 November 2010

Chocolate Cupcakes with Strawberry Frosting


Eid-al- Adha Mubarak to you all. Hope you all have a wonderful day with family, friends and relatives.

For me, before I start on my cooking and daily chores of the day I thought I will post something for the day to make it special. This is something that I have typed long back, shot pictures even longer before, actually few months back, but just dint find time or gap to post it. Life’s been so busy that I can’t get my head around on anything these days. I have moved to this new place couple of weeks back, and I am travelling to Dubai in another two weeks time. So it’s all a chaos, settling down, shopping, unpacking and packing for travelling on other side. And my little baby (read Blog) is the one getting affected by all this chaos :D. It’s been hard to log into my blog these days, I just peep into it if I need to cook something. Anyhow, let me break all that chaos and give you another fabulous recipe to enjoy.


Today I am posting the recipe of cupcakes that I made a while ago. These beauties were prepared to send off to my little one’s nursery on his last day there. I thought it was nice way of conveying a ‘Thank you’ message by baking something home, rather than getting a ready-made one. I made around 50 mini cupcakes, that turned out perfectly spongy and chocolaty. I had a plan to frost them with my favourite chocolate frosting, but I then thought that would be too chocolaty and sweet. So I frosted them with strawberry as mentioned in the recipe. I made a thin glace rather than a large blob of frosting as it would turn out to be too sweet again. These could be made into large ones, which would come around 16-20 of them. Follow the recipe to dot and get perfect results all way long. Please read Cupcakeblog and the comments given on the site for any doubts.


Chocolate Cupcakes with Strawberry Frosting
Recipe Courtesy: Cupcakeblog

Ingredients:
226 g (2 Sticks) butter at room temperature
2 ½ cups castor sugar
4 large eggs at room temperature
1 ¾ cup plain flour
1 teaspoon baking powder
½ teaspoon baking soda
¼ teaspoon salt
1 cup cocoa powder (I used Cadbury’s)
1 cup whole milk
2 teaspoon vanilla essence
Hundreds and thousands – to sprinkle

Preparations:

1. Beat butter and sugar for 3 minutes on high speed until soft and fluffy.

2. Add egg, one by one at a time to the above mix, mixing well after each addition.

3. In a separate bowl, sieve together flour, baking powder and soda, cocoa powder and salt twice or thrice.

4. Mix vanilla essence with milk.

5. Fold 1/3 of the flour mixture to the egg-sugar mixture followed by little of the milk and mixing well. Repeat the process until milk and flour is all used up. Add flour and milk alternately, starting and finishing off with flour.

6. Scoop the mixture to muffin liners filling just below half or just half full. Bake for 20 minutes in a preheated oven of 180 degrees Celsius or until a skewer inserted in the middle comes out clean. Cool them on wire rack completely before frosting them.

N:B:Batter rises quite high, so don’t get tempted to fill more than half full as it will overflow.


For the frosting:

400g icing sugar
175g soft unsalted butter
3 Tablespoons strawberry Pulp (see notes)
Few drops of strained strawberry juice

Prepareation:

1.Mix all until you get a thick glace. Spread on the cooled cakes as required. Add more puree or icing sugar to get the right consistency. Sprinkle with Hundreds and thousands.

Notes:

For making strawberry pulp, I used frozen strawberries. After reading few comments mantioneing about runny frosting, I pureed strawberries in a blender and placed them in a sieve to drain off every drop of juice from it. I heated the strained juice to get thick syrup and used few drops of it to loosen the icing as required and to give some natural colour. I used the frosting as a glace rather than a thick frosting.

Monday, 8 November 2010

Fish Cutlets - Malabar Style


Cutlets are one of the dishes that I used to prepare during my initial stages of cooking. It is easy to make and tastes great. But I have to agree to the fact that it takes a bit of time to cook. Again, plus point is that these patties can be frozen without frying and can be fried when ever you feel like treating yourself. For freezing the patties, shape them and place them in a container in layers, one layer of cutlets over another layer of cutlets, and baking paper or wax paper in between so that they don’t stick to each other. i.e, one layer of uncooked cutlets, a sheet of baking paper and another layer of cutlets on top of baking paper. You can take a few out s required, thaw them and fry them as per need and it would taste as fresh as new. No one would even know that they were frozen once. These are usually served along with evening tea, or during Iftar or to serve any guests. My mom always tricks my sisters into eating these fish cutlets  as they don't eat fish and these almost tastes like chicken cutlets and fish taste is not very obvious. 
Here, I have used only egg whites as the yolks make the oil frothy while frying the patties.


Ingredients:

2 Canned tuna in spring water
1 large potato, 250g
500g onions, chopped (3 ½ medium size, 3 ½ cup chopped)
1 Tablespoon pureed Garlic
1 Tablespoon pureed Ginger
3 medium hot Green Chillies, cut into thin rounds
½ cup chopped Coriander Leaves
A pinch of Turmeric powder
1 teaspoon coriander powder
½ teaspoon Garam Masala Powder
2 teaspoon Kashmiri Chilli Powder
2 Tablespoon Lime Juice
Oil – as required to fry the cutlets
4 egg whites
Breadcrumbs – as required

Update: I have forgotten to add potato in the ingredients, which is now added.


Preparations:

1. In a large non stick frying pan or a wide saucepan heat 2-3 tablespoons of oil.

2. Add chopped onion and salt and sauté until onion becomes soft and translucent.

3. Add chopped chillies along with pureed ginger and garlic. Sauté for 2-3 minutes or until the raw smell goes off.

4. Add all the spices and coriander leaves. Cook for couple of minutes.

5. Add drained tuna; stir well breaking all the lumps.

6. Add lemon juice and adjust seasoning if necessary. Cook on low - medium heat for about 5-10 minutes until the flavours are well blended.

7. Meanwhile Cut the potato into 4 large chunks and cook it in salted water just until soft. Make sure the potatoes don’t go really soft and fall apart. They have to be firm, but cooked through. If it goes really soft, cutlets will fall apart while frying.

8. Drain water completely and peel potatoes. Mash them with fork lightly with little lumpy texture; whilst hot/warm. (Don’t make it into a paste or a smooth puree).

9. Add mashed potatoes to the fish masala prepared earlier and mix well.

10. Make lemon size balls out of this mixture, flatten it into 1” thick patties; dip it in lightly beaten egg whites and roll it in breadcrumbs. Tap off extra crumbs and leave it aside for 5 minutes to dry a bit.

11. Heat a frying pan (any size) and add vegetable oil to a height of 1-2 centimetres. Fry the patties on medium heat until they turn golden brown colour, flipping them over a couple of times to ensure even browning.

12. Serve hot or warm with ketchup.

Thursday, 4 November 2010

Swiss Oatmeal Soup with Chicken and Vegetables and a Thank You Note!


Nothing is more comforting than a bowl of hot steaming soup and a rustic bread to dunk in to it on a cold winter evening. On such a cold evening I decided to make my favourite Cauliflower and Potato Soup when my hubby put forward his suggestion of having a thick, creamy chicken soup and not a chicken and sweet corn soup that I make on a regular basis! I din't even ask his opinion as I knew he would come up with some non-veg plan and ruin my already set mind of making cauliflower and potato soup. He was adamant on having chicken soup that was of some creamy consistency and I came up (had to come up) with these. It is a modified version of Swiss oatmeal soup that I got from one of my old scribbled recipes and I just sneaked some chicken in it! I don’t really know if it is appropriate to call it a Swiss Soup anymore. Anyways, here is the recipe that made way to another good soup in my kitchen.

Swiss Oatmeal Soup with Chicken and Vegetables
Serve 6
Ingredients:
1 large potato peeled and diced (315g, 1 ¾ cups)
2 medium carrots diced (230g, 1 1/3 cups)
1 large onion chopped (165g, 1 cup)
1 fat garlic clove, chopped
270g Chicken on bone (I used a large legpiece)
3 dry bay leaves
2 cubes of chicken maggi bouillon
3 cup boiling water
1/3 cup Quaker Oats
2 Tablespoon butter
1 Tablespoon Olive oil
½ cup whole milk (optional) or water

Preparations:

1. Place a non-stick saucepan on medium heat and add oil+butter. Add bay leaves and oats and sauté for 3-4 minutes or until it starts changing colour or lightly coloured.

2. Add all vegetables and sauté for 2-3 minutes adding few tablespoons of water when it starts sticking to the pan. (I added 1/3 cup of water here.)

3. Add chicken cubes, chicken and water. Cook until chicken is very well cooked and starts falling off the bone. Take it out using a slotted spoon and shred it into titbits and keep it aside. Discard the bone.

4. Using a potato masher, lightly mash the vegetables to make a chunky soup. Add chicken, boil for 3-4 minutes. Add milk, stir to combine and turn off the heat. Serve hot alongside any rustic bread like garlic bread, foccassia, Ciabatta etc.

*****************************************************************************************

This post also comes along with a Thank you note to my lovely reader and a friend - Nasi who tries my recipes and sends me pictures whenever possible. After I posted the recipe of BFG, she immediately tried it on the very same day (including assembling and decorating) and sent me a surprising mail with gorgeous pictures of her creation. Along with Black Forest Gateaux, Celebration chocolate cake, Orange cake, Cardamom and Pistachio Cookies are some of them that she tried with success. Thank You Nasi for your constant support and encouragement. It means alot to me. Below is her mail that that she sent me few days back and the pictures she shot. Don’t they look perfect?


"I baked the cake the moment I saw it on your blog. I couldn’t resist!!!It was not for the eating part but for the thrill of baking it. I didn’t have cherries with me and I didn’t use them as I don’t like them in my cake ( I know this can’t be called as a black forest cake!!!).I also used sugar syrup instead of cherry syrup and also use Raspberry jam as decoration instead of the cherries...I know mine is not anywhere close to yours but I enjoyed making it very much.......and the taste??....It was delicious and I felt it tasted much better the next day after it was refrigerated...it was soft and delicious.....enjoyed every bit..The photos are taken from my mobile...but I hope at least you could get a glance of how my cake looked....Thanks a ton for the easy recipe......."


Thank You for stopping by!

Sunday, 24 October 2010

Black Forest Gateaux (BFG)


Note: This post is overloaded with pictures. You may straight away head over to the recipe at the end, but I have given little tips in the last paragraph before the recipe and little information about the cake, it's origin etc..You may read it if interested..

I feel there is no better dessert than a Black forest to celebrate any occasion like Birthdays, potlucks and even informal gatherings. It makes way to a perfect party dessert and it is always liked by kids and adults alike. Today is my Birthday and we are also moving to a new home on the very same day. My dad and one of my sisters will also be celebrating their Birthdays next week. So, let me share my happiness with this bit of indulgence that looks elegant, tastes brilliant and an all time favourite dessert – Black Forest Gateaux.


Black Forest Cake also known as Schwarzwalder Kirschtorte in German or Black Forest Gateaux is a cake that is adorned with several layers of whipped cream and cherries. To add an extra elegance, it is also topped with extra whipped cream, cherries, chocolate shavings and chocolate curls. In the traditional recipe, a brandy named Kirchwasser is added which is related to its name, Kirschtorte. I have substituted that with cherry syrup by cooking cherries with sugar and water. This is a non alcoholic version of the traditional Black forest, so I cant name it Schwarzwalder Kirschtorte, But it is still a black forest gateau without Kirschwaser.

I thought it had some steps involved in making, but it was a straight forward recipe that even a kid could master it! A basic sponge, some whipped cream, some cooked cherries and a basic sugar syrup and doesn’t require a pro-skill. Does that sound so complicated?? But I have to accept the fact it takes a bit of time, as I did everything from scratch, like pitting the cherries, making chocolate shavings etc, which requires quite sometime. But these thigs dint worry me at all, all that I was worried about was the cake. I wanted a perfect cake, that is spongy and not dry, something that uses less ingredients and that needs less skill to make it. Googled it and came through millions of recipes which even confused me more. So I just gave it up and relied on a the cake book that enjoy flipping through every now and then. To make the job easier, you can substitute the fresh cherries with the crystallized ones, buy ready made chocolate curls and sprinkles.


Here, I have used English dark cherry of Kordia variety which is sweet, juicy, fleshy and huge compared to the regular variety. It is deep red in colour and it is around 3-4 times larger than the regular cherries. They are as pricey as their size too compared to the regular varieties. They were so sweet that most of the time they were guzzled as fresh as they are and dint make its way to my baking. They are quite cheap during the season, but shoots up as soon as the season starts changing. That was when I bought some extra and stashed in the freezer so that I could save something for this cake. And despite using frozen cherries, they pretty well held together without being squishy, that I could use them for garnishing as well. I know I am sharing this cheery-licious cake waaay after the cherry season, but I was so obsessed with making Black Forest Gateaux that I had to bake it this time. . You can easily make it with glaced cherries (Maraschino cherries) and syrup substituting fresh ones whenever fresh echerries are off the season. I have also seen recipes using canned cherries. I have never used them and dont know how good they are.

Photography Technique: Coutesy of Lovely Sala Kannan @ http://www.veggiebelly.com/ . Hope over to her place to have stunning  visual treatment and her special recipes.


Here to make the procedure easy, I have shared some tips all along the way through out the preparation processwa instead of giving it all at the end. Hope you find it useful. I baked cake and made chocolate shavings the first day. I whipped some cream, made cherry syrup and assembled them the next day. But let me warn you something, If you are trying to make it all in a day, it might be a bit tiring and a very long procedure. I have been there, So try to split the work and do it in a matter of two days. I would make this recipe again, not once, but every occassion I get. It is simply delicious.

Note: Recipe of Sponge is adapted from My cake decorating book which is already packed away for shifting. Will update its name and authors later as appropriate.
Ingredients :
For the sponge/Gateaux:
5 medium eggs
¾ cup caster sugar
½ cup plain flour
1/3 cup cocoa powder
75g unsalted butter, melted

For Whip cream filling:
570 mls/ 2 ¼ cups double cream
4-5 tablespoons caster sugar
½ tsp vanilla essence

For cherry filling and syrup:
½ kilo ripe dark cherries like Kordia variety, pitted and chopped, reserving 8 whole cherries or more depending on the size of cherries for decoration
¼ cup caster sugar
1/4 cup water
¼ tsp vanilla essence

Garnishing:
150g plain chocolate
Few fresh cherries reserved

** Number of eggs in the recipe has been changed from 3 large to 5 medium eggs. Sorry for the typo.


Preparation:

1. For the sponge: Grease 2 deep 8 inch round pans, line the bases and sides with baking paper.

2. Place eggs and sugar in a large mixing bowl and beat with an electric beater at high speed for about 10 – 15 minutes or until the mixture is thick and pale yellow in colour.

3. Sift together cocoa and plain flour, then sift again to the egg and sugar mixture. Fold in gently, then trickle in the melted butter and continue to fold until everything is well mixed. Note: Do not over mix the batter here as it will knock out air bubbles and result in a hard cake than a soft and fluffy sponge.

4. Meanwhile preheat the oven to 180 degree Celsius for 10 minutes. Divide the mixture equally (if you can manage) into the prepared tin and smooth the surfaces. Bake in the preheated oven for about 30 minutes or until springy to touch and a skewer inserted in the centre of the cake comes out clean. Leave it in the tin for 5 minutes and then turn the cake over to a wire rack to cool completely.

Note: I couldn’t divide the batter equally in both pans. One pan had more batter than the other. So I baked the one with more batter for 30 minutes and the one containing less batter was done in 22 minutes. But they were baked well.

To prepare the cream filling:

In a large bowl, place whipping cream and sugar and whip until it holds soft peaks. Add vanilla essence and whip until combined. Set aside.

To make cherry filling and syrup:

Place chopped cherries, sugar, water in a sauce pan and gently bring to boil. Once it has come to boil, reduce heat and simmer until cherries have become slightly soft. Strain the cherries and place the liquid back to saucepan and gently simmer it until you have around ¾ cup of liquid left. If you had just around 1/2- 3/4 cup of syrup after boiling the cherries, that should be enough. Dont reduce it further.

Notes: Here, I bought fresh cherries and froze them for later use as I could not make the gateaux as planned. I made it after a while when cherries were not season as well. The frozen berries when thawed had released some juice already before cooking them hence I added only less amount of water while cooking it. You can also adjust and add more sugar if needed, if your cherries are sour ones. I also discovered that freezing cherries makes pitting them a lot easier. You can just squish them to pit them and them chop them further if they are large. If you are using fresh cherries that are not frozen, please add couple of tablespoons more of water before cooking. You need to have around ¾ syrup however for soaking the cake.

If you don’t have fresh cherries in hand, just substitute them with glace cherries and simple sugar syrup. You can use around 300g of glace cherries chopped or even less if you like it less.


For chocolate shavings and curls:

1. Melt chocolate in a bowl over a pan of hot water, or in a double boiler. Make sure water doesn’t touch the bowl containing chocolate. Once they are all melted, spread the chocolate on a plastic/wooden chopping board/ marble set on a damp cloth to prevent it from slipping. Spread the chocolate evenly over the surface with a flat palette knife or any large knife.

2. leave the chocolate to cool slightly, it should feel just set, but not completely hard. Hold a large, sharp knife at a 45 degree angle to the chocolate and push it along the chocolate in short sawing movements from right to left and left to right to make curls. Remove curls by sliding knife underneath each one and lifting it off. Keep in fridge until ready to use. You can crush these curls gently to make chocolate shavings. Or you can grate a chocolate using a box grater or a vegetable peeler. Make sure the chocolate is at room temperature to do this.

For assembling:


1. Slice each cake horizontally into two. (I cut one cake into 2 and other one I just left it as one piece as it was quite thin to slice it into two. So I had three pieces of cake)

2. Place one slice of cake on a serving plate/dish/cake stand. (Snip the baking paper into several 8-10 cm long pieces. Gently slide these papers all around underneath the cake. This will gather all the mess that has occurred in the decorating process. Once decorating is done, these can be taken out slowly leaving the serving plate clean and mess free.)

3. Sprinkle 3-4 tablespoon of the syrup all over the first cake. Add 1/3rd of the whipped cream and spread it all around.

4. Sprinkle half of the cherries all over the whipping cream. Place another layer of cake and press gently. Sprinkle all over again with 3-4 tablespoon of the syrup, add cream, spread it and scatter cherries equally all over. Top with the last piece of cake and gently press down. Sprinkle again with 3-4 tablespoon of cherry syrup all over. Spread the remaining whipped cream on top and sides of the gateau, spreading evenly with a palette knife. Using a piping bag, swirl few extra cream on top as well to place cherries, if wished.

Note: I haven’t used all of the syrup. I just sprinkled 3-4 tablespoon of the syrup on each layer of cake just enough to moisten it. Around ¼ cup was left behind after the use. Don’t sprinkle more than mentioned as it may result in a soggy cake.

5. Using hands, stick chocolate shavings on to the sides of the cake. Place few chocolate curls on to the centre of the cake and decorate with reserved cherries with stalks intact if possible. Cherries can also be coated in melted chocolate before arranging on the cake. Dip the cherries in melted chocolate and place it on a baking paper to dry if you are doing that.

This post of mine goes for the Monthly Mingle - Fruits in baking hosted by Deeba who writes at her gorgeous blog Passionate about baking.

Saturday, 16 October 2010

Rosemary and Sundried Tomato Focaccia


Ever since I moved into the present flat of ours I have become kind of a plant aficionado. Most of the things around look edible in my eyes. I pluck few leaves and sniff them to see if they give out any scent, pluck berries, fruits etc and research on their details with some vague information. It wasn’t a waste of time at all. Among quite a few other stuffs, I also discovered that the outrageously growing bush all around our estate is Rosemary! Wow. I was quite exited and have been looking out for recipes that use rosemary. Talking about rosemary, it is a herb with quite hard and spiky leaves and that has a mint-like smell.


Among the entire set of recipes that I came across, focaccia was something that really fascinated me. I have also come across some lamb shank recipes that use rosemary for flavouring. Rosemary grows wildly like any grass or bush you see anywhere. I thought I have to use into something before I shift from here and decided to give a go with focassia. I referred James Martin’s recipe for the basic dough but tweaked it much by adding Sundried tomatoes in olive oil


Focaccia is an Italian staple which is enjoyed by old world bakers as a snack between laborious efforts of bread baking. Focassia has ever since made a name for itself as a premier sandwich loaf. This rustic recipe with rosemary and sundried tomatoes through out can be made into 2 smaller loaves or one large loaf and used in sandwiches ~ Sandwiches Panini and Wraps by Dwayne Ridgeway.
I made a swiss oatmeal soup to go along with it and it tasted great. I read focassia is something like a pizza base, but I thought it had its own difference. The bread was slightly chewy and crumbly rather than soft and tear-apart kind of texture. You can try your own variations of it like adding black olives, cheese, tomatoes, different herbs etc. Here is the one that I baked last week and this goes to 5th World Bread Day.
World Bread Day 2010 (submission date October 16)

Ingredients:

500g Bread flour (3 cups plus 6 Tablespoons)
1 ¼ teaspoons active dry yeast
1 tsp salt
1 teaspoon castor sugar
2 teaspoons finely chopped rosemary leaves
300 mls tepid (Lukewarm) water
3 Tablespoon olive oil (I used flavoured oil from the sundried tomato Jar)
75g (1/2 cup) chopped sundried tomato in flavoured olive oil
Few extra twigs of rosemary

Preparations:


1. In a large bowl sift flour, salt, sugar, yeast, chopped rosemary and mix well.

2. Add 2 Tablespoon of oil and rub well. Gradually mix in the water and knead for about 8-10 minutes until a soft, smooth and elastic dough forms. When the dough is smooth, smear the dough with the remaining tablespoon of oil. The dough should be elastic but not sticky at all.

3. Place the dough in an oiled bowl and cover it loosely with oiled cling film. Leave to rise in a warm place for about 1-2 hours or until the dough has risen well and has doubled in size.

4. Knock back the dough by punching it down with fist. Add chopped sundried tomatoes and knead for couple of minutes to incorporate them well into the dough.

5. Lightly flour a work area and roll the dough into ¾ inch thick and 9” round. You can also divide the dough into 2 smaller loaves instead of a making a single massive loaf. You can also make it in rectangle. Place it on a greased baking tray and leave it to rise for 30 minutes, or until doubled in size. If the weather is dry, like in the UK, cover it loosely with oiled cling film (If the cling film is not oiled, dough will stick to it and make a mess).

6. Meanwhile heat oven to 200 degrees Celsius. Take off the cling film and make several indentations with your fingers all over the surface of the dough. Lightly brush with olive oil (I used oil in the sundried tomato jar) and lightly insert few rosemary twigs into the indentations.

7. Bake for around 20 minutes or until golden brown all over. If you tap the underside of the bread at this point, I should sound hollow if it is well cooked. Cool on a wire rack and slice into wedges if made in circles or squares if made into large rectangles. Serve alongside your favourite soup or use it in sandwiches.

Notes:

1.I used plain flour instead of bread flour.

2. It is important to oil the cling film as the dough sticks to it otherwise.

Related Posts Plugin for WordPress, Blogger...