Thursday, 6 May 2010

Chunky Garlic Sauce


Have you heard of Marmite? It is made from yeast extract, a by-product of beer brewing, and is similar to the Australian Vegemite and Swiss Cenovis . It is usually spread on toasts, bread, crackers and biscuits along with butter or sometimes used in sandwiches. If you have ever come across the ad, it says: “Marmite – you either love it or hate it”. If at all you are wondering why I had to mention the marmite story here, it’s just because, the slogan very well goes with this Garlic sauce as well.

This sauce would be quite a strong one, spicy and tangy and you are supposed to consume in small proportions like pickles. If you are a garlicky person like many including me, this is for you and would be your favourite as well. This is one recipe I can’t live without while having certain meals and is a favourite of my parents and siblings. But there is one person who can’t digest it and that’s my hubby. He tried to have it many times when he saw me enjoying the sauce and kept praising it, but he always ended up asking: “ How could you have it?”. I normally have it along with my ghee rice, just a touch of it like pickle. My dad sometimes drizzles this sauce on his fried fish, chicken fries and sometimes he drizzle over the curries. It is something that should be used in moderate amount, much less than we use pickle (Well, it goes how much of pickle you use along with your dish).

P.S. Let me know if anyone out there just try their hands on this one.

Ingredients:

1 Large Bulb of garlic (12 Large cloves)
2 green chillies, you may reduce to 1 chilli if it’s really hot.
2 ½ Tablespoons (37 ml) of lime juice
¾ tsp salt
3 Tablespoons (45 ml) Olive oil

Preparation:

1. Peel the garlic and crush it in a grinder. You can also grate it using the smaller holes in the box grater.

2. Add the chillies and just pulse in the grinder to crush it. You don’t need a smooth paste. It is normally left chunky.

3. Tip the ground garlic and chillies in a bowl and add the remaining ingredients and mix well. You can store it in jars in the fridge (I am not sure how long this will last, will update it later.)

This can be drizzled on your roasted chicken, roasted lamb, fried fish and chicken as well.

Saturday, 1 May 2010

Celebration Chocolate Cake


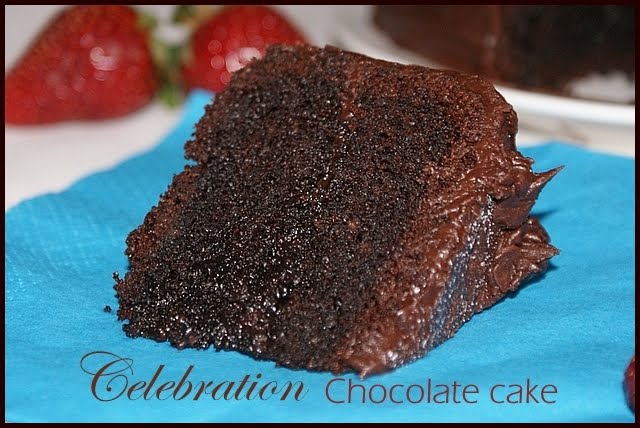
I always had the passion to bake or cook something sweet, but the only thing that kept me away was, I was the only one with sweet tooth at home and my hubby either hates it or just eats in a very moderate amount leaving the whole chunk for me. But recently I discovered that my son loves cakes. I haven’t noticed his love for cakes until I baked one on his birthday. He kept asking for it and that was when I realised that Richu loves cakes. It was a chocolate Madeira sandwiched with another vanilla cake. It was good, but not that great though. So I baked another cake of chocolate flavour after that and it was taken from Divya’s breath taking blog which she took from Hersheys site. Her blog is full of baked goodies and this particular cake was showcased for few days which really caught my attention. I just thought I had to bake it and here you go. The cake was really moist and tasted yum. Well, it doesn’t look as neat and pretty as Divya’s. I am just a beginner in icing the cakes and I am not happy with the look of my icing here. Hopefully it will get better in time. I knew that cake was going to be a huge one, so I halved her recipe and baked it in a 6 inch pan which was perfect for our small family. Even then after icing was done, it was quite a big cake. You can view the original version of her recipe here.


My son had been pestering me from the moment he saw the cake batter being prepared and was really impatient to have them. So, as you see the cake was iced whilst warm and the icing in the centre got melted and got absorbed into the cake. So you cannot see the middle layer in the picture. That’s why it’s always advised to ice the cake when it’s completely cool:). The cake was an absolute beautiful one in all sense and tasted simply yum. And the icing is fantastic too. Very easy to put together and tasted great.  Even my hubby who hates chocolate cake told me that the cake was real good.


Celebration Chocolate Cake
Serves 7-8 people
Ingredients:
6 Tbsp Cocoa powder
½ cup boiling water
80g soft butter (not spread)*
1 cup caster sugar
2 large eggs
½ tsp vanilla essence
¾ cup All purpose flour (Maida)
¾ tsp baking soda
A pinch of salt
1/3 cup plus 1 tablespoon whole milk
2 Tbsp greek yogurt

Chocolate Butter Icing:
50g butter
1/3 cup (5 Tbsp) cocoa
1 ½ cup icing sugar
2 ½ - 3 Tbsp milk

Preparation:

1. Mix cocoa with boiling water and stir until smooth and free of lumps. Set aside to cool.

2. Beat butter and sugar until light and fluffy for around 2 minutes.

3. Add eggs, one at a time mixing well after each addition .

4. Add in vanilla and stir well. Add cocoa mixture beating well.

5. Sift flour, baking soda and salt 2-3 times. Add alternately with milk and sour cream to butter mixture, beating until blended.
6. Grease and line a 6 inch pan and pour this mixture in the pan. Keep the cake tin in a pre-heated oven of 180 degrees and bake until well risen and the cake springs back up when lightly pressed. Or to to check the doneness, insert a skewer in the centre and the skewer should come out clean without any crumbs clinging to it. I was hoping my oven was a fan assisted one, so baked it @170 degrees Celsius for 1 hour and 10 minutes and it came out perfect even though it took long time. But you can bake it at 180 degrees and bake till done.

For the Chocolate butter Icing:

Melt Butter and stir in cocoa powder. Add in powdered sugar and vanilla essence and mix till smooth. Add in enough milk to loosen the icing just enough to a spreading consistency mixture. If the icing becomes loose, add in some icing sugar and if it goes too stiff to spread, add in some milk. Make sure you sift the icing sugar and cocoa to avoid any nasty lumps.

For assembling:

Let the cake cool completely before frosting. Cut the cake horizontally into two using a serrated knife. Spread little icing and sandwich the cakes. Spread rest of the icing outside using a palette knife (Which I don’t have, so I used a regular one). After icing the cake, dip the knife in hot water and smooth the icing using the warm knife. Or you can use warm knife through out icing to get an even smoother finish.

Notes: * While using butter make sure that you don't use spread here for cooking as most spreads are not suitable for baking.

Thursday, 29 April 2010

Chilli Garlic Prawns


Recently we went on an amazing Scotland trip for few days where we visited many places in and around Scotland and tried different cuisine on all days. One among them was a Thai lunch from a Thai restaurant near the Edinburgh Castle called ‘Thai Orchid’. I vaguely remember when I had Thai food before that. At Thai Orchid, we ordered a platter of starters to start with, which included chicken satay with peanut butter dip, Thai omelettes, Thai samosas, and deep fried prawns wrapped in wonton wraps, along with three other dips. They all had certain names in Thai language which I would never remember any ways. For the mains we ordered a seafood Pad thai, chicken Red curry and coconut rice. And Boy, it was finger licking good. The only negative point that I could point out was the amount of oil that was added to each dish.

If you have never eaten Thai, I strongly recommend you should. I have tried creating it at home, but cheated on it using ready-made curry paste. I would try to post the recipe when I try the authentic way rather than the cheat’s way. Thai dishes uses coconut milk immensely in their dishes and it has slight resemblance in taste to our Kerala dishes. Thai dishes are very aromatic as well due to the use of different flavours like lemon grass, galangal, Kaffir limes leaves, basil, Shrimp paste and most importantly fish sauce and coconut milk. I really got hooked to Thai cuisine ever since I had it from Edinburgh and badly wanted to recreate it at home. So started for researching on the net for Thai recipes, came up with many recipes from many sources and Finally I planned to make Thai red curry. When I went over the ingredient list, there were many ingredients that were not at home. Went to the supermarket and found that they dint have many either. So I thought I would cheat on the recipe for the time being by using a ready-made curry paste. So brought home a readymade Thai red curry paste and made a delicious meal consisting of a simple chicken red curry, Thai coconut rice and these Garlic prawns that I posted today. It was really easy to prepare all the dishes. I also tried garlic stir fried in red curry paste which was amazing too. You can find many of Thai cuisines at http://www.tan-kitchen.com/. I was always looking forward to make red curry paste at home, but it never worked until now. May be in future I would be trying it. And you too can create amazing Thai flavours at home.


I also bought a really good book on Chinese-Thai-Indian cuisines and can’t wait to try the dishes out. If you are in the UK, and you have W.H.Smith nearby, Go and grab this Asian book on deal: 400 recipes WOK & STIR FRY. RRP was £14.99 and now down to £2.99. I guess they are clearing them off. It was £5 before that when I purchased a similar book on cake decoration book. The book is really a chunky one and has 512 pages which also includes step by step preparation and pictorial representation of each dish. Below is how the book:


400 Wok and Stir-Fry Recipes: Discover The Delights And Simplicity Of Successful Stir-Fry Cooking With Sensational Classic And Modern Wok Dishes For Every Meal And Every Occasion

Ok, stories apart, when coming to todays recipe, Chilli garlic prawns, as the name indicates is a very simple garlic dish packed with garlicky flavour with a kick from the chilli heat. I prepared these as a side to go with Coconut rice and red curry. The flavour was very good but I guess it will only pair with Thai – Chinese dishes. It went well with Thai coconut rice. This can also be served along side noodles and fried rice.

Chilli Garlic Prawns

Ingredients:

250g cleaned Prawns
5 large garlic cloves
4 whole Dried Kashmiri chilli (Reduce if you are using a Hot chilli)
1-2 Tablespoons butter/Vegetable oil
Salt- as required

Preparation:

1. Heat a sauce pan and add butter. When melted, add chopped dries chillies and garlic and sauté till garlic goes soft.

2. Add prawns and required amount of salt; Cook for around 10 minutes or until done. This dish will pair well with noodles, fried rice etc..

Note: Too much of cooking will make the prawns hard, so check in between and if the prawns turn juicy and soft, that should be done. Cooking time may depend on the heat and medium of saucepan used.

Friday, 23 April 2010

Malabar Style Pepper Mutton Curry in two ways.


This curry is one that my mom prepares at home quite often whenever she gets hold of some mutton/goat meat. I love it when she prepares it, she makes them to go with the famous Malabar Neypathal, chappathi or sometimes Malabar Porotta. She prepares one of the best porottas at home. I have said it a zillion times here, but I can’t stop saying it; My mom is one of the best cooks and I just love her food. It’s not only my opinion, but anyone else who ever had her food. I don’t know if I will ever be able to create her taste in my kitchen, but I do try hard to bring that taste. Even if I cook exactly like her, and even under her guidance, I feel something is missing.


Not only my mom, my younger sis ‘Sham’ is also a great cook. One thing that never stops amazing me about her is that even if she doesn’t eat fish, she prepares one of the best fish curries! I don’t know how she does it without even tasting it. When I asked her that question, all she told me that she watched our mom cooking and cooks exactly like her! I sometimes call her to clarify the recipes because she was the one who learned all recipes from my mom exactly. I was also told by few of my family members who got a chance to eat her food; that her food is real tasty! This is one recipe that I called her up to clarify before sharing with you here.

Coming to the recipe part now, as I mentioned in the title, this curry can be prepared in two ways: One is by adding the roasted coconut and spices to the gravy, giving it a rich aroma of coconut and blended spices. That’s is pepper mutton in roasted coconut gravy. The other one is a simpler version without the hassle of adding the coconut – simple pepper mutton. This curry will be quite darker in colour since there is no coconut involved and is much easier since no grinding or anything is involved. Its tastier either ways, but adding freshly ground spices and coconut gives the curry an entirely different taste.


Ingredients:
520g mutton/lamb
240 g onion chopped (1 ½ large onion, 1 ½ cups)
160g tomatoes chopped (1 ½ large ones, ¾ cup)
1 tbsp minced garlic
½- ¾ tbsp minced ginger
3-4 tsp pepper powder
4 tsp lightly roasted coriander powder
¼ tsp turmeric powder
1-4 green chillies split lengthwise (opt out if you like it less spicy)
1/3 cup water or as required
Salt - as required
2-3 Tbsp coconut oil/vegetable oil
2 twigs curry leaves

To roast and grind:
½ cup freshly grated coconut tightly packed
2 cardamoms
2-3 cloves
1 small piece cinnamon stick
¼ tsp fennel seeds (perumjeerakam)
1 – 1 ¼ cups water


Preparation:

1.Heat oil in a pressure cooker and add chopped onion and salt. Saute on medium flame until it becomes soft and starts taking golden colour.

2. Add ginger,garlic and green chillies and sauté for a minute or two until the raw smell goes away.

3. Add pepper powder, coriander powder and turmeric powder and sauté for 2 minutes. If the masala starts sticking to the pan, add few drops of water and continue cooking.

4. Add chopped tomatoes, cover the pan and cook till tomatoes gets mushy and all oil starts leaving the sides.

5. Add washed mutton pieces, stir well. Add water and pressure cook till done. If mutton has released lot of water, boil of excess water until you get thick gravy.

6.In another pan, add coconut and other whole spices. Saute on medium flame stirring constantly until coconut turns golden colour. Grind this into smooth paste by adding required amount of water.

7. Add this coconut paste along with curry leaves to the mutton curry cooked earlier and cook for further 4-5 minutes.

8. If you don’t want the coconut based curry, after step 5, just add curry leaves and ½ tsp of garam masala and some water if necessary. Cook it covered for 2-3 minutes to infuse flavour.

This curry pairs well with almost anything including neypathal, paratta, chappathi, pooris, ghee rice and even plain rice.

Thursday, 22 April 2010

Low-fat Banana Bread


As I have mentioned in my previous version of banana bread which contained nuts and spices, this one is even a simpler one; a no nuts - no spice version and a cake with full of banana goodness in it. By the way, even if it says banana bread, it's texture and taste is just like that of a cake and not a bread. This recipe is also a low fat one compared to other banana breads around , using only 4 tablespoon of oil than many other cakes! It still was very moist due to mashed bananas in it. I gave half of the bread to my neighbour the day I baked them and they shared it with their guests. She told me all of them liked it and took the recipe from me. So, I share that same recipe here as well. In case you have some bananas lying in the corner crying for help, this fool-proof recipe would sure come handy.


Simple Banana Bread
Ingredients:
1 ¾ cup (250g) all purpose flour
1 cup granulated sugar
¾ tsp baking soda
¼ tsp salt
¼ cup (4 Tbsp) vegetable oil
5 Large bananas mashed (1¾ cups)
2 large eggs, lightly beaten with whisk
2 tsp vanilla extract/essence
1 lemon’s rind

Preparation:

1.Preheat oven to 350 degrees F (180 degrees C) and place oven rack to middle position. Cover the base and the longer side of a 1 kg loaf pan with a baking paper. Set aside.

2. In a large bowl combine the flour, sugar, baking soda, and salt. Set aside.

3. In a medium-sized bowl combine the mashed bananas, grated lemon rind, eggs, oil and vanilla. Mix well with a spoon.

4. With a rubber spatula or wooden spoon, lightly fold the wet ingredients (banana mixture) into the dry ingredients just until combined and the batter is thick. (The important thing is not to over mix the batter. You do not want it smooth. Over mixing the batter will yield tough, rubbery bread). Scrape batter into prepared pan. Bake until bread is golden brown and a toothpick inserted in the center comes out clean, about 60 minutes. Place on a wire rack to cool and then remove the bread from the pan. Serve warm or at room temperature. This bread can be frozen.

Monday, 19 April 2010

Dark Chocolate Mousse - a Chocolate Lovers Heaven!


If you are a regular visitor of my blog, you would have noticed a chocolate mousse before. It is almost the same recipe, but I slightly modified the ingredients and changed the method of preparation to an easier one. Took some better pics than the previous one and so thought of reposting it. I made this again quite a long back and thought will repost again replacing the old post. It was one of the desserts that I perfected over time. Chocolate mousse is one luxurious dessert of a kind. I first time had chocolate mousse during my college days and loved it. But when I made it at home, I just realized how easy it was to prepare at home and we can even give better flavourings as well. This is a simple and an elegant desert and something that feels real light. There are eggless versions of mousse around, but mine contains raw eggs. Don’t be put off by that. You wont even know that there are eggs in it because it doesn’t give any feel or taste of egg. You won’t even know there are eggs in it until somebody tells you it has! And the chocolate flavour is so strong that it will contradict any egg-y affair. Since the main ingredient calls for chocolate, use the best chocolate you can get hold off.


As you can see, this dessert is a simple one, but if you don’t do it properly, it can affect the texture intensively. Whipping of egg whites is one important factor. When you whip egg whites, you must make sure that the bowl you use for whipping the eggs is grease-free and is squeaky clean. All these will affect the volume of the whipped egg whites. Also make sure that there is no yolk in the egg whites when you separate them. If there is even a teeny bit of yolk in the whites, you can’t whip the whites properly. In this recipe, egg whites are whipped into soft peaks; that is when you lift up the egg whisker after whipping, you should get a wobbly peak at the end of the whisk rather than stiff peaks; something like froth that you get when you shampoo your hair:)(Don’t know if that’s a good example though). This mousse can also be made with milk chocolate, but make sure you reduce the amount of sugar because the chocolate would be sweet already unlike the bittersweet ones.

Other flavours you may try: You may add 1 Tbsp orange rind while scalding the cream to give a subtle orange flavour. I have never tried this, Just because I make all these kind of simple desserts in a jiffy and in hurry and nothing comes in mind at the time. Only when the pudding sets, I would think, Oh! I should have added that and this and so on. But this is one that I am looking forward to try, since orange and chocolate is a heavenly combination. You can also try adding 1 teaspoon of coffee or espresso granules to the hot cream and mix it to give another lovely intense coffee flavour to the mousse.


Before I get in to the recipe, if you are a fan of Malabari cuisine and you are in Toronto, Canada, there is a Malabar restaurant situated in the heart of Toronto, which is one and the only one Malabar restaurant there. You can treat yourself and your loved ones with rich and yummy Malabari food. They also condust an yearly Malabar Food festival where they display an array of Malabar delicasies. Details of their restaurant and more can be found at its homepage Maroli and their blog.


This post goes for 'Thanda Mela' Thanda Mela Event hosted by Srivalli of Cooking 4 all Seasons.


Dark Chocolate mousse:
Serves 6

Ingredients:
150 gm Dark chocolate (72% cocoa)

150 mls double cream

1/3 cup sugar (Taste and add more or less as required)

2 – 3 large eggs, separated (I sometimes add 2 and sometimes 3.)

Preparation:

1. Heat cream in a bowl until scalding point, i.e. until you start seeing the bubbles appearing on surface, but not boil.(I heated it in the microwave)

2. While the cream is being heated, cut the chocolate into small pieces. When the creamhas reached scalding point, add the chocolate pieces. Let it stand for couple of minutes. Stir well until all the chocolate pieces have melted and the mixture is smooth. If at all chocolate din’t melt completely, place the chocolate and cream mixture on a double boiler and heat till all the lumps have melted completely. Alternately you can heat the cream along with the chocoltae in the double boiler or even microwave. If your are doing this way make sure you keep stirring in between and make sure not to burn the chocolate bits.

3. Add sugar and stir well with a spoon until you get a thick glossy mixture.

4. While still warm (but not hot), add the egg yolks and stir well until combined. Keep it aside.

5. In a clean and spotless dish, whip up the egg whites until soft peaks.

6. Add little of the whipped egg whites to the chocolate mixture and fold gently to loosen the mixture.

7. Add the rest of egg whites and gently fold without knocking out the air. (Folding slowly is very important because if you mix it thoroughly, you will knock out all the bubbles in the mousse and ends up in a chocolate cream rather than airy mousse.)

8. Serve in a small individual ramekins or dessert bowls and cover with cling film, if you don’t like the thick film forming on top.

8. For serving: You can whip up some cream and spoon on the mousse and sprinkle cocoa, or add some chocolate shavings sprinkled with icing sugar. Here I stewed few strawberries with some sugar and little corn flour and sprinkled icing sugar.
Related Posts Plugin for WordPress, Blogger...