Thursday, 27 May 2010

Pistachio and Cardamom Cookies


Is there anyone out there who don't like cardamom? I love the smell of the cardamom and try to sneak it in anything possible....You can add them in anything imaginable from cookies, Kulfi’s, tea, desserts, kheers, sweets, fudge and cakes to rice, curries, smoothies and even pickles!...anything and everything you could imagine. It is such a versatile ingredient with a very sweet smell, that it makes one of the best flavouring ingredients in most of the dishes especially for desserts. The other day I was preparing some Arabic Rice ‘Machbous’ and I ran out of cardamom powder and had to grind some fresh ones. The smell of the ground cardamoms left me craving for some cardamom cookies that we used to get back in India. I guess it’s the ‘Good-day’ brand cookies that are unavailable here or may be available in some remote unreachable Indian grocers.


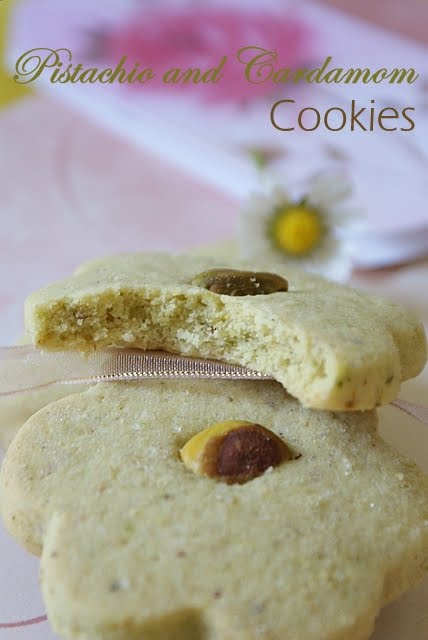
 So I looked upon net for any recipes that uses cardamom and pistachio combo and came up with these. Oh my! The cookies were simply delicious and divine much better than I thought and I just loved it to core. Pistachio and cardamom paired perfectly. The texture was light and melt-in mouth type- not hard, not crunchy but very light texture, somewhat like a very good butter cookie. I have added more cardamom here than the recommended amount, but that’s up to you how much to add! The cookies had a light green hue from the pistachios which made it look soooo pretty! Since my son loves shapes, I cut them into different shapes to make it more appealing for him. I tell you, these are one of the best cookies ever and a definite keeper. I got around 28 medium sized cookies. You can view the original recipe which is double the amount given here.


I started taking the pictures when I started, then I forgot to take the pictures as I continued! So I just have two pictures that I captured in the beginning of the process until I mixed the sugar. Sorry about that, but I am sure you will be able to follow the recipe because it is a straight forward and a simple recipe.

Pistachio and Cardamom Cookies
Makes around 28 medium size cookies

Ingredients:
½ cup pistachios
½ cup – ½ cup plus 2 TBSP castor sugar (Depending on the sweetness you prefer)
½ cup butter, at room temperature
1 medium egg
1 cup + 4 Tablespoons Plain flour, plus extra to flour the Rolling surface
3 Tbsp corn flour
1/8 tsp salt
¾ tsp freshly ground cardamoms
½ tsp vanilla essence
Granulated sugar to sprinkle on the cookies
Few pistachio halves for garnishing

Preparations:


1. Finely grind pistachios and sugar in a Grinder. You can leave it slightly coarse if you wish.

2. Cream butter and half of pistachio-sugar mixture till smooth using a wooden spoon.

3. Beat in the egg and vanilla essence and mix wel scraping the sides of the bowl as needed. Mix in remaining pista-sugar mixture and stir till smooth.

4. Sift plain flour, corn flour and salt in a bowl. Add the flour mixture to the above wet mixture and mix to form a soft pliable dough and is not at all sticky. You may add a tablespoon more if need be.

5. Pre heat the oven to 160 degrees Celsius. Line a cookie sheet with baking paper

6. Flour a clean surface and roll the dough using a rolling pin that is also coated with flour to avoid sticking. Roll to a thickness of 8mm-9mm and cut using floured cookie cutters to desired shapes. Lift it carefully using a palette knife or a simple knife and place on the cookie sheet. Slightly push a pistachio in the centre of each prepared cookie and sprinkle the cookies with coarse suagr crystals or granulated sugar. Bake for 10 – 12 minutes until the bottom edge starts to turn slightly golden. I baked for 11 minutes exactly, but the timing will differ from oven to oven. After cutting the first batch of cookies, there will be left over dough. Form it into a ball and roll it and flatten it again and cut into desired shapes until all the dough is used up. You can just make a ball and flatten it for the last bit of dough. Once they are baked, leave them in the sheet for 3-4 minutes and then transfer them to a wire rack to cool them off completely. Once completely cooled, store them in air tight containers. These are perfect with a cup of tea And if you prefer you can have it with cardamom infused tea!

Notes:

I have halved the original recipe. The original recipe calls for a large egg, and I substituted it with a medium egg. So I had to add more flour to make a pliable dough that I could roll. The dough was soft still, but manageable with the amount of flour of flour used. So I tried chilling the half part of the dough to make it slightly firmer and easier to roll without sticking. The result was exactly the same with no difference at all. So you may chill the dough and roll it.

You may use ½ cup of sugar if you like it less sweet, else add ¾ cup of sugar to make it sweet. I used ½ a cup of sugar here, but would love it slightly sweeter.

Sunday, 23 May 2010

Mango and Cheese Pudding


Here is another mango pudding that I made quite a while ago from Priya’s blog. It was so simple to assemble and the outcome was equally good. The given measurement makes a huge batch of pudding and it will serve quite a lot of people. So this would be one easy peasy recipe for parties especially if you need to prepare some dessert in a hurry. The cheese in the pudding gave the dessert a slight tang which made me think that, this would be the best filling if we need to convert this pudding to a mango cheese cake. I am not sure on that since I haven’t tried, but I guess it would work fine because the pudding really sets well. It made an enormous quantity and if planning to prepare this as a filling for cheesecake, we should get a good sized two 9 inch size cheese cake because it really made a lot of pudding. We also served with pralines which gave it a nice sweet crunch. We felt the pudding was a bit plain without pralines. You can find the recipe for pralines in my Nutty pineapple pudding recipe.


Ingredients:


200g Philadelphia cream cheese
750 ml (3 ¼ cups) mango puree
250 ml (1 cup) liquid double cream/Whipping cream
250ml (1 cup) milk
1 cup sugar
3 Tbsp Powdered gelatine

Preparation:

1. Sprinkle gelatine over milk and mix well. Heat it in a double boiler until all the gelatine granules melt.Dont boil the gelatine for long. Pass the gelatine and milk mixture through a strainer to remove any possible lumps. Set aside to cool. This can also be done in mmicrowave.

2. In a large bowl, whip cream to stiff peaks.


3. Add in cheese, mango puree, sugar and mix well until well combined. You can Pour it in blender and give it a whizz, or use an egg beater.

4. Add the cooled (make sure it is not hot and not cold, because gelatine sets as it starts to get cold) gelatine-milk mixture to this and mix well until well combined.

5. Pour in a large dish that can hold almost 2 litres of liquid and chill in the refrigerator for about 4 hours or until set. Serve cold. This can also be served in individual serving dishes if making for large parties.

Notes:

If canned Mango puree is unavailable, you can peel and puree fresh mangoes and take the required amount of puree as mentioned in the recipe. The puree in the can was really sweet and the given amount of sugar was just perfect. If using freshly pureed mangoes, make sure they are sweet enough, else increase the sugar as needed.

Tuesday, 18 May 2010

Pacha Manga Chammanthi( Raw Mango with Coconut)


There are some foods which you assume it to be tasteless just by the sound of it and just then just forget about it. I do it always! This chammanthi was one among that list. I have come across this recipe here and there and in one of my cook books as well. But I never even bothered about it even though I am a core fan of Raw mangoes. Again after a long time, I saw this chammanthi on Collaborative curry and her description really sparked that longing taste of raw mangoes in me. Went ahead, made it, and had it. It was so finger licking delicious! These kind of chammanthi’ s are normally had along with rice and other curries or our humble gruel which is simply boiled rice that is slightly over cooked and served in its own cooked water. Gruel is quite a bland food to eat, but that blandness has some soothing effect and for me it is one of my comfort foods. The amount of coconut can be increased or cut down depending on the sourness of the mango. You can also use frozen mango slices for this. My friend Prathibha lso recommends grinding this chammanthi on a stone grinder (Ammikkallu) and adding Kaanthari Mulaku (Bird's eye chilli) instead of regular chillies to enhance the taste.


You know when I was quite young, I used to stay at my paternal aunts place whenever we pay a visit. I was so adamant that I would force my mom to permit me to stay over at my aunt’s place. I loved raw mangoes and they had it in abundance which they even used to sell it away and sometimes dry them for later use. We either get the mangoes plucked by our male cousins or some workers, or if the trees were short, we plucked them ourselves using a hook attached to a long pole. We ate the mangoes sliced and smeared in salt and chilli powder. Yum! I used to have them so much, that I always ended up having tummy upset by the end of the day. Even then these chammanthi’s were unheard by me or probably I was quite unaware of it. There also used to be chicks, ducklings which I very much loved and even had fun chasing them. I still remember chasing them barefooted as far as I could and coming home with fish thorns pricked on foot.

Here goes the recipe, inspired from Collaborative curry.

Ingredients:
¼ cup Finley chopped raw mango pieces (Skinless)
½ cup freshly grated coconut
½ tsp salt or as required
1 ½ Tbsp chopped shallots
½ - 1 green chilli, preferably kaanthari mulaku (a kind of bird’s eye chilli)

Preparation:

1.Grind together coconut, mango shallot and chilli to a coarse paste.

2. Add salt and mix well.

Serve along with plain rice and  other curries, thoran etc.

Friday, 14 May 2010

Low fat Banana Muffins


Whenever I go shopping I always make sure that I buy some basic fruits like bananas, pears, apples and oranges and vegetables like carrots, potatoes, tomatoes and lettuce. Even if they might not be eaten on regular basis, these would be always seen in my fridge. I sometimes end up buying them even if I don’t want them just to give me a feel that I am actually having some fruits and vegetable. I make sure that they are always there at home, hoping myself to eat vegetables and fruits. I am an anti-fruit and anti-vegetable person when it comes to eating it in raw forms. Even if it is the delicious mango, the case is not different. So I always end up using them in my curries (vegetables) or if fruits, it goes into any delectable but calorie laden dessert, smoothie or a cake.

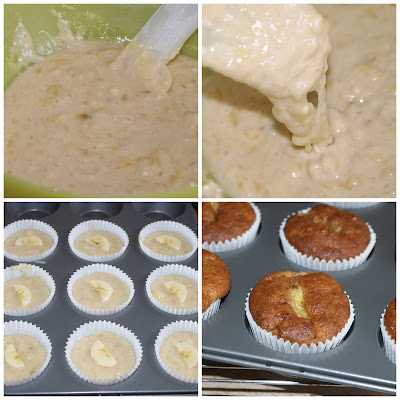
This banana muffin was also born to save bananas from binning. Unlike carrots and potatoes, bananas have a very short shelf life. They ripen at a rapid pace, which if not used up will have to be thrown away. I normally add them to my smoothies like banana and peanut butter smoothie (Has anyone ever tried that?), strawberry banana smoothie, apple and banana etc. This time it was a plain banana muffin. Din’t bother adding any nuts or chocolates because I was not sure of the outcome and my son hates nuts in his cakes. I have reduced the fat as minimum as I could imagine and added some milk to keep some moisture in. The result was a fabulous light and spongy banana muffins. It was made with the intention of low fat muffin so it lacks the buttery goodness or richness from fat. As you can see I just used 3 tbsp oil, but it was really moist and I am quite happy with the result. If you prefer the buttery rich kind of muffin you may omit milk and try adding more oil. I thought it would be just me gulping these muffins, but my family loved it too. So I would try adding more melted butter or vegetable oil next time to see what difference it makes.


Low Fat Banana Muffins
Makes 9 medium muffins, serves 9

Ingredients:
1 cup Plain flour
3 Tbsp/45 mls vegetable oil
2 large bananas mashed (300g, peeled weight)
1 large egg
½ cup castor sugar
½ tsp baking powder
½ tsp baking soda
1/8 tsp salt
4 Tbsp whole milk
1 tsp vanilla essence
Few sliced bananas – optional
½ cup chopped nuts or chocolate chips - optional

Preparation:

1. Preheat the oven to 190 degree Celsius. Sift together flour, salt, baking powder and baking soda. Add in chocolate chips or chopped nuts if using. I left it plain.

2. In another bowl, mash banana. Add to it lightly beaten egg, milk, oil and vanilla essence.

3. Pour the wet ingredients to dry ones and fold until no dry flour is visible.

4. Place 9 medium sized muffin cases in the muffin pan. Scoop the batter into muffin cases until it is ¾ full. Place a slice of banana on top and bake for 20-25 minutes or until it springs back when lightly pressed.

Thursday, 13 May 2010

Kadhai Gosht/Kadai Gosht (A North Indian Mutton Curry in Tomato Based Sauce)


This is one of most popular Indian non-vegetarian curry that you will come across almost every Indian restaurant menu anywhere in the world. Much before I started blogging, I was always tempted to try these popular dishes at home, and perfecting it as possible as I could. One among them was this Kadai gosht. When I started preparing this curry dish at home, the recipe was quite different, and I was not 100 percent satisfied with the outcome. Either it was a bit to tang from the tomatoes and the curd and sometimes the lemon juice that was added in the recipe. Made it several times making few tweaks here and there and this is so far the final version that I make these days and the best that I could make. Kadai gosht also known as Karahi gosht is prepared in large woks called ‘Kadhai’ or ‘kadai’ or ‘karahi’ and hence it gets its name. The curry is normally red in colour, quite a delicious one and it’s one of the best combinations of naan bread. Whenever we get it ordered from restaurants, many a times I have also found capsicum added to it. Capsicum would’nt be fully cooked, but crunchy. And I guess that is added at the final stage of cooking to bring that flavour and hold its shape without overcooking it. I have never tried with capsicum though since the capsicum taste will overpower the taste in the dish. You may try it at home, if you love the taste of capsicum in your dish.


Here, my meat got slightly overcooked because I forgot to take into account the time that I simmered the mutton before pressure cooking it and cooked it as it should be done without sautéing. You can see that in the outcome. My meat has started breaking down from overcooking. But apart from that the curry was really good and my hubby even asked me if it was Mutton Kadai even before I told him that it was. It pairs the best with butter naan, or simply plain naan and may be served along with rice, tandoor roti and even chappathis along with plain curd, raita and pickle.

Ingredients:

½ kilo lamb meat cut into 2 inch chunks

Marinade:
2 medium onion grated (scant 1 cup, 220g)
1 Tbsp dry fenugreek leaves (Kasury Methy) crushed using fingers
3 Tbsp creamy yogurt
1 tsp garam masala
½ Tbsp minced ginger
½ Tbsp minced garlic
Salt

Others:
3 Tbsp vegetable oil
2 cardamoms
3 cloves
2 small pieces cinnamon stick
2 tsp Kashmiri Chilli powder
1 tsp roasted coriander powder
¼ tsp fennel seeds/aniseed
¼ tsp cumin seeds
¼ tsp turmeric powder
2 large tomatoes chopped (1 cup, 200g)
2-3 green chillies (Optional, add only if you need to give some heat to the curry)

Preparation:

1. Wash mutton pieces and drain well. Marinate lamb with the ingredients under marinade and refrigerate in a container with lid for a minimum of 4 hours or over night. (I always marinate it for one day.)

2. Bring the marinated meat to room temperature before cooking.

3. In a pressure cooker, heat oil. Add cardamom, cinnamon and cloves and sauté for few seconds till it leaves aroma. Add in the marinated meat and sauté for 10 minutes on medium heat, stirring occasionally.

4. Add chilli powder, coriander powder, turmeric powder, fennel seeds, cumin seeds, green chillies if adding and tomatoes and stir fry for 8-10 minutes until the tomatoes are cooked and the meat is smothered in thick spiced gravy.

5. Add ¾ cup water, stir well and cook till done. Adjust the salt if need be. Normally the gravy is very thick and is delicious that way. But if you want little more gravy, add few tablespoons of water. Since we already sautéed meat for sometime, it would take less pressure cooking time. So don’t forget to check in between for doneness.
Garnish with coriander leaves and ginger juliennes and serve hot with naan.

Friday, 7 May 2010

Nutty Pineapple Dessert with Caramel Crunch

Hi all,

Hope all’s well out there. Here I am sharing with you a decadent dessert, that I recently discovered on Curryinkadai. You can read her story on the divine dessert as she calls it (and I believe it too) and find her version of the dessert there as well. I prepared this few weeks back when I had canned pineapple and condensed milk that has been sitting in my cupboard for some time. I was so in the mood of preparing some desserts and started blog hopping in search of recipes and this was the recipe that really caught my attention. I fell in love with it at first sight and I knew the flavours are gonna be amazing. Gave it ago and it was much more than I expected. I made few changes though because I am not a fan of frozen dessert much.

When I made it, my husband’s eye wide opened out of bliss and asked me what it was! Now, that was the first time that I saw my hubby so happy after tasting a dessert, as he is not a dessert person himself. After he had them, all he said was ‘ Post it in your blog, it will surely be a hit’! I also served my friends who loved it and made it at another place as well because she so loved it too. The dessert is so simple to make, so easy to put together and tastes real good. It is creamy in texture with lovely crunch from the nuts; and praline adds in a little more luxury and an appealing look. Praline is simply optional, but we loved it


If you all know, I have an inborn affection with the orange zest and I can’t tell you the amazing orangey flavour that the dish gets from the zest. It won’t be over powering, but gives it a mild zesty aroma which is so refreshing. I love it like crazy and you can see the use of it in many other dishes like Palmiers, Pineapple soufflé, mango pudding , orange and raisin cookies, orange cake etc. I never let my orange peel go to the bin without scraping the skinoff. I zest it and I freeze it for later use. For zesting the orange, wash the orange thoroughly before cutting it, use the small holes of your box grader that you grate your vegetables, and grate it like you grate any vegetable making sure not much of the bitter pith underneath the skin is being used. Pith is quite bitter and it can make the dish bitter too. Try it once in your dish and you too will get hooked.

Nutty Pineapple Dessert with Caramel Crunch
Serves 6-8

Ingredients:
1 x 405g Condensed milk
1 x 432g can of Chopped Pineapple in its own juice  (check notes)
284 mls double cream / whipping cream
¼ cup whole almonds
¼ cup Cashewnuts
¼ cup Pistachios
½ Tbsp gelatine
4 Tbsp (1/4 cup) Fruit juice (You can use orange juice, pineapple juice, or the syrup from the can. I used tropical fruit juice, a shop-bought one)
1 orange’s zest (Outer thin skin)

For praline:
4 Tbsp caster sugar
1/3 cup of chopped nuts
1 tsp butter


Preparation:

1.In a clean bowl, whip cream using an electric blender until it forms stiff peaks.i.e., when you lift the whipping whisk, it should form a peak (Refer to my Queen of pudding recipe to see the peak there.)

2. Chop the nuts in a food processor or using knife or you can place the nuts in freezer bag or any polythene bag and whack it using the rolling pin until you get coarsely chopped nuts. Reserve 1/3 cup of chopped nuts aside for making praline.

3. Chop pineapple into very fine pieces. Don’t puree, you need little bits of pineapple in the dessert.

4. Take ¼ cup of fruit juice in a small bowl and sprinkle gelatine and mix it with spoon. Place this bowl over simmering water and stir well and cook till all gelatine granules dissolves and you get a clear liquid. DON’T BOIL the gelatine mixture as this will destroy the gelatine’s setting property. You can also heat the gelatine mixture in microwave, if you can do it carefully without boiling and stirring often to avoid lumps. Let it cool.

5. After everything is prepared, combine all the ingredients. i.e. pour the condensed milk over the whipped cream and mix well using a wire whisk. Add the chopped nuts and chopped pineapple and the melted gelatine mixture. Mix well using a metal spoon to combine all. Pour on individual serving bowls and chill for minimum of 4 hours or until set. Serve by sprinkling the praline over.

6. For the crunchy praline: Place a pan on moderate heat and add sugar and butter. You will be tempted to stir, but DON’T. Let the sugar cook until it turns in to amber colour, or honey colour. You have to be quick here because if the caramel goes really dark, it will get bitter. So make sure you don’t burn it. When you get the required colour, add nuts and mix well. Pour this on an oiled aluminium foil, spread it and let it dry. Once dry, break them into pieces, put it in a Ziploc bag, and whack it with a rolling pin until you get chunky bits of nuts as you see in the picture or even smaller.

Notes:
If you are using fresh pineapple, make sure you cook the pineapple with few tablespoons of sugar for 7-10 minutes or till the pineapple is lightly cooked. If you use the fresh pineapple in the dessert it will impart a bitter taste.

Thursday, 6 May 2010

Chunky Garlic Sauce


Have you heard of Marmite? It is made from yeast extract, a by-product of beer brewing, and is similar to the Australian Vegemite and Swiss Cenovis . It is usually spread on toasts, bread, crackers and biscuits along with butter or sometimes used in sandwiches. If you have ever come across the ad, it says: “Marmite – you either love it or hate it”. If at all you are wondering why I had to mention the marmite story here, it’s just because, the slogan very well goes with this Garlic sauce as well.

This sauce would be quite a strong one, spicy and tangy and you are supposed to consume in small proportions like pickles. If you are a garlicky person like many including me, this is for you and would be your favourite as well. This is one recipe I can’t live without while having certain meals and is a favourite of my parents and siblings. But there is one person who can’t digest it and that’s my hubby. He tried to have it many times when he saw me enjoying the sauce and kept praising it, but he always ended up asking: “ How could you have it?”. I normally have it along with my ghee rice, just a touch of it like pickle. My dad sometimes drizzles this sauce on his fried fish, chicken fries and sometimes he drizzle over the curries. It is something that should be used in moderate amount, much less than we use pickle (Well, it goes how much of pickle you use along with your dish).

P.S. Let me know if anyone out there just try their hands on this one.

Ingredients:

1 Large Bulb of garlic (12 Large cloves)
2 green chillies, you may reduce to 1 chilli if it’s really hot.
2 ½ Tablespoons (37 ml) of lime juice
¾ tsp salt
3 Tablespoons (45 ml) Olive oil

Preparation:

1. Peel the garlic and crush it in a grinder. You can also grate it using the smaller holes in the box grater.

2. Add the chillies and just pulse in the grinder to crush it. You don’t need a smooth paste. It is normally left chunky.

3. Tip the ground garlic and chillies in a bowl and add the remaining ingredients and mix well. You can store it in jars in the fridge (I am not sure how long this will last, will update it later.)

This can be drizzled on your roasted chicken, roasted lamb, fried fish and chicken as well.

Saturday, 1 May 2010

Celebration Chocolate Cake


I always had the passion to bake or cook something sweet, but the only thing that kept me away was, I was the only one with sweet tooth at home and my hubby either hates it or just eats in a very moderate amount leaving the whole chunk for me. But recently I discovered that my son loves cakes. I haven’t noticed his love for cakes until I baked one on his birthday. He kept asking for it and that was when I realised that Richu loves cakes. It was a chocolate Madeira sandwiched with another vanilla cake. It was good, but not that great though. So I baked another cake of chocolate flavour after that and it was taken from Divya’s breath taking blog which she took from Hersheys site. Her blog is full of baked goodies and this particular cake was showcased for few days which really caught my attention. I just thought I had to bake it and here you go. The cake was really moist and tasted yum. Well, it doesn’t look as neat and pretty as Divya’s. I am just a beginner in icing the cakes and I am not happy with the look of my icing here. Hopefully it will get better in time. I knew that cake was going to be a huge one, so I halved her recipe and baked it in a 6 inch pan which was perfect for our small family. Even then after icing was done, it was quite a big cake. You can view the original version of her recipe here.


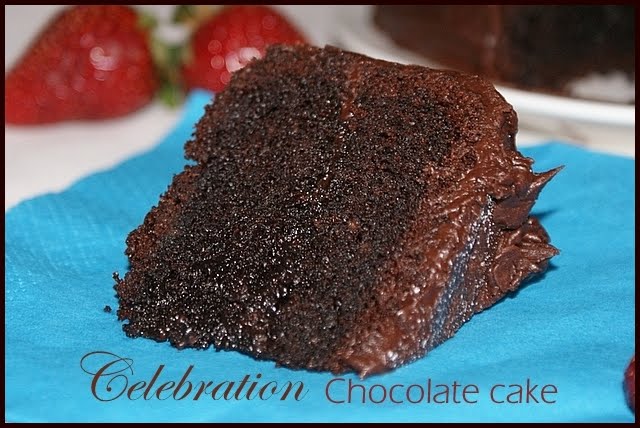
My son had been pestering me from the moment he saw the cake batter being prepared and was really impatient to have them. So, as you see the cake was iced whilst warm and the icing in the centre got melted and got absorbed into the cake. So you cannot see the middle layer in the picture. That’s why it’s always advised to ice the cake when it’s completely cool:). The cake was an absolute beautiful one in all sense and tasted simply yum. And the icing is fantastic too. Very easy to put together and tasted great.  Even my hubby who hates chocolate cake told me that the cake was real good.


Celebration Chocolate Cake
Serves 7-8 people
Ingredients:
6 Tbsp Cocoa powder
½ cup boiling water
80g soft butter (not spread)*
1 cup caster sugar
2 large eggs
½ tsp vanilla essence
¾ cup All purpose flour (Maida)
¾ tsp baking soda
A pinch of salt
1/3 cup plus 1 tablespoon whole milk
2 Tbsp greek yogurt

Chocolate Butter Icing:
50g butter
1/3 cup (5 Tbsp) cocoa
1 ½ cup icing sugar
2 ½ - 3 Tbsp milk

Preparation:

1. Mix cocoa with boiling water and stir until smooth and free of lumps. Set aside to cool.

2. Beat butter and sugar until light and fluffy for around 2 minutes.

3. Add eggs, one at a time mixing well after each addition .

4. Add in vanilla and stir well. Add cocoa mixture beating well.

5. Sift flour, baking soda and salt 2-3 times. Add alternately with milk and sour cream to butter mixture, beating until blended.
6. Grease and line a 6 inch pan and pour this mixture in the pan. Keep the cake tin in a pre-heated oven of 180 degrees and bake until well risen and the cake springs back up when lightly pressed. Or to to check the doneness, insert a skewer in the centre and the skewer should come out clean without any crumbs clinging to it. I was hoping my oven was a fan assisted one, so baked it @170 degrees Celsius for 1 hour and 10 minutes and it came out perfect even though it took long time. But you can bake it at 180 degrees and bake till done.

For the Chocolate butter Icing:

Melt Butter and stir in cocoa powder. Add in powdered sugar and vanilla essence and mix till smooth. Add in enough milk to loosen the icing just enough to a spreading consistency mixture. If the icing becomes loose, add in some icing sugar and if it goes too stiff to spread, add in some milk. Make sure you sift the icing sugar and cocoa to avoid any nasty lumps.

For assembling:

Let the cake cool completely before frosting. Cut the cake horizontally into two using a serrated knife. Spread little icing and sandwich the cakes. Spread rest of the icing outside using a palette knife (Which I don’t have, so I used a regular one). After icing the cake, dip the knife in hot water and smooth the icing using the warm knife. Or you can use warm knife through out icing to get an even smoother finish.

Notes: * While using butter make sure that you don't use spread here for cooking as most spreads are not suitable for baking.

Related Posts Plugin for WordPress, Blogger...