Saturday, 16 January 2010

Queen Of Puddings


Hi all,

Here’s another recipe for a yummy treat- tested, tasted and loved. It was during one of our new home hunt that we visited my friend ‘P’s place. When we went there she told me she has some guests arriving next day and she was planning to make Biriyani and for the dessert ‘Queen of Puddings’. I have come across this recipe in couple of my recipe books and dint appeal me when I skimmed through them. But my friend ‘P’ told me that the pudding tasted so yummy and it is a crowd pleaser. She has prepared it for many of her guests and all had liked it and had even taken the recipe from her. So I thought I would dust up the recipe from the drafts and give it a shot. I had called her up few times to get the recipe, but couldn’t get her through. So after referring the nets and books, I finally ended up in the recipe mentioned here. Well the recipe is almost like hers, but I have added the lemon rind in the milk which I noticed on some recipes.

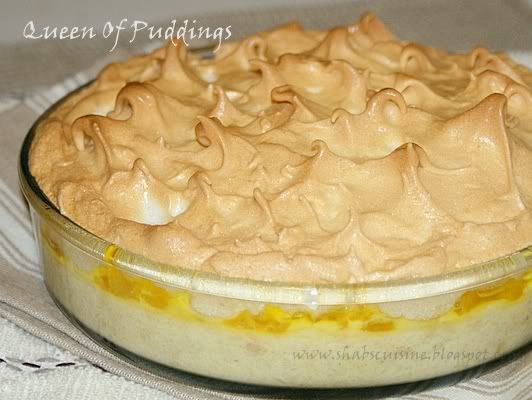
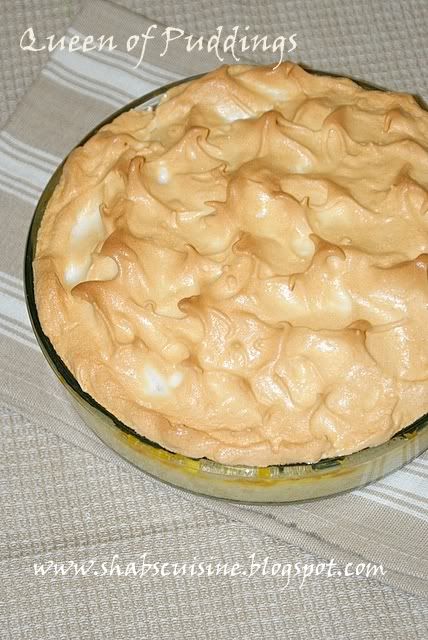
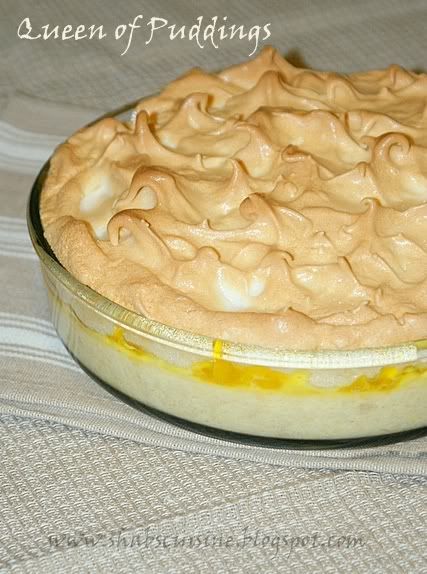
I thought the dessert was quite a light one, using less butter. The amount of sugar can be adjusted per your taste and the one given here is as per my family’s requirement. The dessert has three layers with the softly whipped light snowy meringue on the top that very well complimented with the sweet and slightly chewy stewed pineapple underneath and the soft bread pudding base. The addition of lemon rind in the bread pudding gave the dessert a burst of zesty and citrusy aroma. The flavours - vanilla, lemon and pineapple were all very well distributed and the dessert was full of flavour!


Well, I guess the classic version of the Queen of puddings is made of Strawberry Jam or Raspberry Jam in the middle layer instead of the stewed pineapple. I dint have Jam in hand, so substituted with the pineapple. If you are using jam instead of Pineapple, Warm few tablespoon of Jam in a saucepan until it becomes soft and spreadable and spread it on top of the bread pudding base, as thick as you like it to be. You may also use drained cherries from the can for a much sophisticated look. You may also try stewing berries like strawberries, raspberries etc with little sugar until soft and spoon them over the bread. These are just suggestions. We very much liked the pineapple version and I guess I would be sticking to this recipe rather than using jam. You may also try using your own versions of fruits, but I guess tropical fruits or summer berry fruits should work with the best for this recipe.


Queen of Puddings
Serves 6


Ingredients:
1 ¼ cup (125 gm) finely chopped bread (tightly packed)
2 cups (500mls) milk, whole or semi skimmed
½ tsp vanilla essence
1 lemon’s rind
2 Tbs butter
3 large eggs separated
1*520gm can Pineapple chunks finely chopped (1 1/2 cups), (320g drained weight)
4 Tbs + 4 Tbs + 4Tbs finely granulated sugar (Grind sugar if it has larger crystals)
4 Tbs pineapple juice from the can OR water if using fresh pineapple

Preparation:


1. Chop the bread into very small pieces, tip them into a bowl and keep aside.

2. Add milk, butter and grated lemon rind into a sauce pan and bring to simmering point until the butter completely melts, but don’t boil.

3. Mix in vanilla and add it the chopped bread pieces. Let it stand for 20-30 minutes or until the bread has really soaked up in milk, has become soft and plumb. Mash the bread using a fork or just whisk for 2 minutes with a balloon whisk just to mash the bread.

4. Pre- heat the oven to 180 degrees Celsius.

5. Meanwhile add 4 Tbs of sugar to egg yolks and lightly beat for couple of minutes until pale. Add this to the bread mixture and mix well.

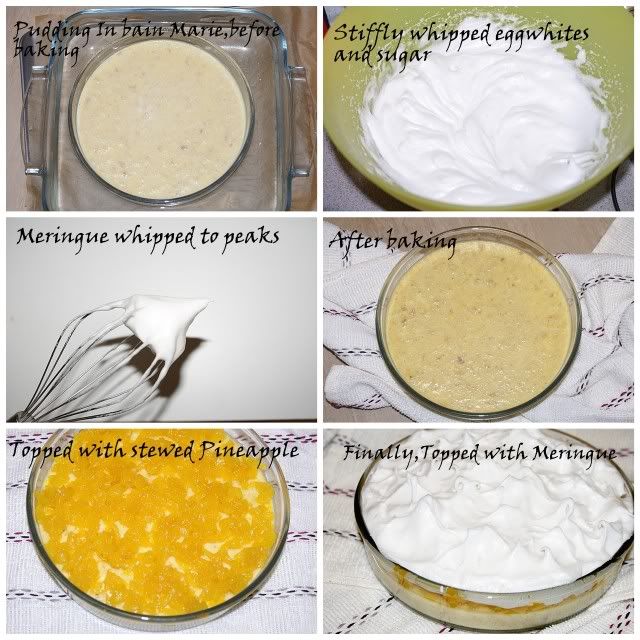
6. Pour this bread mixture in a 1.3 litre oven proof dish or any pie dish. Place this dish in another large vessel or tray or baking dish and fill the larger vessel halfway with hot water (Bain Marie/water bath). Wearing oven mitts, place the whole tray in the middle rack of the oven. Bake the pudding till it sets in the center and stops wobbling, for about 20-30 minutes. (Mine took 26 minutes)

7. While the pudding is in the oven, add the chopped pineapple in a saucepan along with 4 Tbs of sugar and the pineapple juice or water and cook till pineapple is soft and there is no moisture left. Mash it fork roughly and let it cool. Spread this over the baked bread pudding evenly.

8. For preparing the meringue (pronounced as ‘meraang’), in a squeaky clean bowl (make sure it is free of grease), Add the egg whites and using an electric whisk (egg beater), whip until it holds stiff peaks. Add little sugar at a time (1 Tbs at a time and total of 4 Tbsp), and continue beating until the mixture is stiff and glossy as you see in the picture.

9. Spoon the mixture on top of the pineapple and spread it evenly. If you want to form spikes as in picture, slightly depress the back of spoon into the meringue and lift it. It should form low peaks. Don’t lift it too high or the peaks will burn before the rest gets cooked. You may also pipe out the meringue using piping bag to get an even better pattern.

10. Put it back in the oven (No Bain Marie this time) and bake till the top turns slightly golden. I baked it in 180 Degrees here and took me around 15 minutes in my oven. You may reduce it to 150 or 160 degrees and cook for longer.
11. Bring it room temperature and serve it warm or serve it chilled.

Notes:
1.While using lemons rind, make sure you don’t use the white pith underneath the skin which is very bitter. You may substitute orange rind for lemon.

2.If you find it difficult to place the whole tray of pudding and water, you may place the larger tray in the oven, place the smaller one in, then pour the hot water.

This post also comes with 'Beautiful Blogger Award' from my dear friend faiza (http://www.faizaali.blogspot.com/). Thank you faiza for the award. I would like to share this beautiful award with all my beautiful friends.


Meringue

Tuesday, 12 January 2010

Chilli Fish


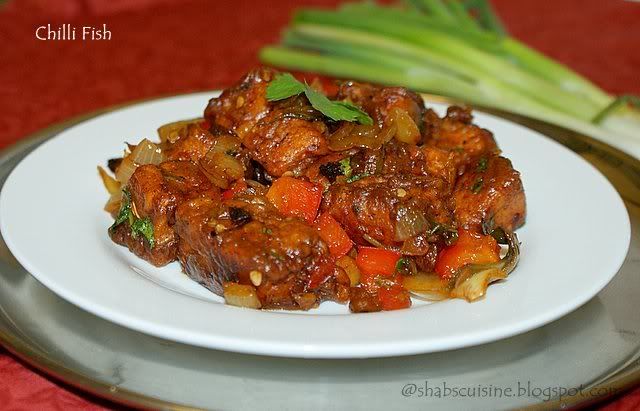
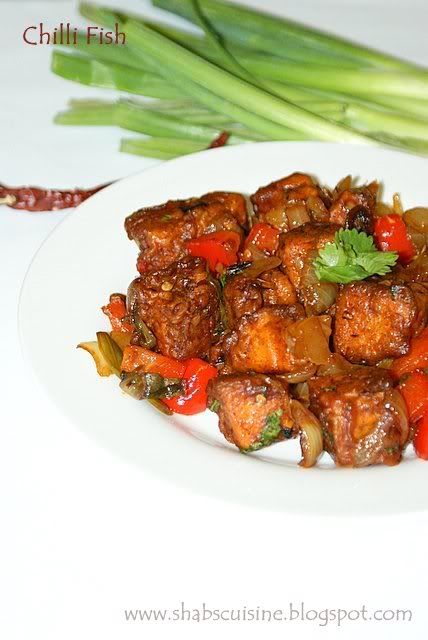
Chilli fish is one of my all time favourite food! I had it for the first time from the flight and fell in love with it on the spot. I desperately tried to re-create it few times at home and was a failure. It was then that I came across the chilli fish recipe posted by Varsha of Will-O’- the- wisp (www.varshaspaceblog.blogspot.com). Well, I just couldn’t resist to try her recipe and that’s it. My experiment has come to an end. To be frank, her recipe was better than the one I had from the flight and was so happy that I found it. Thanks to Varsha for posting such an amazing recipe. I followed her recipe as such and the outcome was just amazing. It had all the heat from the spices and green chillies and sauces and vinegar gave it a slight tang.

I have made this recipe twice ever since. I also tried the same with mushrooms. So, for the vegetarians, you may substitute mushrooms for the fish. They are really good, but personally, I loved the fish better. For some reason I am not a fan of the woody taste of mushrooms. I tried to like it, but I can’t! I only tried the dry version of this recipe. But if you want a gravy, just mix the required amount of corn flour and water as mentioned in the recipe and add it to the dish at the end.
For a note, you may use different fish for this recipe. But make sure the fish is fresh and good especially when it comes to fish like ‘King fish’ (neymeen, Aykoora). They smell very odd when they are kept in the freezer for long time. You may use frozen salmon, haddock etc with no problem, but make sure you use fresh fish when it comes to king fish. I once prepared chilli fish using frozen king fish and the dish turned out to be ‘Uneatable’ because of the nasty smell it had!


Chilli fish as a dry curry can be served as a starter, it is really yummy to munch. It can also be served as accompaniments for rotis, rice, chappathis, noodles etc when you have other curries around. If you are making the gravy version, it will blend well with Fried rice, chilli garlic fried rice, chappathis and even parattas. And you may omit or reduce the green chillies to reduce the heat. I just used 1 of them.

Ingredients:
260g Fillet of fish (salmon. Haddock etc)

To marinate:
2 tbsp Plain flour
2 tbsp corn flour
4 tbsp water
½ Tbsp pepper powder
½ tsp Kashmiri chilli powder/paprika
1 tsp minced ginger and garlic
A pinch of salt


Others:

Vegetable Oil to deep fry the fish
2-3 tsp sesame oil
2 whole Dried Kashmiri Red Chilli (Piriyan mulaku)
2 large cloves of garlic minced
1” ginger julienned (1 Tbsp)
1 ½ cups onion diced
1-5 green chillies split lengthwise (add more or reduce depending on your spice level)
½ of a capsicum diced
2-3 stalks of spring onion sliced thick
1 Tbsp hot Chilli sauce (I used Maggi)
¾ Tbsp Soy sauce
2 tsp tomato ketchup
1 tsp white vinegar
4 Tbsp water
2 tsp corn flour (Add only if making gravy)
1 cup water (Add only if making gravy)

Preparation:

1.Clean the fish thoroughly and drain on a kitchen towel. Cut them into small cubes, about an inch long. Make them as small as u can manage without breaking them.

2. Marinate the fish using the ingredients under ‘To marinate’ title.

3. Fill a frying pan with 2” height of oil and set the heat to medium. When the oil is hot enough, slowly add in the marinated fish pieces (fish pieces should be fully coated in the marinade) and fry till golden and crisp. You may shallow fry them as well with minimal oil. Drain on kitchen towel.

4. In another pan, heat sesame oil and add the crushed chilli flakes. Sauté for few seconds and throw in the minced garlic, ginger juliennes and diced onions. Cook for some time, sautéing occasionally, until the onion is transparent, slightly soft yet crisp.

5. Add bell pepper, spring onion and sauté for a minute. Add the sauces and 4 tbsp of water and mix well till blended.

6. Tip in the battered fish and slit green chillies and mix well until the fish is coated well with the sauces.

7. Add vinegar. Cover and cook on low heat for few minutes until all the flavour is infused and the sauce is all dried up. Chilli Fish prepared this way can be served as starters. If you are serving as gravy for Fried rice or rotis, mix corn flour with water and pour it in the chilli fish. Mix and cook for a while till gravy thicken.

Sunday, 10 January 2010

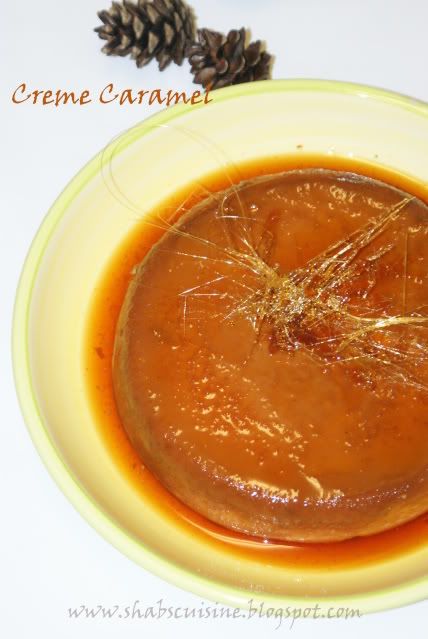
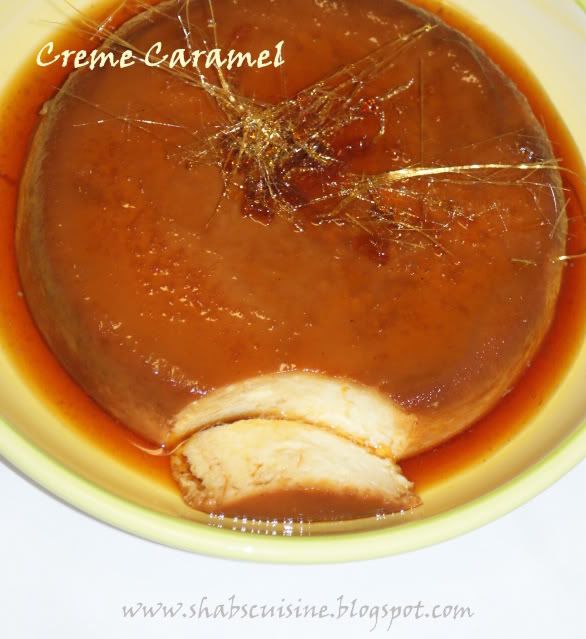
Creme Caramel


Creme caramel is one of most famous desserts ever. Its simplicity and elegance has made this French dessert so popular that there would be almost none who would have not tasted this dessert. Creme caramel is an egg and milk based dessert served with caramel syrup and has a slight wobbly nature and a silky, satiny texture. If you want to make it slightly firmer and a different texture, you can add 2 Tbs of semolina or Rawa to the custard mixture. Creme caramel was also a regular at our home especially during the Ramadan to gratify sweet cravings. But it was always prepared from the instant shop-bought ready-mix packets which just had to be heated with milk and served. Well, it was all good then, but home-made versions always have its own goodness in them. No preservatives, using of fresh ingredients and so on.

This recipe is adapted from one of the cook books that I got along with my ‘Futura Pressure cooker’. I have tried few recipes in the book and they just were perfect! Since the recipe is taken from that book, I have used the pressure cooking method for Creme caramel here. It was just so easy to make and since I used the pressure cooker, it was hassle free and just so quick.

Apart from the pressure cooker method there are couple of other ways to cook the Creme caramel as well. One is the oven method: For baking the dessert in the oven, Pre-heat the oven to 150 degrees Celsius. Place a large tray in the oven and keep the custard filled mold in the tray. Pour hot water in the pan half way up to the mold. Cook for about an hour or until a knife inserted in the centre comes clean. You can also also cook it in a regualr deep sauce-pan which is almost similar to the pressure cooking method. For this method, cover the custard filled mold tightly with a foil and securely tie it with a twine. Place in a saucepan containing hot boiling water. Close the saucepan tightly and cook for about 45 minutes to 1 hour or until set.


While making caramel, there are few things to be taken into consideration. One important thing is DO NOT STIR the caramel until all the sugar is dissolved. It might take some time to get required colour for the caramel, anywhere from 10-15 minutes depending on the heat used. The caramel turns from a light golden, runny honey colour to deep dark brown colour. And if you heat further you may burn the caramel and end up getting a caramel that tastes very bitter. So take the pan off the flame once the caramel reaches a deep golden colour. Make sure you coat the mold immediately because the caramel may set very quickly causing them to harden.
The mess you see on top is the aftermath of my experiments with the leftover caramel:).
Creme Caramel
Serves 6

Ingredients:
For the caramel syrup:

6 - 8 Tbsp granulated sugar
3 Tbs water

For the custard:
2 cups/ ½ litre milk
3 Ex-large Eggs
1 tsp vanilla essence
2 Tbs Semolina (Rava) –optional
4 Tbs (1/4 cup) sugar

Preparation:
To make caramel:

1. In a small, heavy saucepan, conmibe 8 Tbs sugar and 3 Tbs water . Place the pan on low heat and let it sit there until the sugar COMPLETELY dissolves.

2. After all the sugar is melted, increase the heat to medium and continue cooking, stirring constantly, until the syrup turns a deep golden colour. Dont make it too dark, else it will taste bitter.

3. Remove the pan from heat. Wearing oven mitts, pour caramel into a 1 quart (litre) mold and tip and turn the mold to coat the caramel evenly on sides and bottom. In case if the caramel hardens before you can spread it, place it on low heat until it reaches a consistency that is pourable. Keep it aside.

To make the Custard pudding:
1.Place milk and semolina (if using) in a sauce pan and bring it to scalding point stirring constantly. Allow to cool slightly

2. In a bowl, beat eggs lightly to mix yolks. Add vanilla and 4 Tbs of sugar and stir. Gradually add in the milk stirring it constantly using a balloon whisk.

3. Strain this custard mixture into caramel coated mold. Cover mold tightly with aluminium foil, securely tied with a twine or ribbon.

4. Pour 1 ½ cup water in the cooker. Place the grid in the cooker and place the mold on the grid.

5. Close cooker and bring to full pressure on high heat. Reduce heat and cook for 10- 15 minutes depending on the cooker.

6. Remove the cooker from heat and allow to cool it naturally. Open the cooker, take out the mold (Custard will continue to set as it cools). Allow to cool at room temperature and refrigerate.

7. Run knife all around the set pudding to loosen them from the mold if necessary. Place a large serving dish (big enough to accommodate the caramel sauce) on top of the mold and invert. Shake gently to release. Remove the mold and serve the custard chilled.

Thursday, 31 December 2009

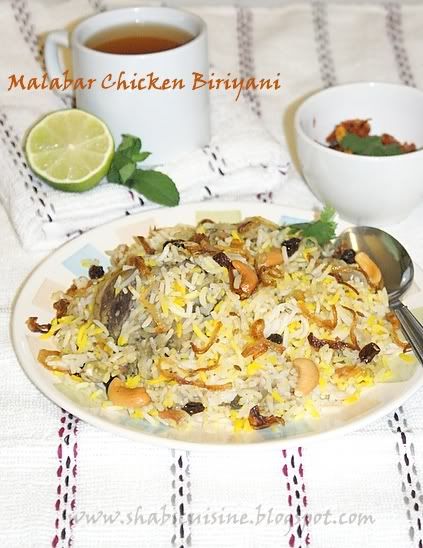
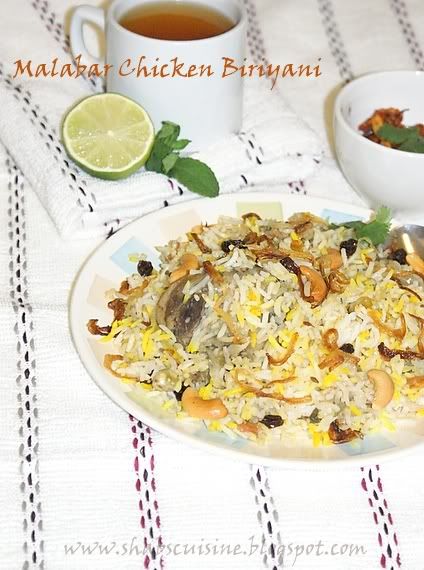
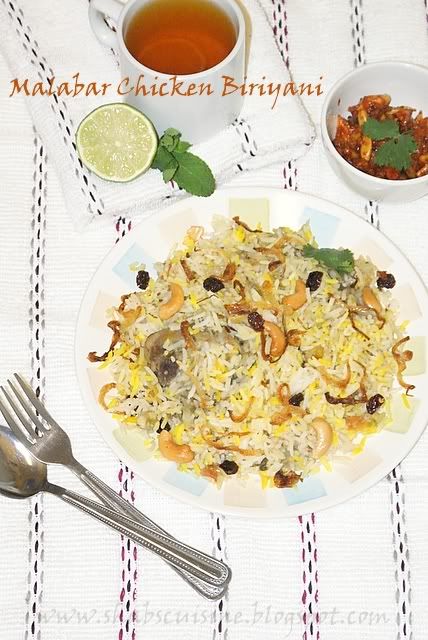
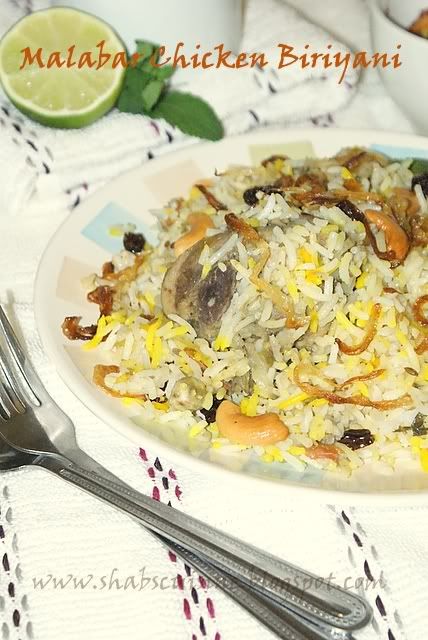
Malabar Chicken Biriyani


I thought I wouldn’t be able make another post before New Year, but here is another one. A yummy Chicken Biriyani. You can try it for the New Year if you really trust me! Once again, wishing you all a wonderful and prosperous New Year.

I have been getting lot of requests from my readers for Malabar Chicken Biriyani and here is the long waited recipe. Malabar Biriyani is known all over for its heavenly rich taste and its flavourful rice! Among them the most famous ones are the Thalassery Biriyani and Kozhikkodan (Calicut) Biriyani. Well, Even though Thalassery belongs to Kannur, the biriyani preparation is slightly different than Kannur Biriyani, but it can’t be beaten in taste and aroma, I bet. This time when I went to India I had Biriyani from different places of Kannur and they tasted almost similar and the method I noticed was also quite similar. The only difference would have been the addition of curd-some adds it and some doesn’t and the same with lime juice for masala. After all, they are used to bring in the sourness to the masala, and you can always increase the tomatoes instead. In my recipe, I always add lime and rarely use curd. The recipe I have given here is with the exception of curd. And For rice, some fries it and some don’t. If you notice, we don’t add pungent spices like chilli powder, Dhanya powder and turmeric powder. The main flavour comes from the ginger, garlic, chillies, tomatoes and onion. To add extra flavour, we finish it up with garam masala. The biriyani usually made is quite rich, lot of ghee is added and it is quite heavy. Here, I have used minimal amount of ghee as possible, so one can have it without much guilt. Well, you may add more ghee or oil if you wish. The recipe serves around 6 - 8 People with condiments side and it is just over a tablespoon of fat per person. How good is that!

For an authentic Malabar Biriyani, the rice that is normally used is known as ‘Jeerakashaala’ rice which has its own unique flavour and texture. The size of the rice is quite small, probably just half the length of the normal Basmati rice. Since we don’t get Jeerakashaala rice here, we always substitute it with Basmati rice. Well, I have never cooked with jeerakashaala rice. I was told by my mom that we don’t soak jeerakashaala rice since the biriyani gets mushy when soaked. So if using jeerakashaala rice for this recipe, please follow the ingredients as such, but do not soak the rice.


Malabar biriyanis are always garnished with fried onions, raisins and cashews. It is served along with Raita, a cucumber and yogurt based condiment, else tomato and onion in yogurt, a pickle, vinegary onions and pappadams. Chicken biriyani or mutton biriyani with the above said side dishes and chicken fries is the speciality of the Muslim weddings back in Malabar. It is always served after the starter ‘Alisa’, which is a porridge like stuff mainly made of wheat and meat and is served by sprinkling sugar on top! Yum..

Here is the recipe of Muslim style Malabar Chicken Biriyani.


Malabar Chicken Biriyani ( Serves 6-8)
For Ghee rice:

4 cups (800 g) Basmati rice
6 cups water
¾ cup onion sliced (1 medium size onion)
¾ - 1 Tbsp cumin seeds
7 cardamom pods
8 cloves
2 1” size pieces of cinnamon sticks
1 bay leaves
9 Tbsp clarified butter (Ghee), (I used 7 Tbs vegetable oil and 2 Tbs ghee)
1 Tbsp salt
1 Tbsp lime juice
1 twig curry leaves

For Biryani masala:
1 kg of large chicken pieces, preferably thighs, legs and breast
500g (4 ½ cups, 4-5 medium onions) thinly sliced onion
15 large cloves(4 packed Tbs) freshly minced garlic
65g (2 ½" thick piece) freshly minced ginger
330g (2 cups packed, 4 large) chopped tomatoes
20 (5 tsp) minced Green chillies (reduce if you want it less hot), you may use just 12-15 of them
½ cup Chopped Coriander leaves
10-12 fresh mint leaves chopped
22 mls (1 ½ Tbsp) freshly squeezed lime juice
½ tsp garam masala + 1 tsp extra to sprinkle on rice while layering.
4 tsp Oil (you may add more if needed)
3 cardamoms
8 cloves
4 small pieces of cinnamon sticks (1” size, thin ones)
1 ½tsp - 1 ¾ tsp Salt

For garnishing:
2 handful cashews
2 handful raisins
2 medium onions sliced thin
Few drops of yellow or orange food colouring or both (opional)

Step by step guide to prepare Dum Biryani:

Method to prepare Biryani masala:
1. Wash chicken well, place it on a colander to drain off all water.
2. Heat a large vessel to medium low and add oil. When hot, throw in the whole spices. When they leave the aroma (takes upto a minute on low heat) sauté chopped ginger, garlic, chillies and onions along with salt until the onions become soft and translucent.
3. At this point, add chopped tomatoes. When the tomatoes start to soften ad breakdown almost completely, add chicken and cook until almost done. All this should be done on a low heat so that onion releases its juice and chicken gets cooked in that juice slowly.
6. Add lime juice, chopped coriander and mint leaves and cook the chicken until done. Add garam masala and close lid to infuse in the flavour.

Note:
If there is lot of liquid, boil it off and reduce to a thick masala. If there is lot of water, the rice may end up overcooked.

Method to prepare Ghee rice and Garnishing:
1. Wash rice several times until you g et clear water to drain. Soak the rice for half an hour.

2. For preparing the garnish, in a large non-stick vessel, add oil + ghee or only ghee as mentioned in the recipe and fry the cashews until golden. Remove them and drain on a kitchen towel. In the same oil fry the raisins until they puff up and keep them along with cashews. Fry the onion until just golden and keep them with the former. The onion will get coloured (will continue to cook even after you take them out, so don’t fry until brown).

3. For preparing the ghee rice, In the same vessel, add ¾ cup slice onion and sauté till the onion turn soft and translucent. (don’t brown them, that will effect the colour of the rice.). At this stage add cardamom, cloves, bay leaves, cinnamon and cumin seeds and sauté for a minute until it leaves the aroma.

4. Strain the rice and tip in the rice slowly and fry for 5 minutes on high heat by constant stirring.

5. Add boiling water, salt, curry leaves and lime juice and keep boiling, by keeping the lid open until all the water has disappeared, but the rice is still wet and not dry.

6. Reduce the flame to low, Cover tightly to let all the steam in and cook it until done. In between you can flip the rice two times to ensure even cooking.

If you follow the method of preparing therice you should get well fluffed individual rice that doesn’t stick to each other.

For layering the biryani and final cooking:

1. Using a large plate, take out 2/3 rd of the rice from the vessel and transfer it to another bowl. Leave the rest 1/3 of the rice in the vessel and level off the surface neatly using a spatula. Sprinkle a good pinch of garam masala (from the garam masala that is reserved for sprinkling) all over. If you are adding colour, add few drops of yellow or orange food colouring in 4-5 places.

2. Take half of the masala and sprinkle over the rice along with the chicken.

3. Spoon 1/3 rd of the rice again over the chicken masala. Sprinkle a good pinch of garam masala, and few drops of colouring.

4. Add the rest half of the masala and complete the layering by spooning the last 1/3 of the rice. Sprinkle again with garam masala, and few drops of colouring.

So now you have alternating layers of rice and masala that’s goes like this: Rice, Biryani masala, rice, Biryani masala and again rice.

5. Cover the entire vessel with foil (to ensure that full steam stays in), then close the lid tightly. Place a weight (you can also use any vessel filled with water for this) over this vessels and cook on hob top for about 30 minutes at very low heat. This is to infuse the flavour of the biryani masala into the rice and this process of cooking is called ‘Dum’. To know if it is done, lift the lid and you should be able to see steam coming from the top part of rice. (Don’t expect smoke, it will be just a light streak of steam from here and there) and the rice on the top will be slightly curvy!!

6. You can also do the layering in an ovenproof vessel and place it in a preheated oven at a very low temperature for about 20-30 minutes for the final cooking. I never tried this, but my friends do it this way.

Just before serving, garnish with fried onions, cashews and raisins.


Note:

1.You can also sprinkle little of the fried onions while layering and leave the rest for garnishing. You may sprinkle it along with garam masala. This helps to bring out the flavour of fried onions into the rice. And it is real good too.

Monday, 28 December 2009

Kozhi Nirachathu (Stuffed Chicken with Gravy)

An advance New year wishes from my side to all of you. May the coming year bring all sort of happiness and comfort to all of you.

Kozhi Nirachathu is one of the Malabar specialities; I don’t think it is popular but is definitely a heart winner. I didn’t have a clue about this recipe until I came across shaheen’s blog. I then enquired about it to my mom who then told me that she have heard about it and one of my aunts used to make it long back. These days stuffed chicken is not commonly made may be due to the tremendous labour that goes into making it and in a household where there are many members, you definitely need more than a chicken to feed all. Well, I never got to eat them even while I was in Kerala and only had them when I made them myself.

Even though Kozhi nirachathu/ stuffed chicken is not popularly seen around, many other luxurious stuffed items are commonly made in Malabar region for any occasion like Eid, Iftar, parties, for the just married groom and when important guests pay a visit. These stuffed foods include stuffed plantains of different types commonly known as ‘Unnakkaya’ or ‘Kaayada’ and pazham nirachathu, stuffed pancakes that take different forms and shapes like meen pathiri, chatty pathiri, atti pathal, Chemmeen ada, kadalapparippu ada to name a few...... I still have bizarre memories of a whole stuffed goat during one of my post wedding parties, with goat lying on its back and all four legs up in the air!!!

Well, coming back to Kozhi nirachathu/stuffed chicken, I recently prepared this it for dinner and we had it with Porotta and salad. It was finger-licking delicious! The recipe was an amazing one and I closely followed the recipe and instruction given at shaheen’s blog. I had noticed that recipe long time when I was blog hopping but I felt it was too complicated and time consuming at that time. And I guess it still is!!! I was just waiting for the perfect mood to make it because I knew it needs quite a lot of patience...The taste was too good and we just couldn’t stop admiring the dish. It was yummy and I surely would make it again, but only if there is someone to help me with my kid or share a part of toil!

Coming to the preparation part, tying the hands and legs sounded quite simple, but it took me sometime to tie the leg and I couldn’t manage to tie the hands. At a point of time, where I almost lost my patience, I also thought of using safety pin instead of tying them up! It also took a long time to finish cooking as managing the large bird was quite a hurdle plus so many other stuffs in between- my son’s feeding, washing up and a bit of time to run behind him and chase him when he tries to distract me playing naughty.....So my advice would be, try this dish when you have plenty of time in hand, a bit of patience and there is no one to bother you in the process!


Kozhi Nirachathu(Stuffed Chicken with Gravy)
Ingredients:

1400g (3 Lb) Chicken, skinned

Marinade:
3 Tbsp Kashmiri chilli powder
1 tsp turmeric powder
1 Tbsp Lime juice
1 tsp salt or as required
3-4 tbsp water

Ingredients for Egg stuffing:
2-3 tsp vegetable oil/coconut oil/olive oil
1 or 2 Eggs
3 medium size (325g) onions sliced thinly (3 cups)
2-4 slit green chillies
1 twig curry leaves
½ Tbsp ginger, minced
½ Tbsp garlic, minced
¼ cup (28g) cashews (Optional)
1 Tbsp raisins (optional)
½ tsp Kashmiri chilli powder/paprika
½ tsp turmeric powder
1 tsp coriander powder
Little salt to taste

Ingredients for the gravy:
4 medium size (385g) onions, sliced and then chopped into small pieces (2 ¾ cup)
2 twig curry leaves
3 large tomatoes (240g) chopped (1 ½ cups)
3/4 - 1 Tbsp freshly minced ginger
3/4 - 1 Tbsp freshly minced garlic
2-4 green chillies split lengthwise
1 ½ tsp fennel seeds powdered (1/2 heaped tablespoon)
2 tsp Kashmiri chilli powder/paprika
½ tsp turmeric powder
2 tsp coriander powder
½ tsp garam masala powder
A handful of coriander leaves, chopped

Others:
4 Tbsp oil
Salt as required
¼ cup water (Add it only if your grvay is quite dry and to add moisture)

Preparation:


1.Clean the chicken well and make shallow incision on the thick part of chicken. Marinate the chicken with all the ingredients under marinade. Cover with a cling film and place it in the refrigerator for a minimum of two hours or overnight. (I usually marinate it overnight to let the marinade penetrate through.)

2. Make the egg stuffing:

a.Boil eggs, peel and keep aside. Heat oil in a saucepan and sauté the cashews until golden and sauté the raisins until it puffs up. Remove from the pan and keep them aside along with the eggs. In the same pan, add the sliced onions, curry leaves, green chillies, ginger and garlic and sauté till onion turns brown. Add all the spice powders (turmeric powder, coriander powder and chilli powder) and sauté till it leaves aroma. Add raisins and cashews if using and mix well. Add eggs and mix well.

3. Stuff the chicken with this mixture taking care not to over stuff it. Insert the eggs first and then the onion masala. Tie the legs together with a twine and hands too.

4.Make the gravy and brief-fry the chicken:

a. Heat 4 Tbsp of oil in a large frying pan or wok and shallow fry the chicken in medium heat briefly just for few minutes until all side are lightly browned. It may take 10-15 minutes for the whole chicken. Remove the chicken and drain on a kitchen towel. In the same pan, add the sliced onions, curry leaves, green chillies, ginger and garlic and sauté till onion turns brown. Add tomatoes and sauté on medium heat till they start to breakdown. Add the spice powders (turmeric powder, coriander powder, fennel powder and chilli powder) and sauté till it forms a mass and tomatoes are pulpy. Add little water if the mixture is dry. Add coriander leaves and sprinkle garam masala. Mix well and cook for a couple of minutes more.

5. Final cooking:

a.Preheat the oven to 180 degrees centigrade. Spread half of the gravy masala on to a baking tray/pyrex dish and place the half fried chicken on the masala. Spread rest of masala on the chicken. Cover the entire dish with foil. Place it in the centre rack of oven and bake for about 1 hour and 45 minutes. Remove the foil and cook for further 10 minutes.

OR

b. After the gravy masala is prepared, place the brief-fried chicken on the masala, cover with a lid and cook it on medium flame until done. Make sure you flip the chicken on all sides to ensure thorough cooking.

Wednesday, 23 December 2009

Savioardi (Lady Fingers)


Seasons Greetings to all!

It was snowing here during last weekend it is a pleasure to see the stunning snow laden streets, trees, and the roofs of houses blanketed with snow. Temperature has been hitting minus degrees recently and yesterday it even reached minus 6 degrees!!! This is the perfect weather for having a bowl of soup and just snuggling under the soft blanket the whole day doing nothing. It’s all Christmassy everywhere, the snow, the gifts and the whole of the town center and malls are always fully packed!! The shops and stores are elegant and colourful with all the Christmas items on sales like the x’mas decor, trees, huge stockings, gift items etc etc. And it’s even livelier in the north than in the south where I used to live before.


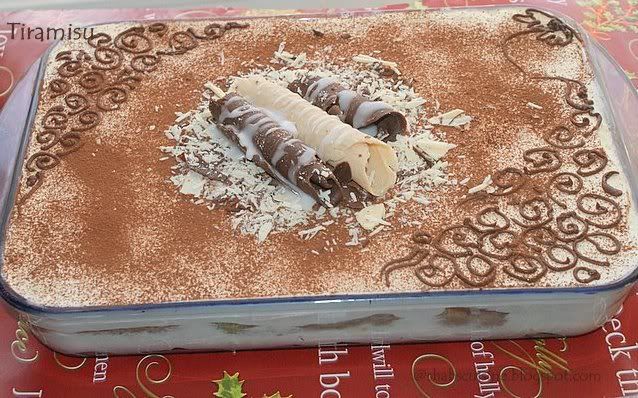
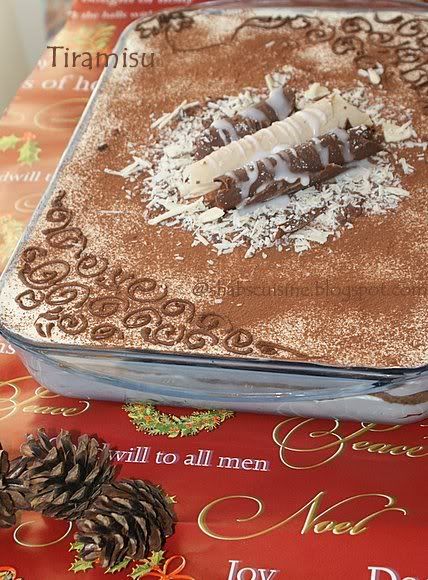
Last weekend we had a potluck party at our friend’s place and it was so much of fun. There were four families altogether and four kids. All of them were to cook and bring something for the potluck and we had an elaborate three course meal. There were 2 starters i.e. chilli prawns and Chilli Paneer from my side, 3 main course – Chicken Biriyani, Roasted fish Masala, Roasted chicken with vegetables, paalappam, vellappam and chicken curry. For the dessert it was Tiramisu, one of the tastiest desserts ever, well, I prepared it and I should say everyone just LOVED it and some even went for a second and third helping!!!!It was a superhit....Not only the dessert but all others tasted so YUM!!


About the sponge fingers...it is another story. I din’t actually think of baking it. I bought all other ingredients for Tiramisu and couldn’t find sponge fingers. Thought I would buy them later and it din’t work either. So I thought it was easy baking it rather than shopping around with my little naughty one. It’s a hurdle shopping around with a toddler who wants to run around and wants all stuffs that comes on their way. So I sat down and searched for some recipes on net. Followed a recipe I got from http://www.recipezaar.com/. The recipe was good, but the instructions that I followed there gave me a result that was so difficult to pipe and when I baked them they turned out so flat for a sponge finger. But it tasted like sponge finger nonetheless. I then set again to make sponge fingers again using the same recipe but instructions from http://www.joyofbaking.com/. It was easy to pipe and tasted awesome. Well, it doesn’t look like the commercially produced sponge fingers you get from the stores, but tasted EXACTLY the same. You would need two double the recipe mentioned here if you are planning to make my Tiramisu. Else you can halve the quantity mentioned in the Tiramisu and stick to the same amount of ingredients for the sponge fingers.


I used the home-made savioardi in the Tiramisu and it tasted just like the one we get from stores. So if you can’t get hold of these savioardi from stores, try piping out some. It doesn’t take much time and is easy. If you are preparing Tiramisu, make this a day or two ahead, so it takes less time to assemble the following day. I have garnished Tiramisu using melted chocolate drawings and some white chocolate and dark chocolate curls. For making the chocolate curls, first, place any large, clean metallic plate or baking tray in a warm oven for about 10 minutes until the tray is warm. Break the chocolate into small pieces and place them in a bowl. Place the bowl over another pan containing simmering water. And melt chocolate till glossy smooth. Pour the melted chocolate on the plate or metallic tray and spread it in a thin layer using a WARM non serrated knife. To make the knife warm, just wash it in hot water. Spreading the warm chocolate will be easier when you use a warm knife. Place the tray in the fridge. When it starts setting (at this point, if you press gently using a finger, it should make a depression), hold both the handle and tip of the knife and gently scrape/shave the chocolate, holding the knife in a slanting position to the sheet. It will form curls. If the chocolate is set until hard, it will break up when you try to scrape and will be hard to shape curls....


Savioardi (Lady Fingers)
Ingredients:
½ cup (80 gm) plain flour
½ tsp vanilla essence
3 large eggs, separated
3 Tbsp + 3 Tbsp (a total of 80 gm) white caster sugar
Extra caster sugar to sprinkle.

Preparation:

1. Using an electric beater, beat egg yolks with 3 tbsp of sugar at high speed until pale yellow and thick, for around 5 minutes.

2. Pour in vanilla and beat again until incorporated.

3. In a squeaky clean bowl (make sure it is grease free and is free of any moisture), add the egg whites. Whip until frothy and continue whipping until it holds peak. Add 3 Tbs of sugar little by little ( a table spoon each) and beat well until think and glossy and stiff. At this point, if you invert the bowl completely, the mixture should stay intact in the bowl without pouring down.

4. Sift the flour on the batter and DO NOT FOLD IN.

5. Add the egg whites in three stages folding carefully to the flour and egg yolk mixture just until incorporated and take care not to over mix.

6. Preheat the oven to 180º C. Fill the mixture in a plastic bag, piping bag or Ziploc bag with ½ inch (1.25 cm) wide hole. If using a Ziploc bag, measure and cut out the hole using scissors. Line two baking sheets with baking paper. Hold the bag at 45 degrees and pipe out the mixture into 3 inch long sponge fingers leaving a space of 1 inch/2.54cm between each piping. After piping out all the cookies, add the powdered sugar in a wire strainer and lightly sift over the sponges. Bake it until just firm and barely golden for about 10-14 minutes depending on the oven temperature (I baked until golden for 14 minutes). Let it cool for sometime, remove and place on a wire rack for further cooling.

Notes: Do not attempt to remove as soon as it comes out of oven because it will be soft. Take it out of the baking paper as soon as it has cooled a bit. Store in airtight containers and use within 2-3 days or store in freezer if using later on. To freeze, place in a plastic bag between layers of wax or parchment paper and freeze up to 2 weeks.
Related Posts Plugin for WordPress, Blogger...